It’s about time isn’t it?
Welcome back! If you’ve been following my I’bles up to this point, I’ve shown you two different ways to set up interrupts in MPIDE using attachInterrupt() and setIntVector(). In the first of those tutorials, I explained what “bounce” was, and why “debouncing” was important, but I had to leave you on a cliffhanger! Now it’s finally time to unhang that cliff and debounce those interrupts!
Just like last time, I’m going to show you two ways of doing this, starting with what I call the “brute force” method!
Let’s get started!
~~~~~
For more Instructables on building cheap robots, please check out the For Cheap Robots collection!
For more things that I’ve done, you can check out my profile page!
For more info from Digilent on the Digilent Makerspace, check out the Digilent blog!
Step 1: Quick Review
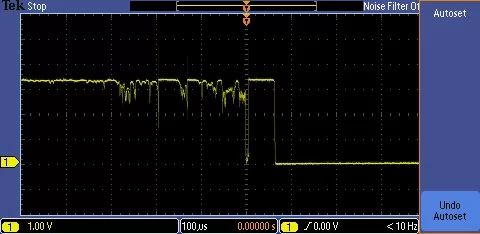
Just to review quickly what bouncing is and why it’s bad, remember that button presses aren’t always as clean as we’d like them to be. The real world is too squishy and slow for electronics, and that button might make and break contact several times before becoming fully depressed. The same goes for releasing a button.
This is called “bounce”, and your microcontroller operates so quickly that it can trigger code from each of those bounces before you really want it too. Debouncing is any technique for taking this jittery, shaky button signal, and changing it into a single, cut and dried, button press.
Now, there are plenty of methods for debouncing button presses for code that operates in your main loop, but interrupts are a different animal and need to be treated carefully. You can’t debounce in your main loop or with a normal debouncing library, because interrupts supersede all that. That means you have to debounce in your interrupt, but your interrupt code doesn’t run until your interrupt is already triggered!
I’ll show you how to get over this conundrum, and you’ll have nice, clean interrupt signals before you know it!
Step 2: What You’ll Need
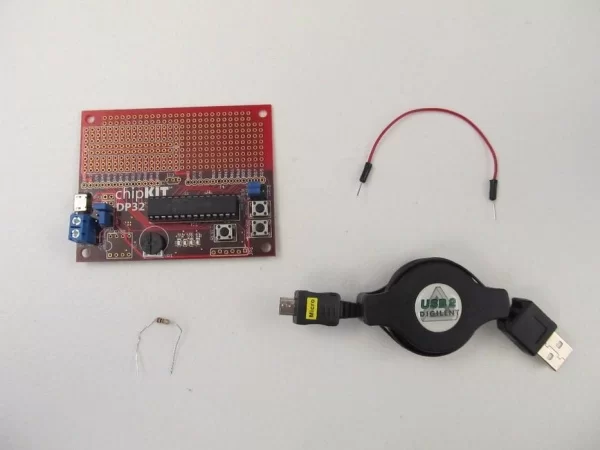
The list for this I’ble is really short:
- A DP32, uC32, or other chipKIT board
- A bit of wire
- A sufficiently high resistor. (I’m using a 1k Ohm resistor here)
- Programming cable for your board.
Step 3: Simple Circuit: Pull Up Resistor
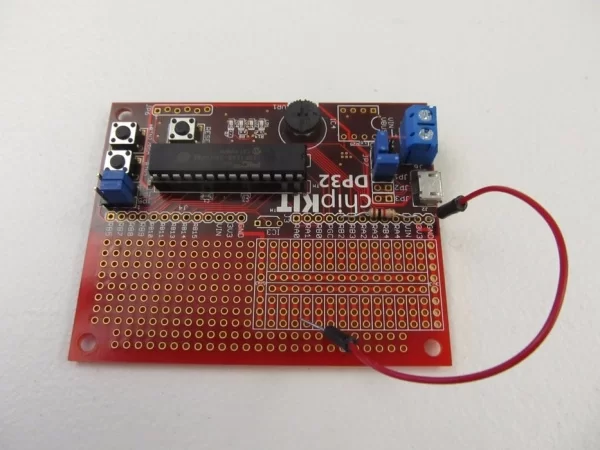
You’re going to use the resistor to create a pull-up resistor for your board. When our interrupt pin isn’t grounded, this will pull it’s voltage up to 3.3 volts, and then you can use the bit of wire to ground the pin, pulling it down to 0. The resistor is necessary to make sure the board doesn’t short out, so make it something reasonably high, at least 1k Ohms.
“But Jay!” I can hear you mumble sleepily, bloodstream still riddled with tryptophan from your epic Thanksgiving dinners. (Or maybe it’s just harder to hear you from so far away. Hope you had a good Thursday.) “Doesn’t this board have pull-up resistors built in?” And you’re right! All the PIC32 microcontrollers have pull-up resistors built in, so you can set them to pull up normally, but unfortunately it’s not that simple this time.
For whatever reason, when I use the built-in pull-up resistor, it doesn’t pull the pin high enough for the interrupt to register as having actually gone high! So unfortunately a little extra oomph is needed, hence the external pull-up.
Step 4: Here Is Your Board
I’ve attached some example code for this step. This code does not include debouncing (it’s actually just the code from my first interrupt tutorial). Tap pin 13 (RB2) with your bit of wire. You should see LED1 turn on and off.
Try getting LED1 to change states once per tap. It’s really hard!
Attachments
Step 5: Here Is Your Board on Debouncing
Now try the example code with debouncing! When you tap pin 13 (RB2) you should see LED1 change exactly once with each tap. Neat huh? Let’s see how this code works!
Attachments
Step 6: How It Works
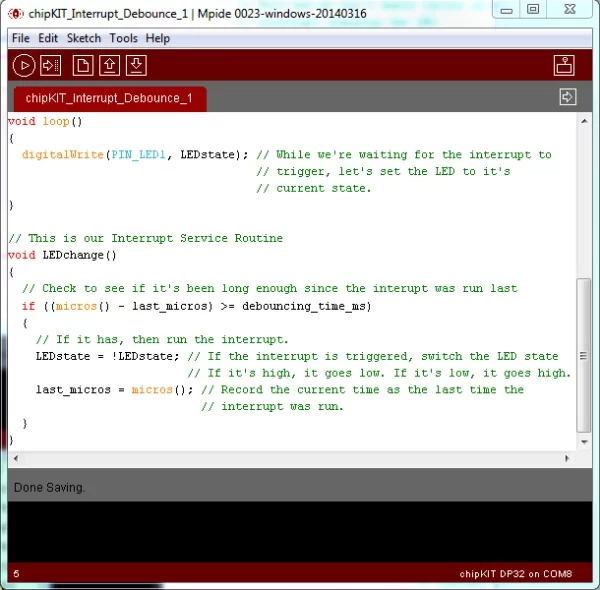
The key to this is very simple. Inside our Interrupt Service Routine (ISR) we have a little if statement that checks how long it’s been since the interrupt was last run. If it’s been long enough, it lets the interrupt run again! This gives our signal enough time to settle, before we run the ISR again.
This code is simple and it works well, but if you’ll notice, the check happens inside the ISR. Really what’s happening is we’re interrupting our main loop code several times, to check and see if it’s been long enough and running the rest of our ISR when it has. That’s why this is the “brute force” method.
This isn’t always the best solution, but our check happens so fast that it’s unnoticeable. Still, my next tutorial will explore an alternative to this brute force method, one that disables and re-enables the interrupt, instead of simply checking over and over.
Source: Debouncing Interrupts With MPIDE Part 1: Brute Force