Summary of Building your own Simple Laser Projector using the Microchip PIC12F683 Microcontroller
The article describes using a PIC12F683 microcontroller to build a laser spirograph projector by driving two DC motors with mirrors to deflect a keychain laser onto a screen. It explains generating two PWM motor drives using TIMER0 (since PIC12F683 has only one hardware PWM) and controlling motor speeds with potentiometers, and lists mechanical and electronic components and construction materials for assembling the projector.
Parts used in the Laser Projector:
- Microchip PIC12F683 microcontroller (8-pin)
- Keychain laser pointer (or any available laser pointer)
- 3xAA 4.5V battery holder (matching laser pointer voltage)
- Two DC motors from discarded PS2 DualShock joystick
- Two potentiometers (trimpots) for speed control
- Two toy car tires from Tamiya racing car (for mirror mounts)
- CD or DVD pieces cut into ~38 mm diameter mirrors
- Breadboard
- Hardboard or acrylic base for projector
- Some toy plastic bricks for motor mounting
- Hot glue gun
- Double-sided tape
The 8 pins PIC12F683 microcontroller is one of the smallest members of the Microchip 8-bit microcontroller families but equipped with powerful peripherals such as ADC and PWM capabilities. This make this tiny microcontroller is suitable for controlling the DC motor speed. In order to demonstrate the PIC12F683 capabilities and to make this tutorial more attractive, I decided to use the PIC12F683 microcontroller to generate simple and yet fascinating laser light show from a cheap keychain laser pointer.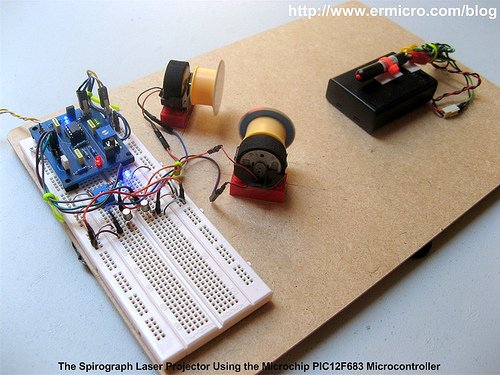
The basic of laser light shown in many entertainments club or park mostly use two method; the first one is to beam the laser shower on the spectators and the second one is to display the laser drawing pattern on the screen. On this tutorial we are going to build the laser projector that displays the spirograph pattern on the screen using the tiny Microchip PIC12F683 microcontroller.
The principle of making the spirograph laser projector is to use at least two DC motors with the attached mirror on it, these mirrors then will deflect the laser beam from one DC motor mirror to the second DC motor mirror and then finally to the screen. By controlling each of the DC motors spinning speed we could generate a fascinating laser spirograph pattern on the screen
The best way to control the DC motor speed is to use the PWM (pulse wave modulation) signal to drive the DC Motor and because we want to change the DC motor speed manually, therefore we need to use the trimport or potentiometer to control each of the DC motors speed. Hmm, this sound like an appropriate job for the microcontroller but could we use this tiny 8 pins PIC12F683 microcontroller to handle this task?
From the datasheet you will notice that the Microchip PIC12F683 microcontroller only has one PWM output (CCP1) and four ADC input channel (AN0, AN1, AN2 and AN3). Because we need two PWM output, therefore instead of using the PIC12F683 microcontroller build in PWM peripheral, in this tutorial I will show you how to generate the PWM signal base on the PIC12F683 microcontroller TIMER0 peripheral. The following is the complete electronic schematic for the laser projector project.
Ok before we go further with the detail; let’s list down the supporting peripherals needed to complete this laser projector project:
- Hot glue gun
- Keychain laser pointer or any available laser pointer
- 3xAA, 4.5 volt battery holder for powering the laser pointer, please use the same voltage rate used by your laser pointer.
- Two DC motor taken from the discarded PS2 Dual shock joystick
- Two toy’s car tire taken from tamiya racing car
- CD/DVD for the mirror, use a kitchen scissor to cut the CD/DVD into the two circle shape mirror with approximately 38 mm in diameter
- Some toys plastic bricks for holding the DC motor
- Breadboard
- Hardboard or acrylic is used for the base of our laser projector
- Double Tape
For more detail: Building your own Simple Laser Projector using the Microchip PIC12F683 Microcontroller
- Can the PIC12F683 control two DC motors for a laser projector?
Yes; although it has only one hardware PWM, the tutorial shows how to generate two PWM signals using the PIC12F683 TIMER0 peripheral. - What is used to create the mirrors for deflecting the laser?
CD or DVD pieces are cut into roughly 38 mm diameter circular mirrors. - How are motor speeds adjusted in the projector?
Motor speeds are changed manually using potentiometers (trimpots) connected to ADC inputs. - What laser source is recommended for the projector?
A cheap keychain laser pointer or any available laser pointer is used. - What powers the laser pointer in this project?
A 3xAA 4.5 volt battery holder is used; use the same voltage rating as your laser pointer. - Where do the DC motors come from?
Two DC motors are taken from a discarded PS2 DualShock joystick. - How is the PWM generated for driving motors?
PWM signals are generated in software using the PIC12F683 TIMER0 peripheral instead of the single built-in CCP1 PWM. - What materials are suggested for mounting components?
Hardboard or acrylic for the base, toy plastic bricks for holding motors, hot glue gun, and double-sided tape are suggested.