Summary of Analog Digital Clock
Summary (under 100 words): A broken IKEA clock housing was reused to build an analog/digital hybrid clock using 60 bi-color red/green LEDs to display hours, minutes, and seconds in bar form. The build uses a PIC16F1823 (JAL language) with a DS3231 RTC for accurate timekeeping, three 74HC595 shift registers, ULN2803A driver, and multiplexed LED matrix wiring. Design iterations tested different RTCs; the DS3231 was final. Schematics, software, and construction photos are provided.
Parts used in the Analog Digital Clock:
- Piece of breadboard
- PIC microcontroller 16F1823
- 3 x 74HC595 shift register
- ULN2803A Darlington Transistor Array
- IC sockets: 1 x 14-pin, 3 x 16-pin, 1 x 18-pin
- DS3231 clock module
- 2 push-button switches
- Resistors: 2 x 33k
- Resistors: 8 x 100 Ohm
- Resistors: 8 x 47 Ohm
- 1 electrolytic capacitor 100 uF/16V
- 4 capacitors 100 nF
- 60 x 2 mm bi-color LEDs (red/green)
- 1 x 5 mm yellow LED
- 3 mm jack plug
- 5 Volt adapter (stable true 5V power supply)
- Optional: headers for breadboard connections
- Kynar wire and wire stripper
- Housing for the clock (original IKEA clock housing)
The reason for making this clock was because my original IKEA clock did not work anymore and I really liked the housing of this clock. I found it a waste to throw the clock away and decided to re-use it for an analog / digital clock.
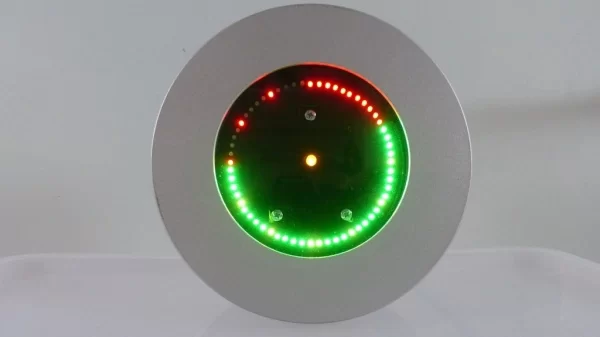
I could have made a standard clock but I decided to make something different. Like any other clock it shows the time but not in a standard way. Using 60 bi-color red/green LEDs the clock shows the time. The red LEDs are used to show the hours and the green LEDs show the minutes. The seconds are indicated by a walking yellow (red + green) LED and by a blinking yellow LED in the center of the clock.
It requires some practice to know how to read the clock. Since the LEDs are used to show both the hours and the minutes it needs a special way of presenting the time. The time is shown as a bar of LEDs where the longest bar shows either the hours or the minutes. If the longest bar is presented by the hours then the shorter bar presents the minutes in green and the remaining part shows the hours in red. In order to make the clock more readable in cases the bars are short, I added an hour indicator using the red LED. If the minutes become larger than the hours, the bars swap, that is all previous green minutes become red to show the hours and the remaining part will show the minutes so in fact almost all green becomes red and the other way around.
It is somewhat difficult to explain how it works so please watch the video. Due to the multiplexing of the LEDs it looks as if the LEDs are blinking in the video. This is only captured by the camera, not by the human eye.
As always I built this project around my favorite micro controller the PIC, using the JAL programming language but you can also use an Arduino.
Step 1: The Designs
In total I made three different versions of the clock before I was satisfied. These versions were designed as follows:
- Using a standard 20 MHz crystal for the PIC. With this design the clock was out of sync 1 second after one day of operation. This was too much. Next to that the time was lost when you switched off the clock since there was no back-up battery in the design.
- Using a DS1302 clock module. The nice thing about this module is that it has a back-up battery so the time is not lost when you switch off the clock. When I tested the clock with this module the clock was out of sync 7 seconds! after one day. I think this is caused by either the wrong crystal or a bad PCB design.
- Using a DS3231 clock module. This module also has a backup battery and it is more accurate than the DS1302. The clock worked fine with this module so I used this for the final design. Because of that, the PIC did no longer need a crystal.
The complete design is drawn-up in three schematic diagrams:
- Clock Controller using the PIC
- Led driver using shift registers
- 60 Bi-color LEDs
Step 2: Required Components
You need tohave the following components for this project:
- A piece of breadboard
- PIC microcontroller 16F1823
- 3 shift register 74HC595
- 1 Darlington Transistor Array ULN2803A
- IC sockets: 1 * 14-pin, 3 * 16-pin, 1 * 18-pin
- Clock module DS3231
- 2 push-button switches
- Resistors: 2 * 33k, 8 * 100 Ohm, 8 * 47 Ohm
- 1 electrolytic capacitor 100 uF/16V
- 4 capacitors 100 nF
- LEDs: 60 2 mm bi-color (red/green), 1 5 mm yellow
- Jack plug 3 mm
- 5 Volt adapter, for example the one that is used for charging a Smartphone. Make sure it is a true 5 Volt power supply.
- Optional: Headers for connecting the external parts to the breadboard
- Kynar wire & wire stripper
- A housing for your clock.
See the schematic diagrams on how to connect the components. It requires quite some soldering, especially for connecting the 60 LEDs. Schematic diagrams are included in the zip file.
Attachments
Step 3: Building the Clock

Have a look at the pictures on how I build the clock. I started by removing the internals of the original clock after which I drilled 60 holes of 2 mm for the bi-color LEDs in the front plate. Then I painted the front plate black and added a piece of plastic to cover the hole where the original hands of the clock where positioned. Now a yellow LED is located at that position.
Then I mounted all 60 LEDs, used some hot glue to keep them at their location and connected them with Kynar wire to each other. Last but not least I assembled the breadboard with all components.
On the back cover I mounted the two push-buttons and the power Jack. Forget about the extra plate I glued on the back as show in the picture. I added that because in my first design the push-buttons were located there but I needed to move them because I had to add the DS3231 module and I could only find a spot where those buttons were when I made my first design.
Step 4: The Software
As already mentioned, the software is written for a PIC16F1823 using the JAL programming language. The PIC runs on an internal clock of 32 MHz. As mentioned earlier, the clock timing is done by the DS3231 clock module.
The software performs the following main tasks:
- Initializing the DS3231 module using an I2C interface. The module will generate a 1 second signal which is connected to the interrupt pin of the PIC. The PIC uses this 1 second interrupt to read the time from the DS3231 module.
- Driving the 60 bi-color LEDs via the shift registers. In the schematic diagram it can be seen that the LEDs are connected in a 16 by 8 matrix. This reduces the number of wires that are needed to connect all LEDs. This matrix design requires that the PIC needs to multiplex the LEDs as to be able to light them up individually. Multiplexing the LEDs is done on an interrupt basis where the refresh frequency is 70 Hz so invisible to the human eye.
- Handling the push-buttons. These are used to set the time, one for setting the hours and one for setting the minutes. Both buttons need to be pressed to activate the time-setting mode. When the time setting mode is selected the yellow led will be continuously on. After 5 seconds of not using the push-buttons the clock returns to the normal time operation and the yellow LED will start to blink.
See the second video on how to set the time.
The JAL source file and the Intel Hex file for programming the PIC are attached in the zip-file. If you are interested in using the PIC microcontroller with JAL – a Pascal like programming language – visit the JAL website.
Have fun building your own project and looking forward to your reactions.
Attachments
Source: Analog Digital Clock
- Why was the DS3231 module chosen for the final design?
The DS3231 was chosen because it has a backup battery and is more accurate than the DS1302, and the clock worked fine with this module. - How are hours and minutes displayed on the LED ring?
Time is shown as bars of LEDs where the longest bar shows either hours or minutes; the other bar shows the remaining value with color swapping when minutes exceed hours. - What indicates seconds on the clock?
Seconds are indicated by a walking yellow LED (red + green) and a blinking yellow LED in the center of the clock. - How are the 60 LEDs driven?
The LEDs are arranged in a 16 by 8 matrix driven via three 74HC595 shift registers with multiplexing controlled by the PIC. - What provides the one second timing interrupt?
The DS3231 module generates a 1 second signal connected to the PIC interrupt pin, which the PIC uses to read the time. - How is time set on the clock?
Press both push-buttons to enter time-setting mode; one button sets hours and the other sets minutes, and the yellow LED stays on during setting. - What happens after inactivity during time setting?
After 5 seconds of no button presses the clock returns to normal operation and the yellow LED starts blinking. - What microcontroller clock is used when running the PIC?
The PIC runs on its internal clock of 32 MHz, so a crystal is not required in the final design. - Why does the video show LEDs blinking but not to the human eye?
Because of LED multiplexing and the camera capture, the LEDs appear to blink on video though they are steady to the human eye.