Summary of USB Voltmeter using pic microcontoller
This article describes a PC-based dual-channel USB Voltmeter using a PIC18F2550 microcontroller. It measures voltages from 0 to 500V with 10mV resolution via a standard USB connection. The device is self-powered and includes specific software for data display. The guide covers component lists, driver installation for Windows XP through Vista/7, and usage instructions.
Parts used in the USB Voltmeter:
- Programmed PIC18F2550 Microcontroller
- USB Voltmeter PCB
- 12-PIN Gold Plated Header
- 8-PIN Gold Plated Header
- 28-PIN IC Socket
- USB Type B Connector
- 20MHz Crystal Resonator
- C1 - 470n Capacitor (474)
- C2 - 100n Capacitor (104)
- C3 - 10uF / 35V Capacitor
- R1, R2 - 10K Micro Resistor
- R3, R4 - 100K 1% Resistor
- R5, R6 – 6.8K 1% Resistor (for measuring voltage up to 70V)
- R5, R6 – 1K 1% Resistor (for measuring voltage up to 500V)
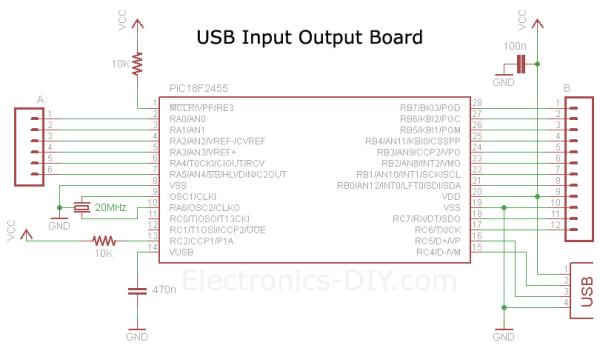
USB Voltmeter
USB Voltmeter is a PC based dual channel voltmeter built around PIC18F2455 / PIC18F2550 microcontroller that measures voltage from 0.00V up to 500.00V with 10mV resolution. USB Voltmeter sends measured data to PC via standard USB connection displaying data on a computer monitor. USB Voltmeter is self-powered drawing very little current from USB port. Voltage readings are displayed via included USB Voltmeter software.

USB Voltmeter Specifications
Voltage Input Range: 0 – 500V
Voltage Input Channels: 2
Voltage Resolution: 10mV
Power Supply: 5V (USB Powered)
PCB Dimensions: 18mm x 59mm / 0.7″ x 2.3″
USB Voltmeter Component List
Programmed PIC18F2550 Microcontroller
USB Voltmeter PCB
12-PIN Gold Plated Header
8-PIN Gold Plated Header
28-PIN IC Socket
USB Type B Connector
20MHz Crystal Resonator
C1 – 470n Capacitor (474)
C2 – 100n Capacitor (104)
C3 – 10uF / 35V Capacitor
R1, R2 – 10K Micro Resistor (brown black orange gold)
R3, R4 – 100K 1% Resistor (brown orange black black brown)
R5, R6 – 6.8K 1% Resistor (blue gray black brown brown) – for measuring voltage up to 70V
R5, R6 – 1K 1% Resistor (brown black black brown brown) – for measuring voltage up to 500V
Installing USB Voltmeter Drivers
1) Download and unzip USB Voltmeter drivers.
2) Connect USB Voltmeter board to a computer using standard USB cable.
3) Windows will issue a prompt to install drivers. Point it unzipped drivers.
Windows 2000 / XP
Under Windows 2000 or XP you will be prompted twice to install two drivers. On the first prompt browse and point to MCHPUSB driver folder. On the second prompt browse and point to USB CDC driver folder.
Windows 7 / VISTA
Under Windows 7 or VISTA you might be only prompted once to install USB CDC driver if MCHPUSB driver is already installed.
USB Voltmeter Software
1) Download and unzip USB Voltmeter drivers.
2) Connect USB Voltmeter board to a computer using standard USB cable.
3) Windows will issue a prompt to install drivers. Point it unzipped drivers.
Windows 2000 / XP
Under Windows 2000 or XP you will be prompted twice to install two drivers. On the first prompt browse and point to MCHPUSB driver folder. On the second prompt browse and point to USB CDC driver folder.
Windows 7 / VISTA
Under Windows 7 or VISTA you might be only prompted once to install USB CDC driver if MCHPUSB driver is already installed.
For more detail: USB Voltmeter
- What voltage range does the USB Voltmeter measure?
The device measures voltage from 0.00V up to 500.00V. - How many input channels does this voltmeter have?
It features two voltage input channels. - Does the USB Voltmeter require an external power supply?
No, it is self-powered and draws very little current from the USB port. - What microcontroller is used in the USB Voltmeter project?
The project is built around the PIC18F2455 or PIC18F2550 microcontroller. - Can I use the same resistors for 70V and 500V measurements?
No, you must use 6.8K resistors for up to 70V and 1K resistors for up to 500V. - Which drivers are required for Windows 2000 or XP?
You need to install both the MCHPUSB driver and the USB CDC driver. - What is the voltage resolution of this device?
The resolution is 10mV. - How do I connect the board to a computer?
Connect the board to a computer using a standard USB cable.