Tutorial: Building cool projects with MCUs (Part 3)
As we proceed onto the third portion of this microcontroller tutorial, let’s first revisit what we have accomplished thus far.
In Part 1, we defined what a microcontroller actually was. I wanted to get everybody on-board (no pun intended) for this, so I started from scratch. Feel free to jump back there if you need a refresher.
Then in Part 2, we looked at the various types of MCUs. And, it turns out that there were a lot! However, by using Atmel’s selection tool, we managed to narrow it down to a few different ones, before choosing a winner — an ATmega32U2. Why? Mainly because it can be programmed through the USB interface without any extra components or tools, and since it did not have too many pins – so we should be able to solder it at home.
 What Components Do We Need?
If you’ve never done it before, putting all the necessary components onto the circuit diagram is not a super easy task. Well, the process is not that hard; but until you know how to do it, it will seem a bit difficult. So, let me take you through my thought process:
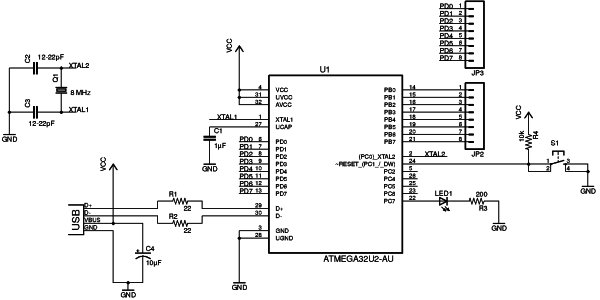
We need to power the chip somehow. There are some pins on the microcontroller that need power. We have to figure out which pins that need power, and what voltage they need.
We also want to program the chip trough USB, so we need a USB connector and learn how to connect it to the chip.
Then, there is extra stuff. Like maybe an LED to play around with, and definitely some connection pins that we can connect other stuff to later when we want to experiment.
So, we need to figure out:
- How to power the circuit
- How to connect the USB part
- How to connect pins to the chip
Using the Datasheet to Find the Details of Our Circuit
The datasheet for the ATmega32U2 is a must when we are designing our circuit. Here, we can find all the necessary technical details.
We don’t have to read it from beginning to end; instead, we simply look up the parts we are curious about, and study them in more depth. We can find a table of contents at the end of the document.
For instance, if we wanted to use the timer of the MCU, we’d look up the part about timers. If we wanted to use the SPI communication part, we would look that up.
 Connecting Power and USB
As you probably know, USB devices can be powered through, well, USB. By doing this, we simplify our circuit and require less components. So, let’s do this.
To figure out exactly HOW we can do this, we’re going to read the datasheet. By going to the table of contents, we find that the section that describes the USB part of the microcontroller is on page 186.