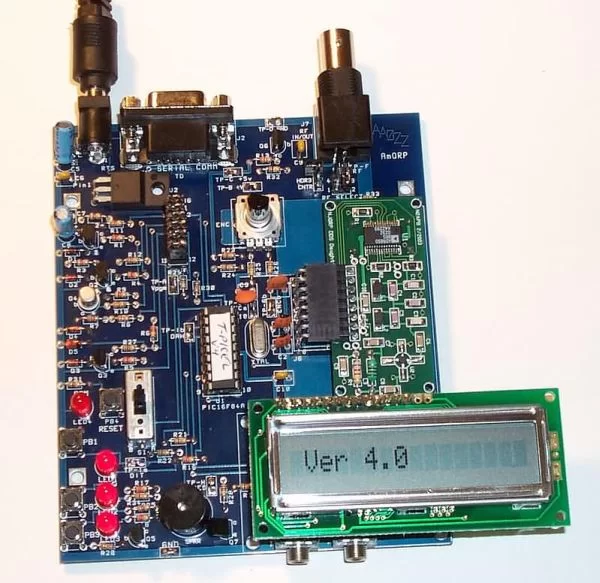
Description — What is the PIC-EL board and what can you do with it?
Specification — What features are on the PIC-EL project board?
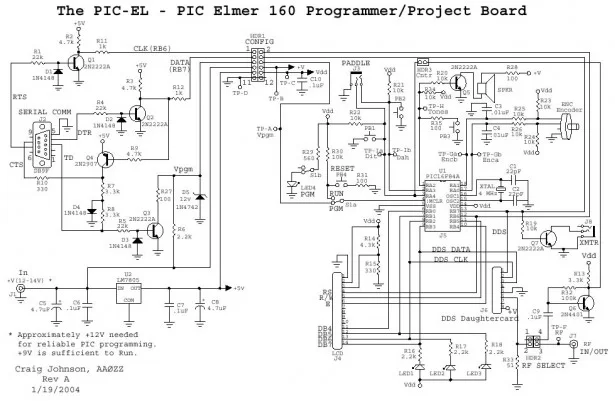
Schematic — Circuit diagram on this web page or in PDF format
Builders’ Notes — Check here for special tips or cautions in building the kit.
Test Software — The latest test software for board checkout. Has many software routines that may be used as building blocks for your own custom programs.
T-PICEL-30 (binary) (source) Test software suite that supports the original 30 MHz “DDS Daughtercard”
T-PICEL-60 (binary) (source) NEW Support provided for the DDS-60, provided in a separate program. (Does not support the DDS-30.)
VFO Software — A wonderful software program called PEgen, by AA0ZZ, allows your PIC-EL board to function as a multi-featured signal generator. NEW: PEGen software has been updated to also support the newer DDS-60 Daughtercard, thus providing clean and stable signal generation capabilities all the way up to 60 MHz. You can download and burn any of these hex binaries below into your PIC-EL card, depending on the type of daughtercard and LCD you are using. The link to download common source file is also provided – just adjust the four #defines statements at the top of the file and assemble to program to produce any of these same hex binary files.
PEGen51-30-8 (hex binary) This file supports the DDS-30 card using the 8-char LCD
PEGen51-30-16 (hex binary) This file supports the DDS-30 card using the 16-char LCD
PEGen51-60-8 (hex binary) This file supports the DDS-60 card using the 8-char LCD
PEGen51-60-16 (hex binary) This file supports the DDS-60 card using the 16-char LCD
PEGen51 (source code) This single file generates the hex binaries above (set the #defs at the top, as desired.)
K8 Keyer Software — Nice keyer software (v4) for PIC-EL. (Original by Steven Elliott, K1EL). Requires the PIC16F628 modification described above.
Using the PIC16F628 on the PIC-EL Board — Easily upgrade to this more common and powerful controller.
Add ZIF socket and crystal/cap sockets — Easy mods to help with re-use of the PIC-EL board (by Eric KE6US)
Kit Availability — The original PIC-EL board kit was offered in various forms by the AmQRP Club from 2002-2005, but is no longer available. However Craig Johnson, AA0ZZ is currently updating the circuit board (to fix minor errors in the orginal kit) and the kit will again be offered through Kanga US in January 2006. Details to be available soon.
Online Assembly & Test Manual — Use this web page to help building & using the kit.
Downloadable Manual.PDF — Right-click the link to download the file to your computer. The file is 3.4 MB in size … please be patient when downloading.
Schematic.GIF Schematic.PDF Layout.GIF — Useful in understanding the PIC-EL board operation and assembly.
The AmQRP “PIC-EL Kit” is a multi-function PIC16F84A-based project board that serves as the basis for the experiments being conducted by John McDonough, WB8RCR in the online PIC Elmer 160 course. The course material is geared around use of common I/O components — pushbuttons, LEDs, LCD display, rotary encoder and speaker — and the experiments are designed to take the student through a step-by-step creation of software programs that beep, display and otherwise interact with the user in an instructional manner.
Further, the PIC-EL project board contains an integrated, built-in serial programmer that allows the user to download new programs directly from the PC and “burn” them into the PIC microcontroller … without requiring any other specialized programming hardware! Thus whenever you make a change in the software source code on your PC, by following the course material or if making your own original program, all that’s needed to program the PIC device is to connect the board to the PC with a standard 9-pin serial cable, like one from Radio Shack (p/n 26-117B).
We designed the PIC-EL project board with the QRPer specifically in mind. Realizing that hams just love to generate RF and use it in all sorts of ways, we provided an ability for the user to plug in the inexpensive and ubiquitous DDS Daughtercard from the NJQRP Club. Some experiments downstream in the Elmer 160 course will provide software that allows the PIC to control the DDS Daughtercard to produce signals in the range of 1 Hz all the way up to 30 MHz. A rotary encoder “dial” provided standard on the board allows one to use the PIC-EL and a stable signal general, a super precise VFO or perhaps even as a signal source for receiver calibration. A BNC connector is also provided in the kit to help enable these common uses. PIC-EL designer Craig Johnson, AA0ZZ already provided a modified version of his popular DDS control software signgen3a that runs on the project board, making the kit immediately useful even while just starting the Elmer 160 course.
Can there be even more capabilities built into the PIC-EL project board? You bet! Not only can the PIC-EL generate signals, it can measure the frequency of an input signal to the BNC connector. Just change the position of an onboard jumper and you’ll route signals coming into the BNC jack over to a small circuit that conditions the signal so the PIC microcontroller can determine its frequency. Again using software developed in one of the Elmer 160 experiments, the PIC-EL board will serve as a frequency counter for your bench, displaying the measured signal on the LCD.
The exciting uses of the PIC-EL board continues with design team’s addition of a couple of 1/8″ stereo jacks on the board. With the right software being developed as course material by John McDonough WB8RCR, you will be able to plug in your iambic paddles (like the nifty ones being produced by the AZ ScQRPions) and have the project board serve as a keyer with adjustable speed, weighting and multiple memory buffers. The onboard speaker serves as a side tone for your memory keyer. Just connect the “keyline” output signal to your rig by cabling from the other 1/8″ jack and you’ll be able to key your rig with the PIC-EL project board. So once again, not only will you learn how to program the PIC to do this keyer function, but you’ll have a fully operational keyer for your rig on the bench!
The PIC-EL project board was designed to fit into a common 5.25″ x 5″ x 1.25″ plastic enclosure, such as from Radio Shack (p/n 270-214), Mouser (p/n 616-63049-510-039), or PacTec (p/n CM5-125). The board fits neatly in this clamshell case and the input/output jacks were layed out to be at the top and bottom of the pc board, and are thus able to protrude from the end panels of the case. Just take off the top part of the clamshell case when you use the project board, and hold it on with a rubber band when you want to store it away.
But wait, there’s more! The AmQRP design team also provided flexibility in the PIC-EL board layout to allow you to use an external PIC programmer, in case you already have a favorite one. By unplugging a single jumper on the board, you can effectively separate the programmer circuit from the PIC microcontroller and functional circuits. This allows you the to connect in your external programmer to the onboard PIC so you can use the same programming system that you’ve been using for years. Alternatively, you can also use the same circuit separation technique to allow the built-in PIC-EL programmer to connect over to another project board to program its PIC microcontroller. Program an external chip with the PIC-EL programmer, or use an external programmer to program the PIC-EL chip — either way, it’s flexibility deluxe!
For more detail: The PIC Elmer 160 Project Board using PIC16F628


