Summary of PIC12F675 Tutorial 4 : Making an LM35 temperature recorder
This article details a DIY temperature recorder project using an LM35DZ sensor and a PIC12F675 microcontroller. The system generates serial output to a PC, calculating temperatures in both Celsius and Fahrenheit at half-second intervals. It employs a 2.5V voltage reference for improved ADC resolution and software averaging to mitigate noise on a breadboard setup.
Parts used in the Temperature Recorder:
- LM35DZ temperature sensor
- PIC12F675 microcontroller
- 1k resistor
- Resistor divider components
- Decoupling capacitor
- Solderless breadboard
- Wires
This page shows you how you can make an LM35 an temperature recorder by using the 12F675 PIC microcontroller as the controller and data store.
It generates serial output so that you can view the results on a PC and it also calculates the temperature reading in Fahrenheit sending both to the serial port at half second intervals.
The project uses the code from the previous tutorials to report the temperature to the PC using the serial port so the serial RS232 data format is generated in software.
LM35DZ
The LM35 is a precision temperature sensor. It is guaranteed accurate to ±¼°C at 25°C (At different temperatures it is less accurate! but it is never more than 2°C inaccurate and it probably is not this inaccurate anyway it’s just the manufacturers maximum limits that may apply).
Typically is stays accurate to within ±¾°C over its temperature range so this is a good general purpose sensor and it’s easy to use.
It generates a linear output voltage using a centigrade scale – generating 10mV of output voltage for every degree centigrade change and there are several versions for operation over different temperature ranges:
| LM35 | -55°C to 150°C |
| LM35C | -40°C to 110°C |
| LM35D | 0°C to 100°C |
Note: The project code calculates the temperature in Fahrenheit and generates both Centigrade and Fahrenheit outputs to the serial port.
Temperature recorder : LM35 pinout
Temperature recorder : pinout for the LM35DZ (from the top).
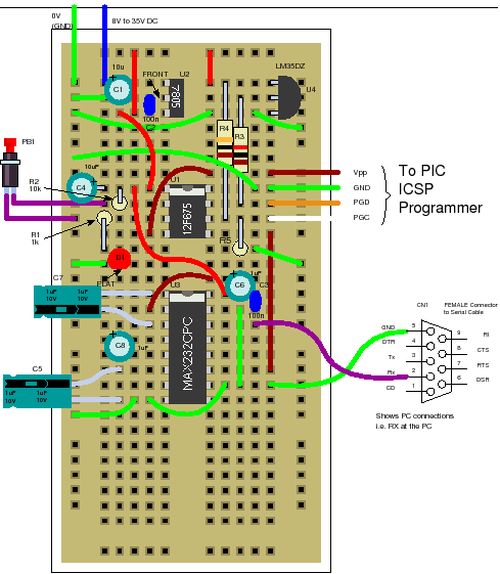
Temperature recorder Circuit
The LM35 is connected to analogue input AN0 which is also the data input line for programming the 12F675 using ICSP so you need a way of connecting the sensor and the programming input at the same time with the programming input overriding the sensor output (and not damaging the sensor!).
This is done here by using 1k resistor that reduces the current flowing back into the sensor and at the same time is not too large (so that the ADC can easily convert the sensor output value – the impedance must be equal to or smaller than 10k Ohm from the sensor).
The voltage reference for the circuit is taken from pin 6 using a resistor divider giving a 2.5V reference. This is simply done to increase the resolution of the ADC as for the LM35 only 0-1V is generated so you loose ADC range when using a 5V reference. You could use a lower reference value but this value gives reasonable results.
Alternatively you could use an amplifier to scale the LM35 output up which would make the ADC less sensitive to noise but for this project it is simpler not to do so.
Note: The large decoupling capacitor on the supply input of the 12F675. This reduces noise overall and gives a more consistent reading. However using a plug block and ADC is not a very good idea as there is no ground plane and no control over current paths which you would be able control in a pcb.
In a commercial system the internal ADC is often not used at all as it is essential to separate the noise introduced to the ADC using separate grounds and shielding – some designs encase the ADC in a custom metal shield and along with a ground plane connecting to the shield gives the best possible result.
To overcome noise problems on the ADC the software averages the input readings so you get a better result.
Solderless breadboard
Add the components (at top right to) the temperature recorder – wires and R3,R4,R5 and the LM35 temperature sensor (U4) and the decoupling capacitor C4.
For more detail: PIC12F675 Tutorial 4 : Making an LM35 temperature recorder
- How does the circuit handle programming input without damaging the sensor?
A 1k resistor reduces current flowing back into the sensor while allowing the programming input to override the sensor output. - What voltage reference is used to increase ADC resolution?
The circuit uses a resistor divider on pin 6 to provide a 2.5V reference instead of a standard 5V reference. - Why is software averaging implemented in this project?
Software averages input readings to overcome noise problems associated with using a breadboard and plug block. - What is the typical accuracy of the LM35 sensor?
The sensor typically stays accurate within ±¾°C over its temperature range. - How often does the device send data to the serial port?
The system sends temperature readings to the serial port at half-second intervals. - Does the code calculate temperature in Celsius or Fahrenheit?
The project code calculates temperature in Fahrenheit but generates outputs for both Centigrade and Fahrenheit. - What is the maximum impedance allowed from the sensor for the ADC?
The impedance must be equal to or smaller than 10k Ohm so that the ADC can easily convert the sensor output value.