Summary of Development of a MATLAB-based Graphical User Interface Environment for PIC Microcontroller Projects
This chapter details a low-cost solution for creating Graphical User Interfaces (GUIs) for PIC microcontroller projects using MATLAB, Simulink, and the Dials and Gauges Blockset. By leveraging serial communication, the system enables bi-directional data exchange between a PC and a PIC16F74 microcontroller. The approach facilitates real-time control command transmission, sensory data acquisition, on-line signal processing, and visualization of experimental results through virtual instruments. Three practical examples demonstrate servomotor control, light intensity monitoring, and a complete light refraction experiment.
Parts used in the MATLAB-based GUI Environment for PIC Projects:
- PIC16F74 microcontroller
- PC running Microsoft Windows NT 4.0
- RS232 driver/receiver (MAX232)
- DB-9 serial cable
- PICSTART Plus programmer
- Photoresistor sensor
- Servomotor
- DC motor
- Linear potentiometer
- Liquid reservoir
- Laser pointer
- Limit switches
2.1. Introduction
Peripheral Interface Controllers (PICs), developed and marketed by Microchip Technology, Inc. [35], are inexpensive microcontroller units that include a central processing unit and
peripherals such as memory, timers, and input/output (I/O) functions on an integrated circuit (IC). There are more than 100 varieties of PIC microcontrollers available, each providing
functionality for different types of applications [36], making PICs one of the most popular
microcontrollers for educational, hobby, and industrial applications. Similar to other microcontrollers, PICs are usually not designed to interface with human beings; instead they are
directly embedded into automated products/processes. Thus, graphical user interface (GUI)
capabilities, which have become a mainstay of many personal computer (PC) applications, are
nonexistent for PICs.
Endowing PIC-based projects with GUI tools can speed the development process in data
driven applications such as feedback control, smart sensors, etc. Microchip Technology’s emulator and debugger products (e.g., MPLAB IDE, MPLAB-ICE) are very helpful in debugging
PIC source code and emulating user-written programs. However, these tools do not provide
data co-processing and advanced data visualization capabilities.
Fortunately, PIC microcontrollers include serial communication functionality to facilitate
data communication with external devices such as analog to digital converters (A2Ds), 1-wire
sensors, etc. Similarly, MATLAB, a commercially available interactive mathematical programming software, also provides serial data communication functionality on PCs. In addition,
Simulink, MATLAB’s interactive icon-based programming environment, enables users to simulate and analyze dynamic system models. Finally, the Dials and Gauges Blockset of Simulink
allows users to embed control objects (e.g., sliders, knobs) and display objects (e.g., graphs,
gauges) in Simulink models to develop an interactive GUI environment. In this Chapter, we
exploit the serial communication functionality of MATLAB to enable a PC to communicate
with PIC microcontrollers to transmit control commands and receive sensory data. In addition, we utilize MATLAB, Simulink, and Dials and Gauges Blockset to develop an interactive
GUI environment for PIC projects, allowing enhanced data processing and visualization.
In this Chapter, we use a PIC16F74, 40-pin, 8-bit CMOS FLASH dual inline package IC.
To facilitate serial communication between PIC and PC, we interface a RS232 driver/receiver
with the PIC16F74. The effectiveness of our MATLAB-based GUI environment to interact
with PIC microcontroller projects is demonstrated by using three examples: i) export user
commands from a Simulink GUI to an actuator interfaced to the PIC; ii) import signals from
a sensor interfaced to the PIC into a Simulink GUI; and iii) use Simulink GUI to export user
commands to the PIC and import sensory data from the PIC to control a device and monitor
its status.
2.2. Hardware Environment
The hardware environment for this Chapter consists of a PIC microcontroller, a PC, a
RS232 driver/receiver, and a DB-9 serial cable. The PIC microcontroller is interfaced with
external devices such as sensors (e.g., photoresistors) and actuators (e.g., servomotors). In
addition, the PIC microcontroller performs embedded computing. The PC is used to write
user specified embedded programs to be executed by the PIC microcontroller. Furthermore,
the PC hosts an interactive GUI for the user to manipulate control variables and visualize
sensory data. The PIC microcontroller and the PC communicate using a serial interface. A
PIC development board (see section 2.2.4) and a light refraction experiment test bed (see
section 2.2.5) are used to illustrate our PIC-based data acquisition and control approach.
2.2.1. Peripheral Interface Controller
PIC microcontrollers are small, low-cost controllers that include a processor and a variety
of peripherals. PICs are significantly easier to use vis-`a-vis embedded microprocessors. As an
example, users can assign desired functionality (e.g., A2D, universal synchronous/asynchronous
receiver and transmitter (USART)) to I/O pins of PICs. PICs can be operated at various clock
speeds (32 kHz to 20 MHz). PIC’s memory architecture separates its data memory from its
program memory with the program memory available as One-Time Programmable (OTP),
Erasable Programmable Read-Only Memory (EPROM), or FLASH. PICs are programmed in
the PIC assembly language using a 35 single-word instruction set. See [37, 38] for more details
on hardware and software features of PIC microcontrollers.
The user specified embedded PIC program is written on the PC and downloaded from the
PC to the PIC microcontroller using the DB-9 serial cable connection between the PC and
a PIC Development Programmer on which the PIC microcontroller is installed. Commonly
available PIC Development Programmers include PICSTART Plus [39] from Microchip, Inc.,
and PIC-PG2B, a handy, low-cost programmer [40] from Olimex Ltd., among others. In this
Chapter, we use the PICSTART Plus programmer that requires MPLAB Integrated Development Environment, a free software available on the Microchip website, for programming
PICs.
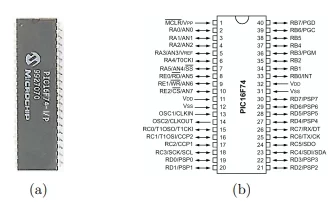
We employ a PIC16F74, a 40-pin CMOS FLASH-based, 8-bit, mid-range (14-bit instruction
word length) microcontroller (see Figure 2.1). PIC16F74 has 4 Kbytes of FLASH program
memory and 192 bytes of data memory. Furthermore, it has 33 digital I/O pins organized in 5
groups of I/O ports that can be assigned as 8-bit A2D, Capture/Compare/PWM (CCP), the
3-wire Serial Peripheral Interface (SPI), the 2-wire Inter-Integrated Circuit (I2C) bus, USART
ports, etc. We use an external 20 MHz high-speed crystal oscillator to supply operating clock
cycles. The PIC16F74 can be powered using a wide range of voltage sources, e.g., 2 volt direct
current (VDC) to 5.5VDC, and each of its I/O pin can sink or source up to 25mA of current.
It is ideal not only for laboratory data acquisition (the application considered in this Chapter),
but also for automotive, industrial, and consumer applications.
2.2.2. Personal Computer
In this Chapter, an IBM-compatible Pentium 3 PC running Microsoft Windows NT 4.0
operating system is used. As previously mentioned, the PC is used to write, debug, and
download embedded PIC programs. One of the serial ports on the PC is reserved for serial
communication with the PIC microcontroller. MPLAB, MATLAB (version 6.1), Simulink,
and Dials and Gauges Blockset are installed on the PC. Control variables are manipulated via
the PC by interacting with control panels embedded in the Simulink program. In addition,
all experimental data is collected and displayed on the PC in display panels embedded in the
Simulink program.
2.2.3. RS232 Driver/Receiver
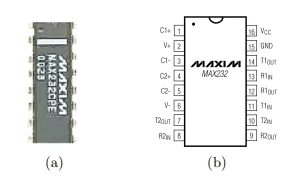
MAX232 (see Figure 2.2) is a 2-channel, RS232 driver and receiver manufactured by Maxim
Integrated Products, Inc. It requires a 5VDC power supply and converts voltage levels between
PC-based logic and PIC microcontroller-based logic. Specifically, whereas the voltage levels
of logic high and logic low for the PC correspond to -12VDC and 12VDC, respectively, like
many other microcontrollers the logic high and low for the PICs correspond to 5VDC and
0VDC, respectively. The MAX232 is used with five 1µF capacitors to adjust the voltage level
differences between the PC-based logic and the PIC-based logic. See [41] for more details of
the MAX232 hardware features.
2.2.4. PIC Development Board
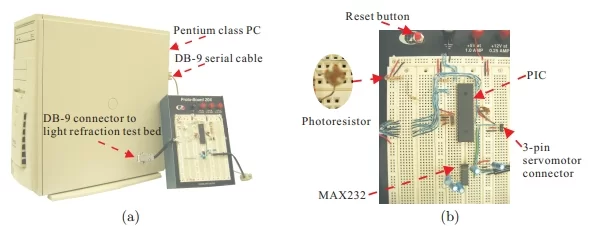
The PIC development board (see Figure 2.3) consists of a sensor (photoresistor), a 3-
pin header for a servomotor connection, a 20MHz crystal oscillator, a MAX232 with five
1µF capacitors, a PIC16F74 microcontroller, a breadboard, and two DB-9 connectors. The
photoresistor sensor provides light intensity measurement and is interfaced to a pin allocated
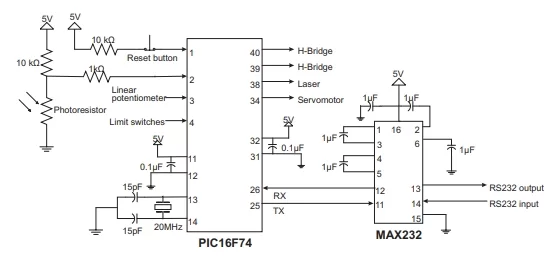
as an 8-bit A2D in port A of the PIC16F74 microcontroller. The circuit diagram of Figure 2.4
illustrates how various sensors and actuators of the light refraction experiment test bed (see
section 2.2.5) are interfaced to the PIC microcontroller. The PIC transmits/receives sensory
data to/from the PC via the MAX232. A reset button is connected to the Master Clear
(MCLR) pin of the microcontroller
2.2.5. Light Refraction Test Bed
The light refraction test bed (see Figure 2.5) is a mechatronics-aided physics experiment
developed under a National Science Foundation (NSF) sponsored Science and Mechatronics
Aided Research for Teachers (SMART) program [42] at Polytechnic Institute of New York
University. This experiment is designed to demonstrate the law of light refraction. It consists
of a light source, a light sensor, a linear potentiometer, two limit switches, a servomotor, a
DC motor, a liquid reservoir, and necessary circuitry. A liquid reservoir on the top of the
test bed can store various liquid media whose index of refraction needs to be determined. For
simplicity, in this Chapter, we use water from a water fountain as the test liquid.
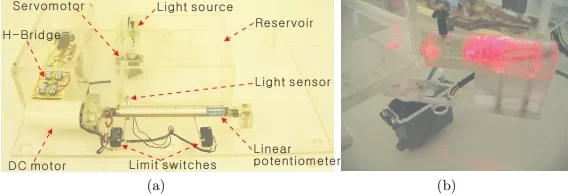
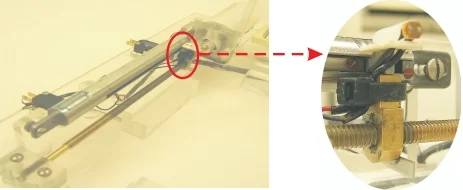
On one side of the tank, as shown in Figure 2.5 (b), a laser pointer, used as the light
source, is mounted on the arm of the servomotor that sets the angular position of the light
source to the incidence angle specified by the user. On the other side of the tank, a general
Cadmium Sulfide (CdS) photoresistor, used as the light sensor, is mounted on the wiper of the
linear potentiometer. It monitors the refracted light coming out from the liquid reservoir (see
Figure 2.6). A DC motor drives the light sensor along the linear potentiometer by turning
a motor shaft connected to a brass screw rod thereby transforming rotary motion into linear
motion. Limit switches at each end of the linear potentiometer indicate sensor travel limit.
The photoresistor and the linear potentiometer output analog voltage signals between 0VDC
and 5VDC.
2.3. Software Environment
Software environment for this Chapter consists of the PIC assembly language, MATLAB,
Simulink, and Dials and Gauges Blockset. The PIC assembly language is a primitive programming language consisting of a 35 single-word instruction set. MATLAB is an interactive
technical computing software. Simulink is MATLAB’s model-based, system-level, visual programming environment that is widely used to simulate and analyze dynamic system models
using icon-based tools. Finally, the Dials and Gauges Blockset of Simulink provides an ability
to embed visual, realistic-looking, virtual instrumentations in Simulink models. In this Chapter, these software tools are judiciously synthesized to produce an effective, interactive GUI
environment. In the sequel, we summarize key instructions of the PIC assembly language and
MATLAB that enable serial communication between PIC microcontroller and MATLAB GUI
running on the PC.
2.3.1. PIC Assembly Program
As indicated above, the PIC assembly language consists of a 35 single-word instruction set
(see datasheets [43] for details). The PIC data memory is partitioned into several banks (e.g.,
5 banks for PIC16F74) that contain the general-purpose registers and the special-function registers. The special-function registers are used to set up special operations (e.g., A2D, USART,
and PWM) and to watch the status of the special operations (e.g., the availability of transmission or reception of the USART). Below, we review key PIC instructions and special function
registers used for serial communication functionality.
1) Key PIC Instructions
BCF: Bit clear f
Syntax: [label] BCF f, b
BCF literally means that the bth bit in the register ‘f’ is cleared. BCF sets the bth bit in the
register ‘f’ to zero, logic low.
BSF: Bit set f
Syntax: [label] BSF f, b
BSF instruction does the opposite of BCF, i.e., it sets the bth bit in the register ‘f’ to one,
logic high.
MOVLW: Move literal to w
Syntax: [label] MOVLW k
The literal ‘k’ is loaded into the working register. The literal ‘k’ can be expressed in terms of
an 8-bit binary, decimal, or hexadecimal number. For example, b’00101111’ in 8-bit binary is
equivalent to 0x2F in hexadecimal. Note that the prefixes b, 0x, and d declare the data type
to be binary, hexadecimal, and decimal, respectively.
MOVWF: Move w to f
Syntax: [label] MOVWF f
MOVWF transfers data from the working register to the specified register ‘f.’ Since the literal ‘k’ cannot be directly assigned into the specified register ‘f,’ the literal ‘k’ is first assigned
to the working register (e.g., MOVLW k) and then moved into the register ‘f’ (e.g., MOVWF f).
BTFSS: Bit test f, skip if set
Syntax: [label] BTFSS f, b
BTFSS checks the bth bit in the specified register ‘f,’ and executes the next instruction if this
bit is zero. Alternatively, if the bit is one, the next instruction is skipped, and the following
instruction is executed.
2) Special Function Registers Used for Serial Communication Functionality
MOVLW d’value’
MOVWF SPBRG
The special function register ‘SPBRG’ contains the user-specified baud rate for serial communication. In particular, the command MOVLW d’129’ places 129 in the working register.
Next, the command MOVWF SPBRG moves the content of the working register to the special
function register ‘SPBRG.’ The placement of ‘value’ 129 in the ‘SPBRG’ register sets the baud
rate to 9,600.
MOVLW b’clock source select bit, 9-bit transmit enable bit, transmit enable bit, usart mode
select bit, unimplemented, high baud rate select bit, transmit shift register status bit, 9th bit of
transmit data’
MOVWF TXSTA
The special function register ‘TXSTA’ contains information for the data-transmit status and
control in an 8-bit binary expression. In particular, the use of commands MOVLW b’00100100’
and MOVWF TXSTA, sets up the ‘TXSTA’ register to enable 8-bit, high speed asynchronous
serial data transmission.
MOVLW b’serial port enable bit, 9-bit receive enable bit, single receive enable bit, continuous
receive enable bit, unimplemented, framing error bit, overrun error bit, 9th bit of received data’
MOVWF RCSTA
The special function register ‘RCSTA’ contains information for the data-receive status and control in an 8-bit binary expression. In particular, the use of commands MOVLW b’10010000’
and MOVWF RCSTA, sets up the ‘RCSTA’ register to enable 8-bit, continuous asynchronous
serial data reception.
2.3.2. MATLAB Program
MATLAB is a commercially available, widely used, interactive, technical computing software. MATLAB’s versions 6.1 and higher provide serial communication functionality. To
serially communicate with an external device from MATLAB, the following steps need to be
performed. First, create a serial port object to identify the specific serial port of the PC
connected to the external device. In addition, specify how this serial port is to be configured
(i.e., baud rate, number of data bits, etc.). Second, connect the serial port object created
above to the external device. Third, send command signals to the external device and receive data from the external device. Fourth, disconnect serial communication connection from
the external device and close the serial port object. Finally, release control of the serial port.
We list the key MATLAB instructions used for serial communication. See [6] for further details.
serial (the PC serial port, the baud rate, the number of data bits)
This command is used to create a new serial port object. In addition, it configures the serial
port properties. In this Chapter, we used the COM2 serial port of the PC with 9,600 baud rate.
fopen (object)
This command opens the serial port object just created and connects the PC to the external
device for actual serial communication.
fread/fwrite (object, size, precision)
The fread command enables the PC to read binary data from the external device. Alternatively,
the fwrite command enables the PC to send control data in binary format to the external device.
fclose (object)
This command closes the serial port object, thereby disconnecting serial communication between MATLAB and the external device.
freeserial (port)
Once MATLAB establishes a data link with the serial port, it assumes complete control of
the serial port. The freeserial command is used, after closing the port object using the fclose
command, to force MATLAB to relinquish control of the serial port. The command takes on
one argument, the port that was used for data communication. This command is executed
from the MATLAB command line after the termination of experiment.
2.3.3. Simulink
Simulink is MATLAB’s interactive, icon-based programming environment [44]. It enables
users to build block diagrams to simulate and analyze dynamic system models. Designers can
effortlessly transfer paper designs of dynamic systems into Simulink block diagrams. Simulink
block diagrams can be modified as easily as paper models of dynamic systems. In addition,
Simulink allows for detailed monitoring of dynamic system outputs at any point in the block
diagram using various tools (e.g., Scope, Display, etc.). Finally, data processing tasks such as
signal scaling, filtering, etc., can be easily performed in Simulink.
2.3.4. Dials and Gauges Blockset
The Dials and Gauges Blockset [45] provides enriched views of graphical, 3-D instruments
called virtual instruments. It has various templates that can be customized to create realistic
virtual instruments for electrical, aerospace, automotive, medical, and process control systems.
The virtual instruments created using the Dials and Gauges Blockset dynamically interact with
MATLAB and Simulink, thus providing an interactive interface for users to enter command
inputs and visualize sensory outputs.
2.4. Examples of Serial Communication between PIC and PC
2.4.1. Serial Communication from PC to PIC: Servomotor Position Control
This example illustrates one-directional serial communication from the PC to the PIC
microcontroller. In particular, it demonstrates that the user commands from a Simulink block
diagram can be exported to an actuator interfaced to the PIC microcontroller. The example
focuses on servomotor position control.
The Simulink block diagram for this example is shown in Figure 2.7. It consists of a dial,
from the Dials and Gauges Blockset, denoted as the servo angle knob. The user interacts with
the dial to enter servomotor position control command. The dial has a range from 0 to 90
degrees with one-degree resolution. The value of the angle commanded by the user is shown
in the middle of the knob.
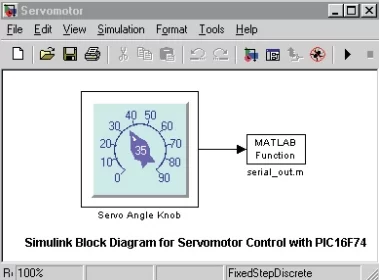
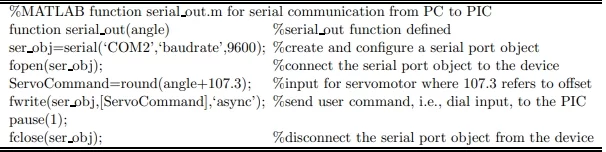
The MATLAB m-function block next to the knob contains a MATLAB m-file (see Table
2.1) to perform serial communication from the PC to the PIC. The user specified servomotor
position control command is transmitted to the PIC via a serial cable connection between the
PC and the PIC. When the PIC receives the command angle, it assigns the angle to a variable
in the PIC code. Next, the PIC utilizes the command angle to compute, generate, and apply
pulse trains for servomotor position control.
Table 2.1: M-function for PC to PIC serial communication
In this example, we used a 6VDC standard servomotor that is interfaced to the 3-pin
servomotor connection header on the PIC development board (see Figure 2.3). The PIC
assembly code corresponding to this example is available in Appendix A.1.
2.4.2. Serial Communication from PIC to PC: Data Acquisition, Processing, and Plotting
This example illustrates one-directional serial communication from the PIC microcontroller
to the PC. In particular, it demonstrates that a Simulink block diagram can be designed to
acquire measurement from a sensor that is interfaced to the PIC. The example focuses on
acquiring measurements from a photoresistor that senses light intensity.
Referring to Figure 2.4, a light sensor is constructed by connecting a 10 KΩ resistor and a
photoresistor in a voltage divider circuit. The output of the light sensor varies depending on
the light intensity incident upon the photoresistor; here the light sensor output refers to the
voltage at the junction of the 10KΩ resistor and the photoresistor. This output is connected
to I/O pin 2 of the PIC16F74. The I/O pin 2 is configured as an A2D in the PIC assembly
code. Each time, the PIC assembly code tasks the PIC to measure the light sensor output, the
PIC16F74 converts the analog voltage signal at the voltage divider output into a corresponding
8-bit digital value. Thus, when the photoresistor is placed in dark condition, the 8-bit A2D
returns a value close to 255. Alternatively, when the photoresistor is exposed to bright light,
the A2D returns a value close to 0.
The Simulink block diagram for this example is shown in Figure 2.8, where a MATLAB
m- function (see Table 2.2) is used to acquire the digitized output of the sensor using serial
communication. The Simulink block diagram of Figure 2.8 also processes and plots the sensory
data. In particular, the top scope in Figure 2.8 plots the light intensity measurement (in terms
of digitized output of the voltage divider circuit) versus time, where the measurements are
filtered using a low-pass filter. The middle scope plots the unfiltered light intensity measurement. Finally, the bottom scope plots the light intensity measurement in terms of voltages by
processing the 8-bit digital value of the voltage divider circuit through a gain factor.
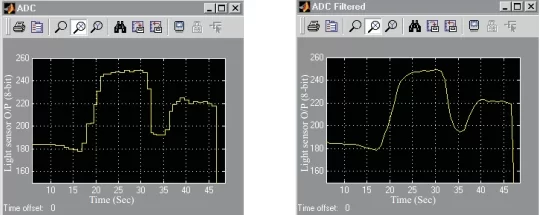
An experiment was conducted in which the light intensity was abruptly altered at several
time instances. The response plots acquired and processed using the Simulink block diagram
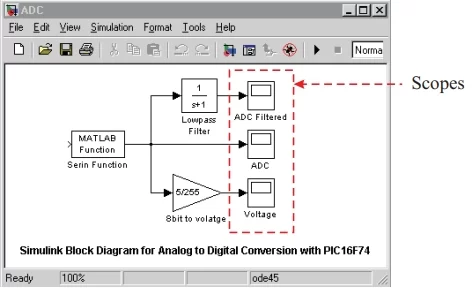
Table 2.2: M-function for PIC to PC serial communication

of Figure 2.8 are shown in Figure 2.9. The filtered output response in Figure 2.9(b) is much
smoother than the unfiltered response in Figure 2.9(a). Thus, Figure 2.9 demonstrates the
efficacy of signal co-processing using MATLAB and Simulink for PIC-based projects. The PIC
assembly code corresponding to this example is available in Appendix A.2.
2.4.3. Bi-directional Serial Communication between PIC and PC
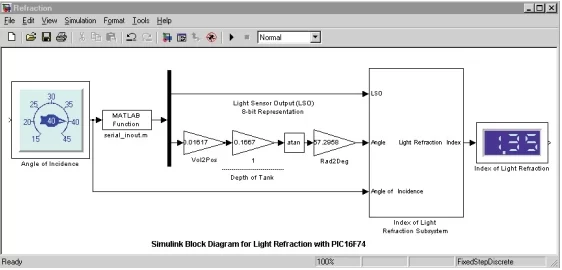
In this example, the light refraction test bed is used to demonstrate the advantage of exploiting bi-directional serial communication between PIC and MATLAB-based GUI executing
on the PC. A Simulink-based interactive GUI for the light refraction test bed is shown in
Figure 2.10. The user interacts with the dial object to command the angle of incidence of
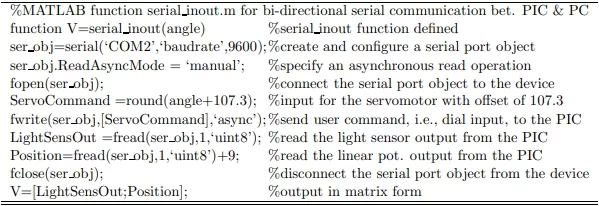
light source. The MATLAB m-function block next to the knob contains a MATLAB m-file
(see Table 2.3) that transmits the user command input to the PIC serially. The PIC stores
the user input in a variable and uses it to compute, generate, and apply pulse trains to control
servomotor position. This positions the light source, mounted on the servomotor arm, at the
commanded angle of incidence. Next, the PIC turns on the light source and performs the following tasks: drive the light sensor along the linear potentiometer by turning the DC motor,
measure the position of the light sensor along the linear potentiometer and the corresponding
output of the light sensor, and transmit the position and light sensor measurements to the
PC. The MATLAB m-function block shown in Figure 2.10 enables receipt of the position and
light sensor measurements from the PIC serially. Simulink blocks following the m-file function
block are used for various data processing tasks, e.g., conversion of position measurement to
the refraction angle and computation of index of light refraction. Finally, a generic numeric
LED display, from the Dials and Gauges Blockset, is used to indicate the calculated value of
index of light refraction for the experimental liquid.
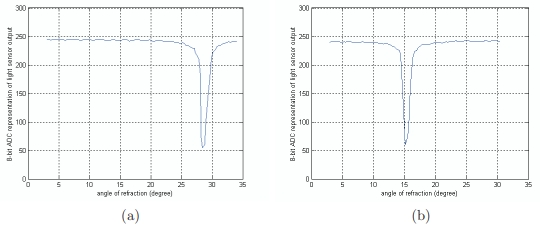
Figure 2.11 shows the block diagram of index of light refraction subsystem of Figure 2.10.
The block diagram of Figure 2.11 is used to generate a plot of angle of refraction versus the
light sensor output. Figure 2.12 shows the plots of angle of refraction versus the light sensor
output for two commanded values of incidence angle, namely, 40◦ and 20◦. Note that for each
incidence angle, the index of refraction is computed from the angle of refraction corresponding
and PC
Table 2.3: M-function for bi-directional serial communication between PIC and PC
to the smallest output returned by the light sensor. Thus, the block diagram of Figure 2.11
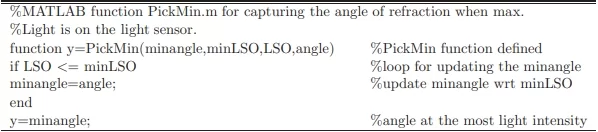
is also used to calculate the index of light refraction. The MATLAB m-function (see Table
2.4) in this subsystem monitors and captures the angle data corresponding to the smallest
measurement returned by the light sensor. Note that the light sensor output is smallest when
the intensity of refracted light focused on the light sensor is highest. Next, the angle data is
used to compute the index of light refraction. The PIC assembly code corresponding to this
example is available in Appendix A.3.
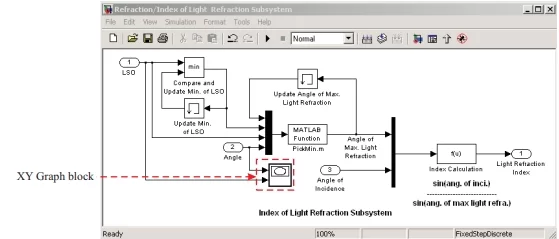
Table 2.4: M-function for calculating the index of light refraction
20◦
2.5. Conclusion
In this Chapter, we developed and presented MATLAB-based GUIs for PIC microcontroller projects by exploiting Simulink, Dials and Gauges Blockset, and serial communication capabilities of MATLAB and PIC. Three examples were presented to illustrate the productivity enhancement potential of the MATLAB-based GUI environment when developing PIC microcontroller projects. The GUIs designed using framework of this Chapter allow the user
to: i) vary control commands; ii) acquire sensory data; iii) perform on-line data processing;
and iv) visualize data using realistic looking virtual instruments. Note that the framework
of this Chapter allows the use of microcontroller as a low-cost, stand-alone data acquisition
and control board (DACB). Whereas PC-based DACBs typically cost several hundred to over
thousand dollars, a PIC microcontroller costs only a few dollars. Thus, the use of PIC microcontrollers with the proposed MATLAB-based GUI environment provides a low-cost DACB
solution that can be particularly beneficial to educators.
Source: Development of a MATLAB-based Graphical User Interface Environment for PIC Microcontroller Projects
- How does the system enable communication between the PC and PIC?
The system uses serial communication functionality provided by both MATLAB and the PIC microcontroller, connected via a DB-9 serial cable and an RS232 driver. - What software tools are utilized to develop the interactive GUI?
The environment utilizes MATLAB, Simulink, and the Dials and Gauges Blockset to create visual controls and display objects. - Can the PIC microcontroller interface with human beings directly?
No, PICs are not designed to interface directly with humans; they require external GUI tools like MATLAB to provide graphical user interface capabilities. - What is the function of the MAX232 chip in this setup?
The MAX232 converts voltage levels between PC-based logic (-12V/12V) and PIC microcontroller-based logic (5V/0V). - Does the framework allow for real-time data processing?
Yes, the framework allows users to perform on-line data processing tasks such as signal filtering and scaling within the Simulink model. - What specific hardware was used for the light refraction experiment?
The test bed included a laser pointer, a CdS photoresistor, a servomotor, a DC motor, a linear potentiometer, limit switches, and a liquid reservoir. - Is the proposed solution considered cost-effective compared to standard PC-based DACBs?
Yes, because a PIC microcontroller costs only a few dollars, whereas typical PC-based Data Acquisition and Control Boards cost several hundred to over a thousand dollars. - How is the index of light refraction calculated in the bi-directional example?
The system computes the index from the angle of refraction corresponding to the smallest output returned by the light sensor, which indicates the highest light intensity.