Summary of Converting a Proxxon MF70 Milling Machine To CNC – 2 using PIC18F4620
This article describes a printable, laminate overlay front panel for a DIY CNC mill control (used previously for DROs), detailing button layout and operations for jogging axes, setting Absolute Zero, and assigning preset axis values including numeric entry and edge-detection. The overlay is inexpensive, easy to clean, and adaptable. For full conversion details see Converting a Proxxon MF70 Milling Machine To CNC using PIC18F4620.
Parts used in the Mill Control Overlay Project:
- Printed paper design (for overlay)
- Lamination/plastic-facing material
- Cut-out for LCD display
- ON/OFF switches
- Edge-detection LED
- TACT switch buttons (protruding through front)
- Container/enclosure front panel
- Numeric keypad (printed/legended on overlay)
- Axis selector buttons (X, Y, Z)
- Jog control buttons (axis-direction pads)
My layout is shown below. It may not be as intuitive or informative as the layout on a PC display, but contains everything I have found necessary for control of the Mill. (and previously the DRO’s on my other Milling Machine and Lathe.)
I should stress here, that this is an overlay – i.e. a plastic-faced, easy-to-clean front which has a cut-out for the LCD display on the left, space for ON/OFF switches and Edge-detection LED below that, and on the right, covers over a set of TACT switch buttons, which protrude slightly through the container front.
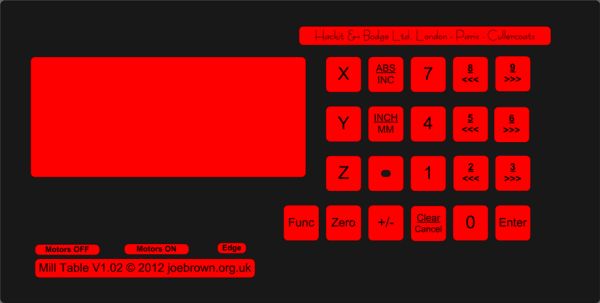
It is cheap and easy to make. (I laminate mine after printing the design on paper) It is also easy to change, should you want to alter the colours, wording, and even position of the legend, after changing the switch layout. (and detection in software if necessary) First and foremost then, it is adaptable.
- e then press and hold. The jog keys are the
 and on the same line as the axis you wish to jog.
 - Setting Absolute Zero for an axis. This is a common operation, and so has been made as easy as possible. First of all the pad is pressed, then the axis , , or , is required. You then have a choice of methods you can employ to set the zero:
- Press again, to select the current position of the axis you have selected as the new Absolute Zero. Or:
- Start entering a decimal value using the numeric keys, (optionally preceded by) an optional decimal point at any position, and complete entry of the number by pressing the pad. Or:
- Press the axis key again to select setting the absolute zero by edge-detection. Then using the and pads co-responding to the axis you are setting, jog the axis until the tool hits the work. A flashing ‘E‘ will be displayed alongside the relevant axis display on the LCD, until the edge is found. The tool will auto-retract when an edge is detected, and the position at which the edge was detected will be stored as the Absolute Zero for that axis.
- Press
- Setting a preset value for an axis. This is also a common operation. First of all the axis for which we want to set a preset is pressed: , , or . You are then invited to select a preset number 0-9. When this is done, you then have a choice of methods you can employ to set the preset value:
- Press to select the current position of the axis you have selected as the new preset value. Or:
- Start entering a decimal value using the numeric keys, (optionally preceded by) an optional decimal point at any position, and complete entry of the number by pressing the pad. Or:
- Press the axis key again to select setting the preset value by edge-detection. Then using the and pads co-responding to the axis you are setting, jog the axis until the tool hits the work. A flashing ‘E‘ will be displayed alongside the relevant axis display on the LCD, until the edge is found. The tool will auto-retract when an edge is detected, and the position at which the edge was detected will be stored as the selected preset value for that axis.
- Press
 and
and on the same line as the axis you wish to jog.
 pad is pressed, then the axis
  ,
,  , or
, or  , is required. You then have a choice of methods you can employ to set the zero:
 ) an optional decimal point at any position, and complete entry of the number by pressing the
  pad. Or:
For more detail: Converting a Proxxon MF70 Milling Machine To CNC using PIC18F4620
- How is the overlay constructed?
The overlay is printed on paper, laminated with a plastic face, and cut to fit the LCD and switches. - Can the overlay be cleaned easily?
Yes, the plastic-faced laminated overlay is easy to clean. - Does the overlay support edge-detection for setting zeros?
Yes, edge-detection is supported and displays a flashing E while finding the edge, auto-retracting when detected. - How do you set Absolute Zero using the panel?
Press the zero pad, select axis (X, Y, or Z), then choose current position, enter a numeric value and press the pad, or use edge-detection by pressing the axis key again and jogging to the edge. - How do you set a preset value for an axis?
Select the axis, choose a preset number 0-9, then use current position, enter a numeric value and press the pad, or use edge-detection to store the preset. - Are the button legends and layout changeable?
Yes, the overlay is adaptable and easy to change for colors, wording, or switch positions. - Where is the LCD located on the overlay?
The overlay has a cut-out for the LCD display on the left side. - What switches are included on the overlay front?
There are ON/OFF switches, an Edge-detection LED, and TACT switch buttons protruding through the front.