Ever wish the Staples Easy Button (R) could say something better than the mundane “That was easy.”? How about a Lil Jon button?
YEAAAUGH, OKKKAY!
LET’S GO!
Attachments
Step 1: What You Will Need (and Where to Get It):
NOTE: You will need a way to program a dsPIC33 (a microcontroller from Microchip.com). I recommend a PICkit 3, but it is ~$50 here: http://www.sparkfun.com/products/9973 .
If you just want a pre-programmed chip, you can contact me through this website, I will try to send you a chip for $5.50 shipped. Edit: no more pre-programmed chips, also moved to PIC18 for better <3.3V compatibility.
1. The Staples Easy Button (R). Buy it online from here: http://www.staples.com/office/supplies/StaplesProductDisplay?storeId=10001&langId=-1&catalogIdentifier=2&partNumber=606396
or get it at any Staples(R) store for $5.49. Apparently their profit goes to charity as well, so this is good all around.
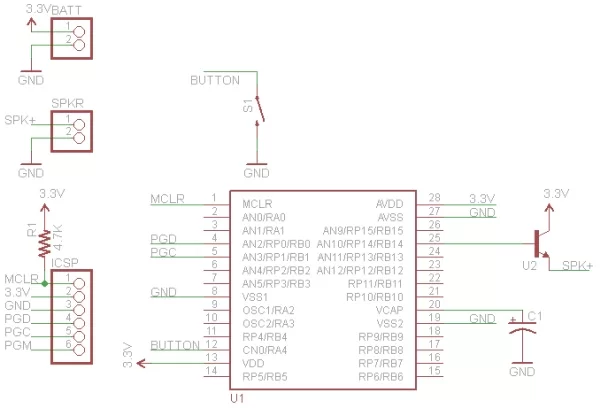
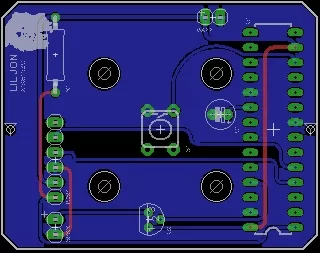
2. A perfboard or PCB. I have laid out a PCB for you which you can have manufactured here for cheap: http://dorkbotpdx.org/wiki/pcb_order . As of writing a set of 3 boards cost $8.65 ($2.89 ea). The files (in Eagle CAD) format can be found here:https://netfiles.uiuc.edu/zcheng1/www/liljon.zip . Alternatively, get a perfboard (e.g. http://www.radioshack.com/product/index.jsp?productId=2102862 ) and wire it up yourself according to the following schematics.
3. The microcontroller itself (U1). I used a dsPIC33FJ128GP202 . You can also use the dsPIC33FJGP802, or any of the others which have 128KB of flash (to store samples) and come in a 28-pin PDIP (that is, a non surface mount) package. Buy it here: http://www.microchipdirect.com/ (DSPIC33FJ128GP202-I/SP) for $4.93 or sample it for free here http://www.microchip.com/samples/ . Remember to get the SPDIP version.
4. Any resistor from 1K – 4.7K Ohm (R1). This serves to pull up the reset pin (~MCLR) for the microcontroller. This is optional, especially if you have a pre-programmed chip. You can just solder a jumper then to where the resistor should be (R1). This should be about $0.05 if you have to buy it.
5. A NPN transistor (U2). Any common NPN bi-polar transistor will do here. This serves as an amplifier (of sorts, even though it will be operating as a switch and not in the linear range). If you have no idea, a 2N3904 or 2N2222 will work fine. Similarly this should be about $0.05-$0.10.
6. A 10+ uF capacitor (C1). This is necessary because the microcontroller has an internal voltage regulator which is quite noisy. You are however in luck as the original Easy Button (R) has a capacitor which is a 47uF 10V electrolytic, perfect to cannibalize for this purpose. Otherwise get it for a nickel.
7. A board mount pushbutton (S1). This is the most common type of 4 pin push button switch. Get it at Sparkfun for $0.35 http://www.sparkfun.com/products/97 if you don’t have a couple lying around.
Your total parts cost is $13.86 (including some money to charity but not including shipping)
Step 2: Soldering It Up:
The code for the microcontroller is programmed using Microchip’s compiler C30. You can get the student or demo versions for free from here: http://www.microchip.com/stellent/idcplg?IdcService=SS_GET_PAGE&nodeId=1406&dDocName=en010065. You will also need an installation of MPLAB (which is the development and programming environment here). Get it here: http://www.microchip.com/stellent/idcplg?IdcService=SS_GET_PAGE&nodeId=1406&dDocName=en019469&part=SW007002.
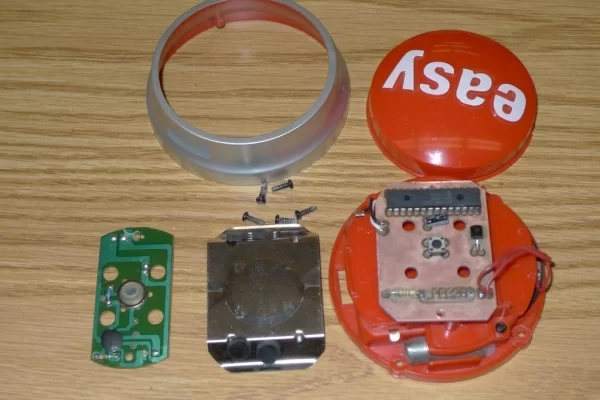
Open your Easy Button(R) with 4 screws on the bottom. Remove the batteries, button, and sleeve. You will see a simple PCB held down by 2 screws. Remove these and de-solder the wires (2 pairs; one going to the speaker, one going to the battery).
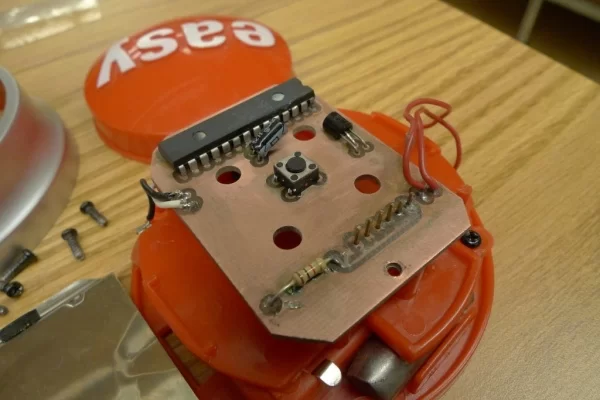
Solder up your board (you don’t need to program anything first unless you do not plan on installing R1, in which case you should leave off R1 until you’ve programmed the chip). As usual install the passive components (resistor, capacitor, switch) first, then the small active components (transistor) and finally the microcontroller last. Notice that the transistor and the capacitor have to be bent down to fit in the housing, leave enough of the lead to allow them to bend.
Solder the wires from the Easy Button to the corresponding points on the Lil Jon board. Notice the polarity for the battery (white -> +). The polarity for the speaker is unimportant in this case.
Insert your programmer (PICkit3 or ICD2/3) to the jumper marked ICSP. Load the project from here: https://netfiles.uiuc.edu/zcheng1/www/liljon_project.zip . If everything works right, you should be able to hit program and go.
As soon as you are done programming, hit the button and you should be greeted with a “YEAH!!!!” or “WHAT!!!”…
You will probably want to reassemble the newly christened Lil Jon Button (R). You may have to file down the corners of the board to get it to fit inside the odd circular enclosure. Screw at least one of the original PCB screws into the hole on the side of the board (it is designed to be smaller than the screw, use a power screwdriver to open up the hole). Put the button back inside the sleeve and put the sleeve onto the base. Reinstall the 4 screws on the bottom and then pop some Cristal http://www.buy.com/prod/louis-roederer-cristal-brut-2004/q/sellerid/31400202/loc/68903/219440445.html ($194.00 as of writing) like Lil Jon would.
Step 3: How It Works:
Hopefully you have a working Lil Jon Button by now. You might be interested in how the code works, so I will explain some sections. Since the code is quite long, I will just refer to sections sequentially.
First, here are a bunch of includes. Of course there are the ones for the processor as well as some standard libraries. What is important here is the header files which correspond to the samples. This is a way to conveniently load data from your computer into the microcontroller at compile time. I wrote a MATLAB script which reads .wav files and declares a large array e.g.:
int mydata[] = {1, 2, 3, 4};
Then there’s the section:
void __attribute__((__interrupt__)) _T2Interrupt( void )
{
This is the interrupt for Timer 2, which drives the PWM. A PWM (Pulse-Width Modulator) generates a sort-of-analog waveform by quickly changing the duty cycle of a pulse waveform. This is because the digital outputs of the microcontroller can only generate a logical 0 (which is at ground voltage) or a logical 1 (which is at the battery voltage). If we want to say, approximate a voltage halfway between that, we can use the PWM to turn on the pin half the time and turn it off half the time. As long as this is done very quickly, we can approximate the voltage well enough to sound like the original waveform.
The T2Interrupt function is an interrupt handler for Timer 2. It basically means that the PWM needs another sample, so we read another sample from program memory and stuff it into the OC1RS register. This is how PWM knows what voltage to approximate for the next sample time.
void __attribute__((__interrupt__)) _CNInterrupt( void )
{
This section is an interrupt handler for the change notification. The change notification throws an interrupt (that is, executes the above function) any time one of the pins you have enabled changes state (goes high->low or vice versa). This is how we detect the switch being pressed. Notice that we could poll here, but the change notification peripheral works even when the microcontroller is asleep, allowing us to save a lot of power. What we do here depends on whether a sound is already playing. If a sound is already playing and we are in the first 375ms of the sample, it will simply reset the sample index (thereby restarting playback at the beginning of the same sample). If there is no sound playing or we are past the first 375ms, we will randomly pick a new sound out of the 10 and play that. This allows the Lil Jon Button to repeat the same sample but still have enough random behavior to be interesting (e.g. Ya-Ya-Yeah! OKAY!).
void setupHS()
void setupCN()
void setupPWM()
Here are some setup functions. This is quite complicated and you are best to consult the datasheet for exactly what happens here. Suffice to say the first sets up the processor clock to 66.33 Mhz, the second sets up the change notification, and the third sets up the PWM. For your reference, the datasheet can be found here:
http://www.microchip.com/wwwproducts/Devices.aspx?dDocName=en532296
Finally the:
int main ()
{
Which is the main loop. Code starts executing here, so the first thing it does is set up the peripherals. Then the main loop doesn’t so a whole lot. It basically just waits around for a bit, and goes to sleep. All the work happens because the interrupts above have been registered, so when something needs attention (e.g. the PWM needs the next sample), the correct interrupt will automatically be called. Typically when the microcontroller goes to sleep, no code gets executed. However, because the change notification peripheral has been enabled, a push on the button will cause the microcontroller to wake up and immediately service that interrupt and start playing a sample.
Final note:
An observant engineer might ask, why did you not use the DAC feature of the microcontroller? In fact the dsPIC33FJ128GP802 has an audio DAC which is designed for this sort of thing. The reason is to simplify the design. Notice that in order to drive a speaker out of a PWM, the only thing that is needed is single digital switch (a BJT in this case with no resistors for biasing). If instead the output was a DAC, a linear amplifier made out of transistors (with additional resistors) or an op-amp would be required. This greatly increases the complexity of the design and the part count. Notice that the input waveforms are simply 8kHz 8bit audio files, so a full CD-quality DAC is overkill in terms of audio quality, but increases the overall expense.
Other final note:
The dsPIC33FJ128GP802’s voltage range is only 3.0-3.6V. I have observed it to run at about 2.8V without problems with this code, but stability cannot be guaranteed for the long run. I recommend if you are to experiment with the code to use some lithium AAA batteries: http://www.amazon.com/Energizer-Ultimate-L92BP-4-Lithium-Battery/dp/B0002DUQDQ . They maintain 1.5V for a much longer time than alkaline AAAs.
Edit: Problem solved by using PIC18, which runs down to 2V
Step 4: New Revision (X2)
Here are the files for the new X2 revision. A couple of changes have been made to make the button more useful musically, see:
The biggest engineering change is to go from the dsPIC30 to a PIC18, which operates at lower voltages. This allows everything to run for much longer on a set of 2 alkalines.