Summary of Stepping Into the 16-bit World with the Microchip 16-bit PIC24F16KA102 Family Microcontroller
This article compares 8-bit and 16-bit Microchip microcontrollers, advocating for the PIC24F16KA102 as an ideal learning tool for hobbyists. It highlights shared features like nanoWatt XLP technology and hardware peripherals while emphasizing the architectural advantages of 16-bit chips for advanced applications. The text provides a comprehensive parts list and software requirements to guide readers through a basic tutorial project involving LEDs and buttons.
Parts used in the Stepping Into the 16-bit World with the Microchip 16-bit PIC24F16KA102 Family Microcontroller:
- Resistors: 330 Ohm (9), 470 Ohm (1) and 10K (2)
- Capacitors: 0.01uF (2) and 0.1uF (2)
- LEDS: 3 mm Blue LED (8) and 3 mm Red LED (1)
- Microchip 16-bit PIC24F16KA102 microcontroller
- Two momentary push button
- Breadboard and breadboard's jumper cables
- 2xAA Battery Holder with 2x AA Alkaline battery (3 volt)
- Microchip PICKit3 programmer
- Microchip MPLAB IDE version 8.47 and Microchip C30 Compiler version 3.30
- Microchip PIC24 Reference Document including datasheet and application notes
One of the commonly asked questions when we move to the bigger and powerful 16-bit microcontroller is do we really need it? As the 8-bit microcontroller is already suite almost all of our needs from a simple blinking LED to more sophisticated embedded application such as robotics. Despite the debate whether to use the 8-Bit or 16-Bit microcontroller or perhaps just go straight to 32-bit microcontroller in our embedded system design, first I will show you the Microchip PIC18F25J11 (8-Bit) and PIC24F16KA102 (16-bit) basic comparison.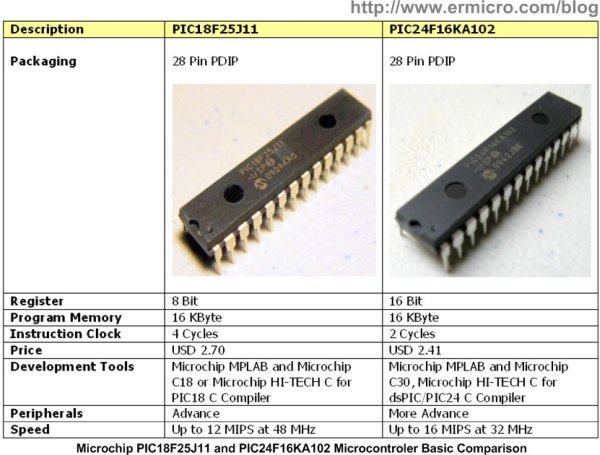
I use the Microchip PIC18F25J11 for the comparison as this microcontroller is considered as the 8-Bit highest end class microcontroller equipped with Microchip nanoWatt XLP technology while the Microchip PIC24F16KA102 is considered as the 16-bit entry level class microcontroller also equipped with Microchip nanoWatt XLP technology. Both microcontrollers have a build in hardware RTCC (Real Time Clock and Calendar), I2C, SPI and CTMU (Charge Time Measurement Unit) for capacitance sensing.
Now here my opinion from the electronics hobbyist perspective, things that we always consider when learning a new microcontroller are how easy to quick prototyping it on the breadboard, how much the cost and the last is the development tools to be used. From the basic comparison above you’ve noticed that for the learning purpose these two types of microcontroller are almost identical. On the other hand let’s consider the advantages of learning the 16-bit microcontroller; the PIC24F16KA102 microcontroller families share the same architecture as the well known Microchip dsPIC (digital signal controlling) microcontroller families, therefore by learning the 16-bit PIC24F16KA102 microcontroller family will open your knowledge and richer your experiences to more advance application of the embedded world system and surely you will love and enjoy it.
…to explore a new 16-bit microcontroller world… new datasheet… and …new programming… to boldly go when the only true electronics hobbyists dare to go…
On this tutorial we are going to step into the 16-bit embedded world and I will use the Microchip PIC24F16KA102 microcontroller as our learning tools. Actually Microchip has a nice product to help you quickly learn the PIC24F16KA102 families features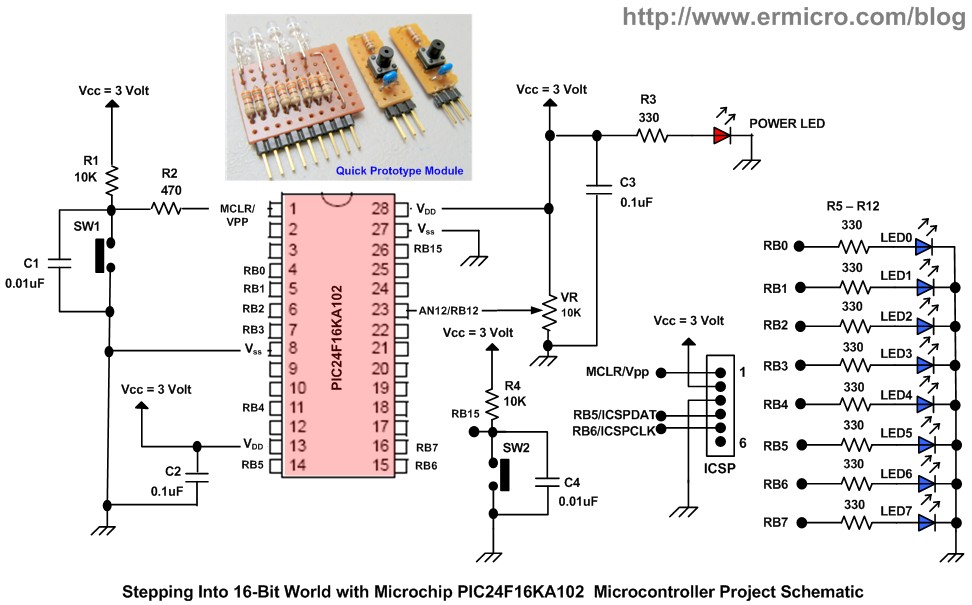
Ok now let list down the necessary electronics components and supported software for our stepping into 16-bit world tutorial and make sure you have the Microchip PIC24F16KA102 microcontroller datasheet near you:
1. Resistors: 330 Ohm (9), 470 Ohm (1) and 10K (2)
2. Capacitors: 0.01uF (2) and 0.1uF (2)
3. LEDS: 3 mm Blue LED (8) and 3 mm Red LED (1)
4. One Microchip 16-bit PIC24F16KA102 microcontroller
5. Two momentary push button
6. One Breadboard and some breadboard’s jumper cables
7. One 2xAA Battery Holder with the 2x AA Alkaline battery (3 volt) for powering the circuit
8. Microchip PICKit3 programmer (used in this project)
9. Microchip MPLAB IDE version 8.47 and Microchip C30 Compiler version 3.30
10. Microchip PIC24 Reference Document: PIC24F16KA102/101 datasheet, AN39703a (CPU), AN39711b (I/O), AN39704a (Timer), AN39705b (ADC)
For more detail: Stepping Into the 16-bit World with the Microchip 16-bit PIC24F16KA102 Family Microcontroller
- Why choose the PIC24F16KA102 over an 8-bit microcontroller?
The PIC24F16KA102 shares the same architecture as the dsPIC family, opening knowledge for more advanced embedded applications. - What are the key similarities between the PIC18F25J11 and PIC24F16KA102?
Both feature Microchip nanoWatt XLP technology and built-in hardware RTCC, I2C, SPI, and CTMU. - How can I quickly prototype this 16-bit microcontroller?
You can use a breadboard with jumper cables and the specified components for quick prototyping. - What power source is required for this circuit?
A 2xAA Battery Holder with 2x AA Alkaline batteries providing 3 volts is used for powering the circuit. - Which programming tools are supported for this project?
The project uses Microchip MPLAB IDE version 8.47 and Microchip C30 Compiler version 3.30. - Can I learn 16-bit development using this specific controller?
Yes, the article recommends the PIC24F16KA102 as a learning tool to step into the 16-bit embedded world. - What documentation should I keep near me during this tutorial?
You should have the Microchip PIC24F16KA102/101 datasheet and various application notes nearby.