


Summary of Serial communication with Pic 16f877 using UART
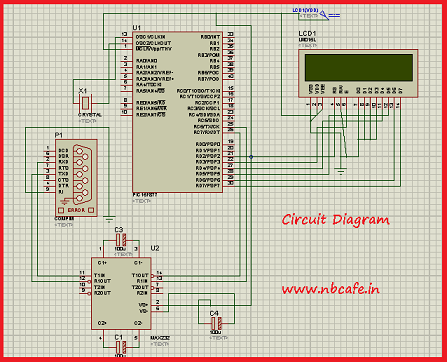
Using UART on PIC16F877 enables serial communication between devices. This project demonstrates connecting PIC16F877 UART pins (RC7 pin 25 for RX and RC6 pin 26 for TX) with MAX232, a UART port, and an LM016L LCD to send and display serial data. For development and simulation, MikroC Pro is used to write embedded C employing UART1_Init, UART1_Data_Ready, UART1_Write_Text, UART1_Write, and UART1_Read. Proteus 7 Professional simulates the circuit, replacing MAX232 and COMPIM with a Virtual UART Terminal.Parts used in the Serial communication with Pic 16f877 using UART:
- PIC16F877 microcontroller
- MAX232 level shifter
- UART port / connector
- LM016L LCD
- Proteus 7 Professional (for simulation)
- MikroC Pro (compiler)
- Virtual UART Terminal (simulation component)
Abstract of that project: Using UART port we can establish serial communication between any devices. Here in my project Serial communication with Pic 16f877 using UART I will show you how easily we establish communication between two devices. In my project we know the pin no 25,26 in PIC16F877 are use as UART. The pin number 25 is use for receiving and 26 is used for transmitting.
Hardware needed: See the circuit diagram bellow we use MAX232,UART port, Pic16f877 and LCd (Lm106L) to make our project.
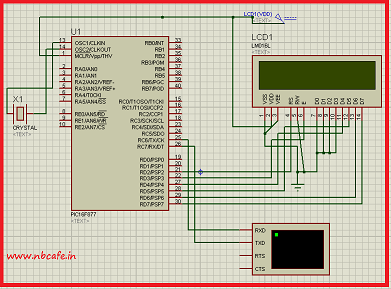
For Simulation: we use Mikcro C pro to write the embedded C program for PIC16F877. We used Proteus 7 Professional for simulation. And for simulation of our project Serial communication with Pic 16f877 using UART, we replace COMPIM and MAX232 with Virtual UART Terminal.
So see our replace circuit for simulation in Proteus in bellow.
Mikcro C Pro Code:
To interfacing UART with Pic we have to use some new command those are
UART1_Init(Baudrate):is Initialize UART module at specified baudrate.
UART1_Data_Ready() : use to check data is receive or not.
UART1_Write_Text(“Start”): use to write declared text on uart
UART1_Write(): use for transmit uart data.
UART1_Read(): use for read the uart data.
Now see at below the programing code to understand use of above mention command.
For more detail: Serial communication with Pic 16f877 using UART
Quick Solutions to Questions related to Serial communication with Pic 16f877 using UART:
- Which pins of PIC16F877 are used for UART?
Pin 25 (RC7) is used for receiving and pin 26 (RC6) is used for transmitting. - What hardware is required for this UART project?
The project uses PIC16F877, MAX232, a UART port/connector, and an LM016L LCD; Proteus and MikroC Pro are used for simulation and programming. - How is the project simulated in Proteus?
MAX232 and COMPIM are replaced with the Virtual UART Terminal in Proteus for simulation. - Which compiler is used to write the embedded C program?
MikroC Pro is used to write the embedded C program for PIC16F877. - What MikroC UART function initializes the UART module?
UART1_Init(Baudrate) initializes the UART module at the specified baudrate. - How do you check if data has been received in MikroC?
Use UART1_Data_Ready() to check whether data has been received. - Which function sends text over UART in MikroC?
UART1_Write_Text is used to write declared text over UART. - Which functions read and write UART data in MikroC?
UART1_Read() reads UART data and UART1_Write() transmits UART data.
Related projects
PIC16F877 Driving LCD in 4-Bit Mode using PIC16F877 with Proteus Simulation
Introduction This microcontroller project shows how a PIC16F877 can drive an LCD display using 4-bit mode inside a Proteus simulation.The project demonstrates...
Programmers & ICSP · PIC16F877AEPE PIC/LCD Demo using PIC16F877 with Proteus Simulation
IntroductionThe EPE PIC/LCD Demo is a classic microcontroller project that demonstrates how a PIC16F877 can fully control a PG12864F graphical LCD.Designed as...
Motors & Robotics · PIC16F877AEfficient Sun-Following Robot: A Solar Tracker with Microcontroller Control
Abstract The impending global challenge of dwindling non-renewable fuel resources underscores the urgency of transitioning towards renewable energy alternatives like solar power....
Communication & Interfacing · PIC18F4520CAN FD Node based on a PIC18 Microcontroller
The introduction sets the stage for an embedded systems project that involves developing a Embedded C CAN FD project using the MCP2517FD...
Communication & InterfacingLAN9662 Gigabit Switch: Optimized for Industrial Ethernet
Introduction It should come as little surprise therefore that one element of what is now more commonly referred to in some circles...
Communication & InterfacingPIC Microcontroller: Fundamentals & Applications for Students
Introduction Microcontrollers are the key components in the embedded systems market. A variety of embedded systems was formed and developed after the...

Ibrar Ayyub
I am an experienced technical writer holding a Master's degree in computer science from BZU Multan, Pakistan University. With a background spanning various industries, particularly in home automation and engineering, I have honed my skills in crafting clear and concise content. Proficient in leveraging infographics and diagrams, I strive to simplify complex concepts for readers. My strength lies in thorough...