Summary of Garage car detector without a microcontroller
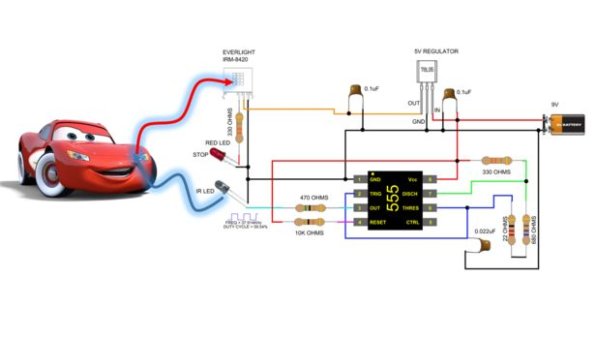
This article details a garage car detection system designed to signal when a vehicle is close enough to the wall, eliminating the need for microcontrollers like Arduino. The project utilizes a 555 timer in astable mode to generate a 37.9kHz signal that drives an infrared LED. An IR receiver detects this specific frequency when light reflects off an approaching car, triggering an indicator light.
Parts used in the Garage Car Detector:
- 1x 555 Timer
- 1x 10K Resistor
- 2x 330 Resistor
- 1x 470 Resistor
- 1x 22 Resistor
- 1x 680 Resistor
- 1x 0.022uF Capacitor
- 2x 0.1uF Capacitor
- 1x IR Led
- 1x IR Receiver (Everlight IRM-8420)
- 1x 78L05 Regulator
- 1x 9V Square Battery
At the end of this instructable you will be able to detect your car as it approaches the wall inside your garage, signalling you that the car is inside far enough so you can close the door.
Most car sensors will use a microprocessor to help calculate the distance of an approaching car when entering the garage. At our Wichita, KS makerspace MakeICT, we received a bag of components from JAMECO, which contain almost all the components needed to perform this instructable.
The main component and the challenge was to use a 555 timer as the driving “brains” of the project. So here we go:
 Step 1: How does it work?
The theory of implementation is very simple. Avoid using an Arduino or any other type of microcontroller. Instead use a 555 Timer in astable (oscillating) mode such that it generates a 37.9kHz. We use the switching output of the 555 timer to drive an infrared (IR) Led. When we do this the LED will turn on and off at a rate of 37.9K time per second.
Why? So we can detect it with a special IR detector that will only sense IR light that is modulated (switched) at a frequency of 37.9KHz. Upon detecting the IR light at that frequency the sensor will drive its output line high.
IR light reflects off objects just light visible light do. So in our application as the car approaches the sensor, the IR light emitted by the 555 will bounce off the car and into the sensor. Just like in a pool table, the angle the light hits the object will make the light reflect at the same but opposite side. With this in mind we need to position the IR led and the IR receiver at an angle such that the car is detected only when the car is getting close to the wall, under other circumstances, the IR light will bounce off the car and never reach the sensor as shown below
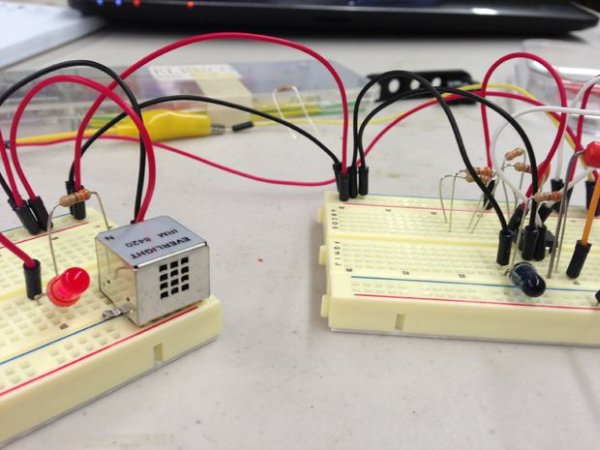
Step 2: The Schematic
The schematic is easy to understand.
The 555 timer:
The main part here is the 555 timer in astable configurations. The 3 resistors to the right of the 555 timer (330, 22 and 680) control the charge and discharge of the 0.022uF capacitor which in turns generate the square wave at the output of the 555.
The 470 ohm resistor next going to the IR LED limits the current out of the 555 timer so we do not destroy it when driving the IR led
The 10K resistor ensures that the 555 is not in reset.
The IR Receiver
The IR receiver used was an erverlight IRM-8420 but just about any IR received for remote control applications would work. Since the IRM-8420 is only a 5V device a 78L05 regulator was used to ensure we power it correctly.
The IR receiver drives a Red LED when it detects a IR signal modulated at the 37.9kHz frequency rejecting all other IR light. That ensures that the sun light will not trigger the sensor.
The Power:
The power comes from a 9V square battery attached to the 5V regulator with some bypass capacitors. Those are all the ones I had handy but if you can add some more near the 555 timer and the IR receiver that would make it even better
 Step 3: Bill of Materials
In order to build a car detection circuit you will need the following components, since Jameco was so kind to provide our maker space with the parts, I figure I would use their part number off their website.
– Qty 1 555 Timer
– Qty 1 10K Resistor
– Qty 2 330 Resistor
– Qty 1 470 Resistor
– Qty 1 22 Resistor
– Qty 1 680 Resistor
– Qty 1 0.022uF Capacitor
– Qty 2 0.1uF Capacitor
– Qty 1 IR Led
– Qty 1 IR Receiver (Everlight IRM-8420) (other source:Link)
For more detail: Garage car detector without a microcontroller
- How does the 555 timer function in this project?
The 555 timer operates in astable mode to generate a 37.9kHz square wave that drives the infrared LED. - Why is the 37.9kHz frequency important?
The IR receiver only senses IR light modulated at this specific frequency, rejecting sunlight and other interference. - Can I use an Arduino for this project?
No, the design specifically avoids using an Arduino or any other type of microcontroller. - How should the IR LED and receiver be positioned?
They must be placed at an angle so the car is detected only when close to the wall, ensuring reflected light reaches the sensor. - What component limits current to the IR LED?
A 470 ohm resistor is placed next to the IR LED to limit current and prevent damage to the 555 timer. - Which regulator ensures correct power for the IR receiver?
A 78L05 regulator is used because the Everlight IRM-8420 is a 5V device powered by a 9V battery. - Does the IR receiver react to sunlight?
No, the receiver rejects all IR light except the modulated 37.9kHz signal, preventing sunlight from triggering it. - What is the purpose of the 10K resistor connected to the 555 timer?
The 10K resistor ensures that the 555 timer is not in reset.