Summary of Blinking LED using PIC Microcontroller with Hi-Tech C
This article guides beginners in learning PIC microcontroller programming using MPLAB IDE and the Hi-Tech C compiler. It details software installation, project wizard usage, oscillator configuration, and register manipulation (TRISB, PORTB) to create a blinking LED project with the PIC 16F877A. The tutorial emphasizes starting from zero knowledge while assuming basic electronics and C language proficiency.
Parts used in the Blinking LED Project:
- MPLAB IDE
- Hi-Tech C Compiler library
- PIC 16F877A microcontroller
- Oscillator
- LED
A lot of you may heard about microcontrollers and its applications. Well it is a bit difficult to start learning microcontrollers. And the guides and tutorials also do not start from zero level which makes learning far more difficult than anticipated. I have tried to start from zero level in here also. All you need is the simplest knowledge of electronics or digital circuits. But you surely should have a decent knowledge of C language.
The software for programming Microchip microcontrollers comes by the name MPLAB IDE. MPLAB is the name of the software and IDE stands for Integrated Development Environment. IDE means that the software itself has all or most of the features that is needed. MPLAB IDE can perform the following operations :
- Source code editing
- Project management
- Machine code generation from Assembly
- Device simulation
- Device emulation
- Device programming
Hence it is called an Integrated Development Environment.
Some things should be clear before starting the tutorial. We can write programs for the PIC microcontrollers in MPLAB but the syntax and code depends upon the library, which may be different from family to family and even a lot of libraries are available for the same family of microcontrollers too.
We are discussing about the Hi-Tech C Compiler library (HTC) for MPLAB in this tutorial. It is used for programming the microcontrollers of series 16F which will be enough for the beginner users. Now if you want to have very high performance applications through microcontrollers then you need to go to higher and more powerful family of microcontrollers like 18F, 24F series and for them the programming library is different. But as the 16F series microcontrollers are 8 bit and support clock rates up to 20 MHz, they are useful in most of our non-commercial applications.
So let’s cut directly to the chase. The software MPLAB IDE comes with integrated HTC compiler library from the version 8.56 on wards.
Let’s start our first project, Blinking LED using PIC 16F877A. 16F877A is a very commonly used PIC microcontroller.
- Download and Install MPLAB IDE with Hi-Tech C compiler
- Open MPLAB IDE
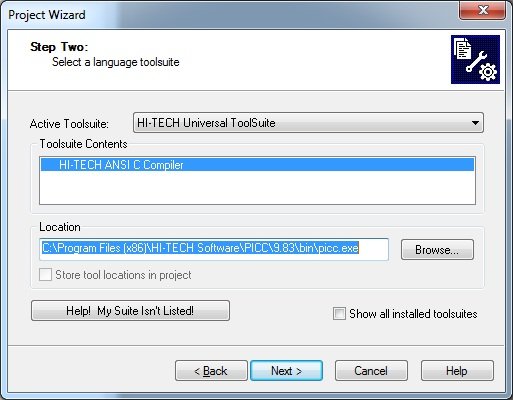
- Click on Project >> Project Wizard
Now we need to define the frequency of oscillator used in the system. This is the style of defining the oscillator frequency. The value 8000000 means its frequency is 8MHz.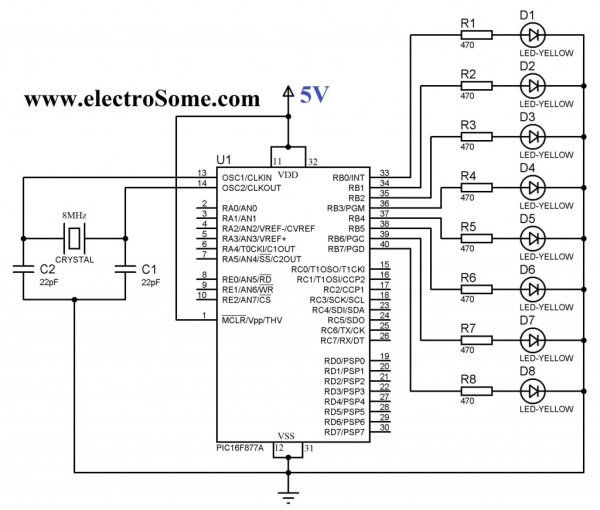
- start
- of the main program code
- TRIS is the command used for initializing the ports of the microcontroller. TRISB is an 8 bit register, in fact every word written in capital represents a register inside the microcontroller and you can get all the information about the register in the datasheet. Using this line will start the use of PORT B and if the value is ‘1’ in the respective register bit, that pin will be made input and if the value is ‘0’, the pin will be made output. One more thing, the use of ‘0x’ in that line represents that we are giving the data in hexadecimal number system. You can use ‘0b’ if you wish to give the data in binary and use nothing if you use decimal number system. So this line makes each 8 lines of port B output. Other way to give the same command is: TRISB=0; (decimal) and TRISB=0b00000000; (binary).
- PORTB is also a register like TRISB. This register passes the value out of port B. This means PORTB=0x00 will give low output from each eight line of port B. This is equivalent to clearing of port B at the start from any stray values. This line is not needed because there are no stray values at the start.
- Start of while loop. We write the entire program inside the while loop. After all initializations have been done, the main code is written here. This is done because this segment of program
For more detail: Blinking LED using PIC Microcontroller with Hi-Tech C
- What is required before starting this tutorial?
You need the simplest knowledge of electronics or digital circuits and decent knowledge of the C language. - Which compiler library is used for the 16F series microcontrollers?
The Hi-Tech C Compiler library is used for programming the 16F series microcontrollers. - How do you initialize ports in the code?
The TRIS command is used for initializing ports, where a value of 1 makes a pin an input and 0 makes it an output. - Can you define data in binary format within the registers?
Yes, you can use 0b if you wish to give data in binary format. - Where is the main program code written?
The entire main program code is written inside the while loop after initializations are done. - Does the PIC 16F877A support high clock rates?
Yes, the 16F series supports clock rates up to 20 MHz. - When did MPLAB IDE start including the HTC compiler?
MPLAB IDE comes with the integrated HTC compiler library from version 8.56 onwards. - What does the value 8000000 represent in the oscillator definition?
The value 8000000 means the frequency is 8 MHz.