


Summary of Adapter for small size PIC/AVR chip programming
This article describes a DIY universal adapter for programming SOIC/QFN microchips used in RC micro airplanes. The author created this tool because standard connections were difficult, allowing for both chip removal and in-circuit programming. The project utilizes common household items like floppy disks and springs to accommodate various microcontroller sizes.Parts used in the Universal Microchip Programming Adapter:
- Hot glue or epoxy
- 6 old floppy disks
- Plexiglass or piece of thick plastic
- Wire
- 8 pin chip socket or pins compatible with PIC programmer
- 6 springs (approx 2mm diameter, 2.5cm long)
- Drill or copper wire to make holes for the springs
I had trouble connecting the chips any other way so I made my own universal adapter.
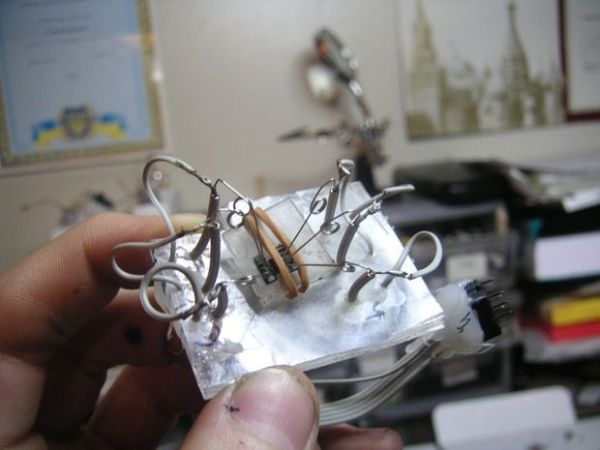
This could also be used to do In-Circuit programming without removing the chip from the PCB.
If you want an adapter to connect and fit any size microcontroller, this Instructable is for you.
Tools and parts that you will need:
+ Hot glue or epoxy
+ 6 old floppy disks
+ plexiglass or piece of thick plastic
+ wire
+ 8 pin chip socket or just pins that you could plug into the PIC programmer
+ 6 springs (abt 2mm diameter, 2.5cm long)
+ drill or copper wire to make holes for the springs
For more detail: Adapter for small size PIC/AVR chip programming
Quick Solutions to Questions related to Universal Microchip Programming Adapter:
-
Why did the author create this adapter?
The author had trouble connecting chips any other way when working on their micro airplanes. -
Can this adapter be used for in-circuit programming?
Yes, it can be used to do In-Circuit programming without removing the chip from the PCB. -
What types of microchips does this adapter support?
This adapter is designed for SOIC and QFN size microchips, including PIC and AVR chips. -
How many floppy disks are required for the project?
You will need 6 old floppy disks to build this adapter. -
What material is suggested for the base of the adapter?
The guide suggests using plexiglass or a piece of thick plastic. -
What are the dimensions of the springs needed?
You need 6 springs that are about 2mm in diameter and 2.5cm long. -
What is needed to secure the components together?
Hot glue or epoxy should be used to hold the parts together. -
How are holes made for the springs if not using a drill?
Copper wire can be used to make holes for the springs instead of a drill.
Related projects
Calculator Test using PIC24FJ64GA006 with Proteus Simulation
Introduction The Calculator Test using EASYHDL is a practical microcontroller project built on the PIC24FJ64GA006 and simulated in Proteus. This project demonstrates...
Programmers & ICSPPID Controlled Oven using TMS320F28027PT with Proteus Simulation
IntroductionThis project demonstrates a PID controlled oven implemented using a PICCOLO TMS320F28027PT microcontroller and verified through Proteus simulation.It is a practical microcontroller...
Programmers & ICSPPICCOLO Motor Controller Sample Design using TMS320F28023PT with Proteus Simulation
IntroductionThis project demonstrates a PICCOLO motor controller sample design implemented using the TMS320F28023PT Piccolo microcontroller and tested through Proteus simulation. It focuses...
Programmers & ICSP · PIC16F84APIC Musical Doorbell using PIC16F84A with Proteus Simulation
IntroductionThis microcontroller project demonstrates a musical doorbell built around a PIC16F84A and a simple piezo sounder.Using two push buttons, the system allows...
Programmers & ICSP · PIC16F877AEPE PIC/LCD Demo using PIC16F877 with Proteus Simulation
IntroductionThe EPE PIC/LCD Demo is a classic microcontroller project that demonstrates how a PIC16F877 can fully control a PG12864F graphical LCD.Designed as...
Programmers & ICSP · PIC16F628ADHT11 Low Cost Humidity Sensor using PIC16F628A with Proteus Simulation
IntroductionThis microcontroller project demonstrates how to interface a low-cost DHT11 temperature and humidity sensor with a PIC16F628A using a Proteus simulation environment.The...

Ibrar Ayyub
I am an experienced technical writer holding a Master's degree in computer science from BZU Multan, Pakistan University. With a background spanning various industries, particularly in home automation and engineering, I have honed my skills in crafting clear and concise content. Proficient in leveraging infographics and diagrams, I strive to simplify complex concepts for readers. My strength lies in thorough...