


Summary of PIC18F2550 : Blink LED using XC8 Compiler
This tutorial demonstrates programming a 28-pin PIC18F2550 microcontroller using MPLAB X IDE and the XC8 compiler to blink LEDs. It presents two distinct coding methods: one utilizing a manual for-loop for delays and another employing simpler, built-in delay routines. The guide emphasizes that while concepts align with previous PIC18F4550 tutorials, specific code modifications are necessary for the PIC18F2550. Users are advised to consult the official datasheet before implementation.Parts used in the PIC18F2550 LED Blinking Project:
- Breadboard
- PIC18F2550 Microcontroller
- LED
- IC 7805 (if necessary)
The concepts for programming a pic18f2550 microcontroller is still going to be almost same as previous tutorials on pic18f4550 microcontroller, however since pic18f2550 is a different microcontroller in the same pic18F family, so little modification is required with the way it is coded.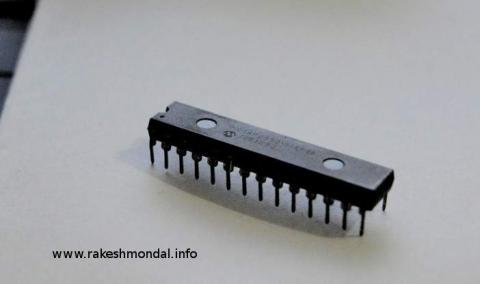
In this tutorial we are going to blink few simple led using pic18f2550. Two source codes are posted here which basically does the same thing, but the motive is to project the various style of coding the same thing in different ways. The method posted here are some of the most common methods for coding a PIC18F2550 microcontroller.
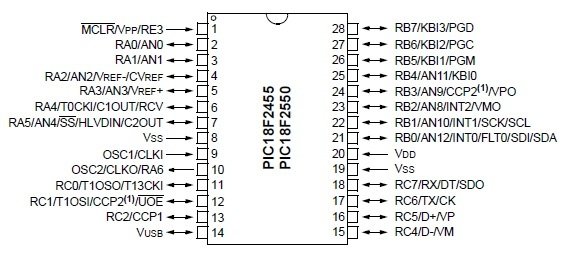
Unlike the traditions c18, here we choose to use the xc8 compiler which happened to be the most recent compiler introduced by microchip. PIC18F2550 is a 28 pin Microcontroller, which also supports USB communication. Always download a copy of pic18F2550 Datasheet from the manufacturer’s website before experimenting with the respective microcontroller.
Components Required
-Breadboard
-PIC18F2550 Microcontroller
-LED
-IC 7805 (if necessary)
Blinking a led is comparatively is simple, we just have to define the ports output and Set the pins to high or low with enough delay in between the High and low for a visible blink. If the power source for input to microcontroller is more than 5V then add a IC 7805 before proving the Input voltage to avoid damage to the microcontroller.
Source Code 1
As mentioned above, that the Source code here is compiled with mplabx ide and XC8 compiler however you can use the traditional c18 compiler as well, if you prefer the old Mplab IDE. The code below blinks the led with delay of few seconds. Without using any predefined delay routines. For delay we would use a simple for loop, the next example shows without using an for loop which is much more simple and short.
For more detail: PIC18F2550 : Blink LED using XC8 Compiler
Quick Solutions to Questions related to PIC18F2550 LED Blinking Project:
- Which compiler is recommended for this project?
The article recommends using the XC8 compiler as it is the most recent compiler introduced by Microchip. - Can I use the traditional C18 compiler instead of XC8?
Yes, you can use the traditional C18 compiler if you prefer the old MPLAB IDE. - What is the purpose of the IC 7805 in this circuit?
The IC 7805 is added if the input power source is more than 5V to avoid damaging the microcontroller. - How does Source Code 1 achieve the delay for blinking?
Source Code 1 uses a simple for loop to create a delay without relying on predefined delay routines. - What is the main difference between the two source codes provided?
One code uses a for loop for delays, while the other uses a much simpler method without a for loop. - Is the programming concept for PIC18F2550 different from PIC18F4550?
The concepts are almost the same, but little modification is required because they are different microcontrollers in the same family. - What should be downloaded before experimenting with the microcontroller?
You should always download a copy of the PIC18F2550 Datasheet from the manufacturer's website. - What is the primary function of the code examples in this tutorial?
The code examples are designed to blink a few simple LEDs.
Related projects
PICDEM FS USB CDC Evaluation Board using PIC18F4550 with Proteus Simulation
Introduction The PICDEM FS USB CDC Evaluation Board is a practical microcontroller project built around the PIC18F4550, designed to demonstrate USB communication...
Peripheral Tutorials · PIC18F4550PICDEM FS USB Mass Storage Device using PIC18F4550 with Proteus Simulation
Introduction This microcontroller project demonstrates how to simulate a USB Mass Storage Device (MSD) using the PIC18F4550 in a Proteus simulation environment....
Development Boards & Kits · PIC18F2550Pinguino Project: A PIC Microcontroller Based Arduino
This is a complete tutorial to make a PIC Microcontroller based Arduino. This is a complete tutorial to make PIC microcontroller based...
LED ProjectsAn Application-Driven Microcontroller Curriculum
Understanding how to apply microcontrollers lies at the core of modern embedded systems education. This student project takes an experiential approach to...
LED ProjectsBuild this microcontroller controlled rainbow flying disc – and then throw it!
Hello all and welcome to this super simple and inexpensive instructable. If you like throwing frisbees AND you like flashing lights AND...
LED ProjectsLED Scrolling Display Project Working With Circuit Diagram
We normally use a simple static LED display screen to convey a message. Earlier, when we want to display large data, we...

Ibrar Ayyub
I am an experienced technical writer holding a Master's degree in computer science from BZU Multan, Pakistan University. With a background spanning various industries, particularly in home automation and engineering, I have honed my skills in crafting clear and concise content. Proficient in leveraging infographics and diagrams, I strive to simplify complex concepts for readers. My strength lies in thorough...