Contents
hide
Summary of Interfacing JHD404A (40×4) lcd with Microcontroller
This article details interfacing the JHD404A 40×4 character LCD with microcontrollers like the 89c51. It explains that the display uses two HD44780 controllers, requiring separate initialization via enable pins en1 and en2 for the top and bottom halves. The text provides a complete C code example for the 89c51 to initialize both sections and display text across all four rows.
Parts used in the Interfacing JHD404A with 89c51 Project:
- JHD404A 40×4 Character LCD
- 89c51 Microcontroller (8051 Series)
- HD44780 LCD Controller
- P1 Port on Microcontroller
- P3 Port on Microcontroller
This post covers how to interface JHD404A 40×4 lcd with microcontroller (89c51, Pic16f877, Arduino etc). JHD404A is a 40×4 Character lcd. 40×4 means it has 40 coulombs and 4 rows. On each row of lcd we can display 40 characters/numbers etc. Total characters which we can display on 40×4 lcd is equal to (40×4=160) 160.
|
Like all other character lcd’s JHD404A also has a controller in it which controls its internal functions. 40×4 contains HD44780 lcd controller by hitachi in it. Which means same commands are used to initialize 40×4 lcd that are used to initialize 8×1, 16×1, 16×2 ,20×2 character lcd’s. The only difference between JHD404A and his siblings when compared is, it has two enable pins (en1 & en2). This is because a single HD44780 controller can handle up to 80 characters. To handle 160 characters we need an extra HD44780 controller.
|
Why two enable ports?
Consider a 40×1 or 40×2 lcd they have one enable (en) pin. In contrary to 40×1 and 40×2, 40×4 lcd has two enable (en1 & en2) pins. Actually 40×4 is comprised of two 40×2 lcd’s stacked on each other. We have to initialize 40×4 lcd two times. One initializing is using en1 pin and second is using en2 pin. We have to initialize both HD44780 controllers. First two rows of 40×4 lcd are initialized using en1 pin and then third fourth rows are initialized using en2 pin.

Some tutorials which might help you if you are new and don’t know much about character lcd’s and their working. These tutorials will help you in understanding this post.
I made a PLC(programmable logical controller) in which i used 40×4 lcd to show input and output status. You can also build yours just take a look at it its not a hard task.
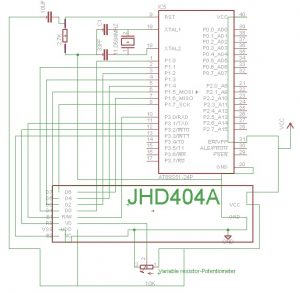
Interfacing JHD404A (40×4) Lcd with 89c51 Microcontroller
Interfacing 40×4 lcd with 8051 series microcontrollers is not a hard task. If you have already done interfacing of any other character lcd with 8051 microcontrollers you can easily interface 40×4 lcd with 89c51. I made a simple project the circuit diagram is below.
| #include <reg52.h> | |
| sbit rw =P3^0; //Read/Write Pin | |
| sbit en1=P3^1; //Enable for First 80 Characters | |
| sbit rs =P3^2; //Register select (RS) | |
| sbit en2=P3^3; //Enable for Second 80 Characters | |
| void delay(unsigned int time) //Time delay function | |
| { | |
| unsigned int i,j; | |
| for(i=0;i< time;i++) | |
| for(j=0;j< 5;j++); | |
| } | |
| //Function for sending values to the command register of LCD | |
| void lcdcmd1(unsigned char value) | |
| { | |
| P1=value; | |
| rs = 0; | |
| rw = 0; | |
| en1 = 1; | |
| delay(50); | |
| en1=0; | |
| delay(50); | |
| } | |
| //Function for sending values to the command register of LCD | |
| void lcdcmd2(unsigned char value) | |
| { | |
| P1=value; | |
| rs = 0; | |
| rw = 0; | |
| en2 = 1; | |
| delay(50); | |
| en2=0; | |
| delay(50); | |
| } | |
| //Function for sending values to the data register of LCD | |
| void display1(unsigned char value) | |
| { | |
| P1=value; | |
| rs = 1; | |
| rw = 0; | |
| en1 = 1; | |
| delay(500); | |
| en1=0; | |
| delay(50); | |
| } | |
| //Function for sending values to the data register of LCD | |
| void display2(unsigned char value) | |
| { | |
| P1=value; | |
| rs = 1; | |
| rw = 0; | |
| en2 = 1; | |
| delay(500); | |
| en2=0; | |
| delay(50); | |
| } | |
| //function to initialize the registers and pins of LCD | |
| //always use with every lcd of hitachi | |
| void lcdint1(void) | |
| { | |
| P1=0x00; | |
| P3=0x00; | |
| delay(15000); | |
| display1(0x30); | |
| delay(4500); | |
| display1(0x30); | |
| delay(300); | |
| display1(0x30); | |
| delay(650); | |
| lcdcmd1(0x38); | |
| delay(50); | |
| lcdcmd1(0x0F); | |
| delay(50); | |
| lcdcmd1(0x01); | |
| delay(50); | |
| lcdcmd1(0x06); | |
| delay(50); | |
| } | |
| void lcdint2(void) | |
| { | |
| P1=0x00; | |
| P3=0x00; | |
| delay(15000); | |
| display2(0x30); | |
| delay(4500); | |
| display2(0x30); | |
| delay(300); | |
| display2(0x30); | |
| delay(650); | |
| lcdcmd2(0x38); | |
| delay(50); | |
| lcdcmd2(0x0F); | |
| delay(50); | |
| lcdcmd2(0x01); | |
| delay(50); | |
| lcdcmd2(0x06); | |
| delay(50); | |
| } | |
| void main() | |
| { | |
| unsigned int count=0; | |
| char st[]=“Its 40×4 Lcd microcontroller-project.com“; | |
| P1=0x00; //Port-1 as Output | |
| P3=0x00; //Port-2 as Output | |
| lcdint1(); | |
| lcdint2(); | |
| while(1){ | |
| lcdcmd1(0x80); | |
| while(count!=40){ | |
| display1(st[count]); | |
| count++; | |
| } | |
| count=0; | |
| delay(5); | |
| lcdcmd1(0xC0); | |
| while(count!=40){ | |
| display1(st[count]); | |
| count++; | |
| } | |
| count=0; | |
| delay(5); | |
| lcdcmd2(0x80); | |
| while(count!=40){ | |
| display2(st[count]); | |
| count++; | |
| } | |
| count=0; | |
| delay(5); | |
| lcdcmd2(0xC0); | |
| while(count!=40){ | |
| display2(st[count]); | |
| count++; | |
| } | |
| count=0; | |
| } | |
| } | |
Download the project code, folder includes the full keil uvision 4 project files and hex code. Please give us your feed back on the project.
- How many characters can the JHD404A display?
The total number of characters is 160, calculated as 40 columns multiplied by 4 rows. - What controller does the JHD404A use?
It contains the HD44780 lcd controller by Hitachi. - Why are there two enable ports on this LCD?
A single HD44780 handles up to 80 characters, so two controllers are needed for 160 characters, requiring en1 and en2 pins. - How are the rows initialized in the 40x4 LCD?
The first two rows are initialized using the en1 pin, while the third and fourth rows are initialized using the en2 pin. - Can I use the same commands for other character LCDs?
Yes, the same commands used to initialize 8x1, 16x1, 16x2, or 20x2 character LCDs apply here. - Which microcontroller series is used in the provided code example?
The code example demonstrates interfacing with the 89c51 microcontroller from the 8051 series. - How do you send data to the command register for the second half of the display?
You use the lcdcmd2 function which sets the en2 pin high. - What happens if you only initialize one enable pin?
Only half of the display would be active because both HD44780 controllers must be initialized separately.