This post provides the i2c code (using the i2c module built in the hardware[1]) for PIC16F877 microcontroller.
This code is written in C language using MPLAB with HI-TECH C compiler. You can download this code from the ‘Downloads‘ section at the bottom of this page.
It is assumed that you know how to blink an LED with PIC16F877 microcontroller. If you don’t then please read this page first, before proceeding with this article. It is also assumed that you know how i2c protocol works, if you don’t then please read this page first.
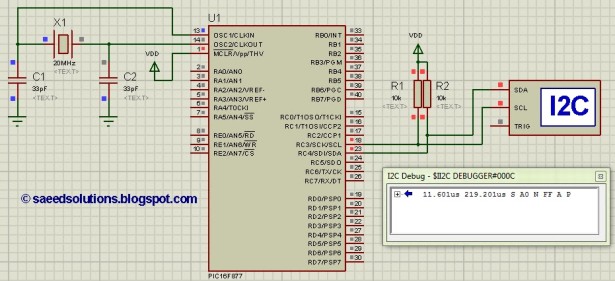
The result of simulating the code in Proteus is shown below.
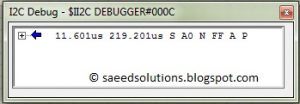
In the above circuit[2], RC4 pin is being used as SDA pin and RC3 pin is the SCK pin. Both of these pins are pulled up using 10K resistors as required for i2c protocol. Proteus provides an ‘I2C Debugger Tool‘ which is attached on the SDA and SCK pins in the above circuit. This i2c debugger tool receives all the i2c messages and displays them on the ‘I2C Debug‘ window displayed in above figure. Close up image of this ‘I2C Debug‘ window is shown below in the figure.
In the above figure, ‘I2C Debugger Tool‘ is telling us that first of all it received i2c start bit S. Then a value of 0xA0 was received. After that, there was a NACK bit (named as N in the above figure). After the NACK, a value of 0xFF was there on i2c bus. After that, an ACK was there (named as A) in the above figure, and in the end i2c stop bit (named as P) was received. When this Proteus simulation started then after 11.601usec PIC16F877 started sending this i2c data and stopped at 219.201usec time.
Code
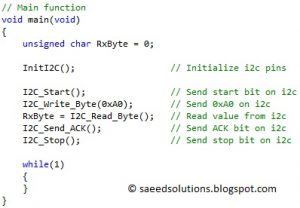
The code for the main function is shown below.
In the main function, firstly i2c pins are initialized using InitI2C() function. Then I2C_Start() function sends a start bit S on i2c bus. Then a value of 0xA0 is written on the i2c bus using I2C_Write_Byte(0xA0); statement. After that, I2C_Read_Byte() function reads a byte from the i2c bus, because there is no slave attached on the i2c bus, that is why RxByte will receive a value of 0xFF[3]. After that, an ACK ‘A‘ is transmitted on i2c bus using I2C_Send_ACK() function. And in the end a stop bit ‘P‘ is transmitted on i2c bus using I2C_Stop() function.
You can compare this main function code with Figure 2. Where i2c debugger is telling us that a pattern of “S A0 N FF A P” was received, but here in the main code we are sending “S A0 FF A P”. There is a NACK missing. The reason for this is that, I2C_Write_Byte() function is written in such a way that it writes 8 bits on the i2c bus and then reads a single bit ( ACK or NACK ) from i2c bus[4]. Because there is no slave attached on the i2c bus at the moment, that is why I2C_Write_Byte() function reads a NACK bit[5]. So, this concludes that PIC16F877 is actually writing “S A0 N FF A P” pattern on i2c bus as confirmed by Figure 2.
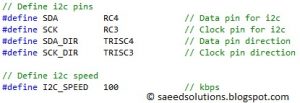
The code used to set different properties of i2c bus is shown below. (From I2C.h file)
In the above figure, SDA pin is selected to be RC4 and SCK pin to be RC3. You can’t change these pins because internal i2c module in the PIC16F877 uses these pins only. Also, I2C_SPEED is defined to be 100kbps. You can change this speed to your desired value. You can go up to a maximum of 400kbps speed.
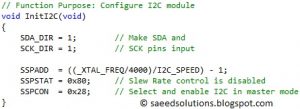
InitI2C() function code is shown below.
In InitI2C() function, firstly SDA and SCK pins are made inputs. And after that, different properties on i2c module are selected, for example, i2c speed is selected by writing SSPADD register and using SSPCON register i2c is enabled in master mode.
The code for I2C_Start() function is shown below.
In I2C_Start() function, SEN bit is set which makes the internal i2c module to send a start bit on the i2c bus. Other functions like I2C_Stop() etc are written in similar fashion.
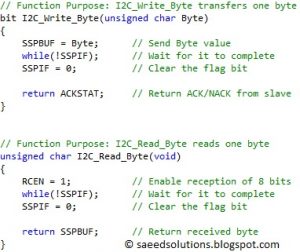
The code for I2C_Write_Byte() and I2C_Read_Byte() functions is shown below.
In I2C_Write_Byte() function, byte value is written in SSPBUF register, which is then transmitted automatically by the built in i2c module. The ACK or NACK received at the end of this byte transfer is received from the slave and returned from this function using return ACKSTAT; statement.
In I2C_Read_Byte() function, when RCEN bit is set then, 8 clock pulses are transmitted to the slave. Slave places the data on each clock pulse, this data value is saved in the SSPBUF register. This register value is returned from the function in the end. Data is received in MSB first style.
This is just an example code of how to use this i2c code library. For a more comprehensive example of how to use this i2c code library, you can check “Interfacing of PIC16F877 with (i2c based) 24LC64 EEPROM” post.
You can leave your comments and suggestions in the comment section below.
Notes and References
[1] You can read the datasheet of PIC16F877 for details.
[2] In this circuit, PIC16F877 is running at 5 MIPS speed using 20 MHz crystal.
[3] Because SDA pin is pulled up normally and when PIC16F877 is not driving it, then it will always stay high because of the pull up. That is why when there is no slave, then a value of 0xFF will be read.
[4] This is because mostly slaves generate an ACK or NACK after every byte they receive. So, I2C_Write_Byte() function is written in such a way that it transmits a byte to slave then receives ACK or NACK and returns this received bit.
[5] When there is no slave on i2c bus, then SDA pin will always stay high when PIC16F877 is not driving it. And when PIC16F877 gives a pulse on SCK pin to read ACK or NACK bit, then because SDA pin will be high then it will be interpreted as NACK.
Downloads
I2C code for PIC16F877 was compiled in MPLAB v8.85 with HI-TECH C v9.83 compiler and simulation was made in Proteus v7.10. To download code and Proteus simulation click here.
For more detail: PIC16F877 i2c code and Proteus simulation

