Summary of HOW TO PROGRAM A MICROCONTROLLER
Microcontrollers are programmable integrated circuits used to add intelligence to products. Choosing the right microcontroller depends on features like I/O pins, clock speed, and memory. Arduino is beginner-friendly with open-source tools; Texas Instruments offers power and complexity. Programming uses IDEs (editors, compilers, debuggers) and higher-level languages; code structure typically includes comments, variable declarations, setup, and loop. Compilers translate code to assembly for the MCU, and debugging uses black-box testing or IDE debuggers. Microcontrollers are versatile, cost-effective solutions for modern electronic design.
Parts used in the Microcontroller Overview Project:
- Microcontroller (general)
- Arduino board
- Texas Instruments microcontroller (example)
- LED
- USB interface for programming
- Integrated Development Environment (IDE) software
- Compiler
- Debugger
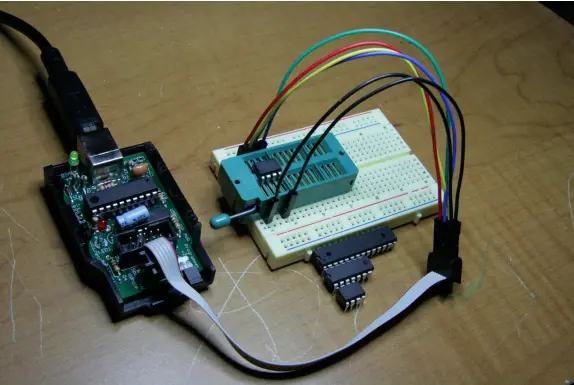
- Programming hardware for smaller MCUs (if required)
- General circuit components for testing (wiring, breadboard)
INTRODUCTION:
In the ever-changing contemporary society, technology is not only progressing rapidly but also becoming increasingly prevalent in our day-to-day existence. The emergence of “intelligent” items is significantly transforming the way we design almost every conceivable product. From shoes integrated with chips that sync with our phones to monitor our physical activity, to refrigerators that can detect the expiration of groceries, and now even self-driving cars, these modern innovations utilize microcontrollers to enhance convenience and simplify our lives.
A microcontroller is an IC (Integrated Circuit) that can be programmed to perform various functions based on its programming. There is a diverse array of microcontrollers available, each offering a wide range of capabilities. This adaptability is what renders the microcontroller a highly potent tool in contemporary design. This article will provide an overview of microcontrollers and their programming fundamentals.
SELECTING A MICROCONTROLLER:
Each brand and model of microcontroller possesses distinct features and capabilities. Therefore, when programming a microcontroller for your project, it is essential to carefully choose a model that aligns with your design’s specific requirements. People commonly seek microcontrollers with features such as I/O pins, clock frequency, and storage memory, but numerous other specifications are also available. Writing code becomes futile if the chosen hardware cannot interact effectively with your circuit as per your project’s needs.
Among both hobbyists and professionals, Arduino is a widely adopted brand of microcontroller, particularly favored by beginners. One of its key advantages is its open-source software, allowing anyone to contribute to its expanding collection of resources available to users. A quick Google search will reveal a wealth of threads, blogs, and forums offering numerous examples, documents, and tutorials on coding for various applications. The Arduino development suite used for programming is freely accessible on their official website, Arduino.cc.
Texas Instruments offers an extensive range of microcontrollers, some of which come with integrated hardware designed for specialized tasks. However, programming and utilizing these microcontrollers can be more complex. Users often need to manually configure data registers, which may entail delving into lengthy data sheets exceeding 600 pages to locate the precise line of code or variable necessary to accomplish specific objectives. In comparison to Arduino, Texas Instrument microcontrollers provide greater capabilities but demand more resources and time due to their intricacies.
Numerous other manufacturers, including Atmel, Intel, Sony, and Ubicon, also provide microcontrollers tailored for various intended applications. Conducting thorough research and gaining hands-on experience will aid you in identifying the most suitable option for your design. Additionally, there are several online resources, like http://www.instructables.com/id/How-to-choose-a-MicroController/, that can provide valuable assistance throughout the decision-making process.
PROGRAMMING:
Microcontrollers are commonly programmed using higher-level languages like C++ or Java. An integral requirement for microcontroller programming is an Integrated Development Environment (IDE). Typically designed by the microcontroller creators, an IDE comprises valuable tools to facilitate the programming process.
Within an IDE for microcontroller programming, you will find various essential tools, such as code editors, compilers, and debuggers. Additionally, depending on the specific application of the microcontroller, supplementary features may also be available.
Once you have acquired a suitable IDE, you can commence the process of writing code. For illustrative purposes, this guide will demonstrate an example using the Arduino IDE. Below is a simple Arduino program that causes an LED to blink on and off at a frequency of 1Hz. The code is divided into four distinct sections, as outlined below:
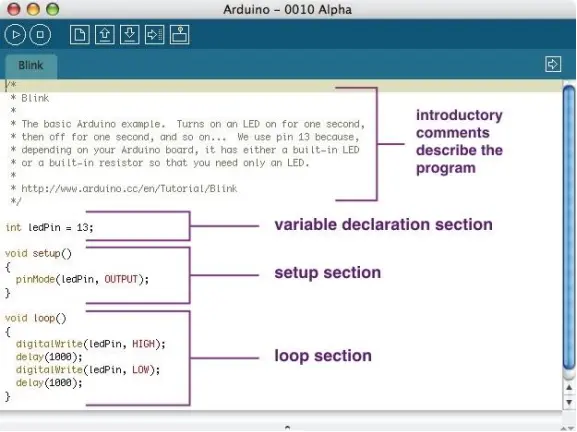
It is commonly acknowledged to initiate any code with a comment section that provides a general description of the code’s purpose and functionality. Although this section does not impact the program’s execution, documenting it is highly recommended for future reference. Additionally, user instructions, company details, and copyright information are frequently included in this section as well.
The second section involves declaring variables, which are global and can be accessed from any subsequent sections. It is customary to create variables to define the function of each pin and assign them the corresponding pin numbers on the board, enhancing the code’s readability and intuitiveness.
Next is the “Void Setup()” section. Typically, digital pins on microcontrollers serve either as inputs or outputs, with very few exceptions allowing both functionalities simultaneously. In this section, the user specifies which pins are designated as inputs or outputs and initializes any other necessary parameters. Although the specific approach may differ among various microcontrollers, most of them require a similar step to configure their internal circuitry according to the requirements of your design.
Finally, the “Void Loop()” section is where the core functionality of your microcontroller is coded. This section encompasses any operations that involve reading or writing values from pins, as well as computations involving different variables. It is the primary segment where the microcontroller performs its intended actions and tasks.
COMPILING AND UPLOADING:
This step is usually automated by the IDE. After writing your code, it needs to be uploaded to the microcontroller. Most microcontrollers come with USB interfaces for easy programming, but some smaller ones might require special hardware for programming. While we typically write code for microcontrollers in higher-level languages, the microcontroller itself runs on assembly language. To convert the code into a format understandable by the microcontroller, a compiler is used.
A compiler is a software tool that takes higher-level code and optimizes it for assembly language. Assembly language provides specific instructions to the microcontroller, guiding it on what register operations to perform to execute the original code’s operations effectively.
DEBUGGING:
Achieving flawless results on your initial attempt is not always guaranteed. Debugging plays a crucial role in any design process, and programming microcontrollers is no exception. Fortunately, there are several methods to help you identify errors in your code without excessive effort.
The most fundamental approach is to connect your microcontroller to the circuit it is designed to control. Often, you can discern issues simply by observing the output and comparing it with the intended functionality. This approach is known as black box testing. While simple and devoid of the need for additional tools, it is limited since it lacks insight into the inner workings of the microcontroller.
As mentioned earlier, most IDEs come equipped with debuggers that allow the code to be executed step-by-step, under the user’s control. These debuggers keep track of variable and register values, enabling users to pinpoint the exact point at which the program deviates from its intended behavior. This method is a form of white box testing, providing more comprehensive information that aids in deducing the root cause of a faulty program.
CONCLUSION:
Microcontrollers offer a pragmatic, cost-effective, and adaptable approach to addressing numerous challenges in circuit design and modern control systems. While specific details, such as the software utilized for programming, may differ, the underlying thought process applied to program them remains universal. Remember that abundant online resources, like those listed on the following page, are at your disposal should you seek additional information and guidance.
- What is a microcontroller?
A microcontroller is an integrated circuit that can be programmed to perform functions based on its programming. - How do I choose a microcontroller for my project?
Choose a model that matches your requirements such as I/O pins, clock frequency, and storage memory, and research manufacturers and resources. - Why is Arduino recommended for beginners?
Arduino is widely adopted, beginner-friendly, and has open-source software with abundant online resources, examples, and tutorials. - How are microcontrollers programmed?
Microcontrollers are programmed using higher-level languages like C++ or Java within an IDE that provides editors, compilers, and debuggers. - What are the main sections of an Arduino program?
The main sections are comments, variable declarations, Void Setup(), and Void Loop(). - How is code uploaded to a microcontroller?
The IDE usually automates compiling and uploading; many microcontrollers use a USB interface, while some small ones need special programming hardware. - What does a compiler do for microcontroller code?
A compiler converts higher-level code into assembly language optimized for the microcontroller's registers and operations. - How can I debug microcontroller code?
Use black box testing by observing outputs with the circuit, or use IDE debuggers to step through code and inspect variables and registers.