


Summary of How to interface keypad with PIC16F84A
This article explains how to interface a 4x4 or 4x3 keypad with a PIC16F84A microcontroller using C code in MPLAB. The system utilizes PORTB for the keypad and RA0-RA2 pins via a 4094 IC to drive an LCD, displaying pressed keys. A scanning algorithm detects inputs, and the code waits for key presses before updating the display.Parts used in the Keypad Interfacing Project:
- PIC16F84A microcontroller
- 4x4 or 4x3 Keypad
- LCD Display
- 4094 IC
- MPLAB IDE
- HI-TECH C Compiler
- Proteus Simulation Software
In this post, it is assumed that you know, how to interface LCD with PIC16F84A microcontroller by only using 3 pins. If you don't then please read this page.
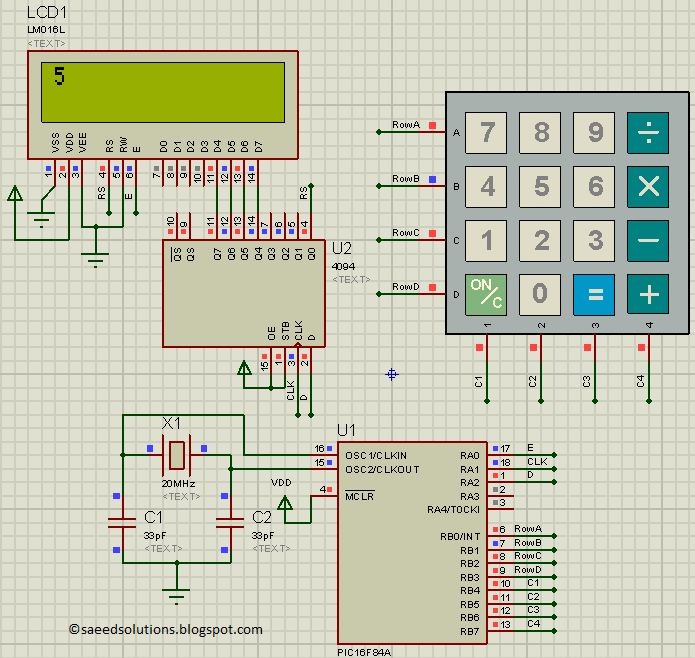
The circuit required to interface keypad with PIC16F84A[1] is shown below.
The result of simulating the code in Proteus is shown above in the figure. This code is written in such a way that when you press any key from the keypad, then the value of that key is displayed on the LCD. For example, in the above figure LCD screen is displaying '5', because this picture was taken after pressing '5' from the keypad.
In the above circuit, RA0, RA1 and RA2 pins are used to interface LCD through 4094 IC as explained in the "PIC16F84A LCD interfacing code (using 3 pins only) + Proteus simulation" post. LCD is used here just to show the pressed key value. 8 pins of PORTB are used to interface 4x4 keypad. 4 pins are used to attach columns and 4 pins are used to attach rows and scanning algorithm code is used to check for any pressed key.
Code
The main function code is shown below.
In the main function, keypad is initialized using InitKeypad() function. Then LCD is initialized using InitLCD() function. After that, in the while(1) loop, GetKey() function is used to read any pressed key value. GetKey() function is a blocking function, i-e code hangs in it until the user presses any key. After a key is pressed from the keypad, then LCD screen is cleared using ClearLCDScreen() function and the value of pressed key is displayed on the LCD screen using WriteDataToLCD() function and then again code starts to wait in the GetKey() function for the user to press another key.
The code used to initialize keypad is shown below.
Downloads
Keypad interfacing code using PIC16F84A was compiled in MPLAB v8.85 with HI-TECH C v9.83 compiler and simulation was made in Proteus v7.10. To download code and Proteus simulation click here.
For more detail: How to interface keypad with PIC16F84A
- How is the keypad initialized?
The keypad is initialized using the InitKeypad function within the main code. - Which compiler was used for this project?
The code was compiled using HI-TECH C v9.83 compiler inside MPLAB v8.85. - What happens when a key is pressed?
The value of the pressed key is displayed on the LCD screen after the screen is cleared. - Which pins are used for the LCD interface?
RA0, RA1, and RA2 pins are used to interface the LCD through a 4094 IC. - How many pins of PORTB are used for the keypad?
All 8 pins of PORTB are used, with 4 pins attached to columns and 4 to rows. - Is the GetKey function blocking?
Yes, the GetKey function is blocking and hangs the code until a user presses any key. - What software was used for simulation?
Proteus v7.10 was used to simulate the circuit and verify the code functionality. - How is the LCD updated after reading a key?
The ClearLCDScreen function clears the display followed by WriteDataToLCD to show the new value.
Related projects
PIC Stepper Motor Controller using PIC16F84A with Proteus Simulation
Introduction Stepper motors are widely used in embedded systems and DIY electronics projects where precise position control is required. This PIC Stepper...
Programmers & ICSP · PIC16F84APIC Musical Doorbell using PIC16F84A with Proteus Simulation
IntroductionThis microcontroller project demonstrates a musical doorbell built around a PIC16F84A and a simple piezo sounder.Using two push buttons, the system allows...
Beginner Tutorials · PIC16C84Exploring the World of PIC Microcontrollers: An Architectural Overview
A Peripheral Interface Microcontroller (PIC), developed by General Instruments Microcontrollers in 1993, operates under software control and is programmed to execute various...
Communication & Interfacing · PIC18F4520CAN FD Node based on a PIC18 Microcontroller
The introduction sets the stage for an embedded systems project that involves developing a Embedded C CAN FD project using the MCP2517FD...
Communication & InterfacingLAN9662 Gigabit Switch: Optimized for Industrial Ethernet
Introduction It should come as little surprise therefore that one element of what is now more commonly referred to in some circles...
Communication & InterfacingPIC Microcontroller: Fundamentals & Applications for Students
Introduction Microcontrollers are the key components in the embedded systems market. A variety of embedded systems was formed and developed after the...

Ibrar Ayyub
I am an experienced technical writer holding a Master's degree in computer science from BZU Multan, Pakistan University. With a background spanning various industries, particularly in home automation and engineering, I have honed my skills in crafting clear and concise content. Proficient in leveraging infographics and diagrams, I strive to simplify complex concepts for readers. My strength lies in thorough...