Character lcds can display character of font size 5×8 and 5×10. In 5xn, 5 represents number of coulombs and N represents number of rows. Character lcd’s especially which are controlled by Hitachi HD44780 controller can display 5×8 and 5×10 size font character. Some lcd’s can only display character in 5×8 font. In this project i am going to teach you how to display characters of font size 5×8 and 5×10 on character lcd?
If you are newbie and don’t know about internal structure of character lcd and how to interface it with microcontrollers? Than i suggest you you first take the getting started with lcd tutorial.
As you know first we have to initialize the lcd that we are using (8×1, 8×2, 8×4, 16×1, 16×2, 16×4, 20×1, 20×2, 20×4, 24×1, 24×2, 24×4, 32×1, 32×2, 40×1, 40×2, 40×4). By initialization I mean
- Should the cursor appears on lcd or not? If appearing, whether it should be blinking or normal?
- What should be the size of character-font appearing on lcd (5×8, 5×10)?
To learn about lcd initialization standard commands go through the simple tutorial below.
We are going to discuss only commands that are related to character size Font-matrix in this tutorial. To initialize character lcd we have to send commands to command-register of lcd. All the commands are 8-bit in nature. For Initializing character font size, 8-bit commands individual bits represents.
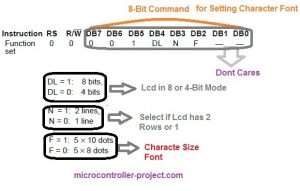
- DL selects lcd mode. 8-bit or 4-bit. Don’t know Go through the tutorial(Lcd in 4-bit and 8-bit mode)
- N selects if lcd contains 2 rows or 1.
- F selects character font size. (5×8 or 5×10)
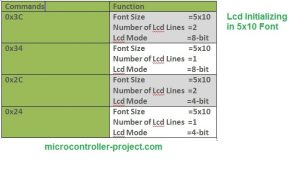
Now if I have a 16×2 lcd and i want to initialize its Character font to be 5×10 my command will be.
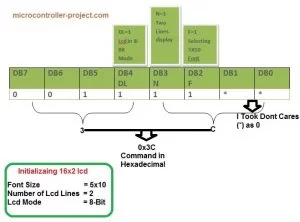
Standard Lcd Commands for 5×10 Display
Now i am going to display characters on lcd in 5×8 and 5×10 font. I am going to print it on lcd using two different microcontrollers. Microchip pic16f877 and 8051(89c51,89c52) microcontroller.
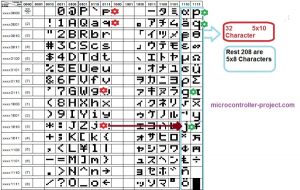
- You can display 208 characters in 5×8 font and 32 characters in 5×10 font. Total ASCII characters present in HD44780 lcd controller are 240. In which 208 are in 5×8 font and 32 are in 5×10 font.
- In CG-RAM you can create 8 custom characters at a time in 5×8 font and 4 custom characters in 5×10 font. Don’t know about CG-RAM and custom characters? Go through(CG-RAM & custom characters generation and display)
See the difference in the same characters in same row, marked against red and green star. red star represents 5×8 font size character and green represents same character with 5×10 size font. Picture taken from hd44780 controller data sheet.
Displaying 5×10, 5×8 font size Characters on character lcd Using PIC16f877 Microcontroller.
- PIC 16f877 microcontroller
- 16×2 lcd
- Potentiometer (To set Lcd Contrast)
- Crystal (20 MHz)
- Capacitors 33Pf
I am going to print/display G,J,P & Q in 5×8 and 5×10 font. These characters are present in HD44780 Controller in 5×8 and 5×10 font. I will call their addresses and they will appear/display on lcd screen.
Lcd data pins are Connected to Port-B of microcontroller. Lcd control pins (en,rs,rw) are connected to Port-D Pins#7,6,5. Rest of the connections are normal connections. Supplying power to microcontroller. Grounding GND pin. Connecting Crystal to microcontroller etc. Circuit diagram of the project is given below.
Code is written in Mp-Lab ide and high tech c compiler is used to compile the code. Pic kit-2 is used to upload the code to microcontroller.
/**************************************************
* Property of: www.microcontroller-project.com *
* Author: Usman Ali Butt *
* Created on 11 April, 2015, 2:30 PM *
**************************************************/
#include <htc.h>
#define _XTAL_FREQ 20000000
#define en RD7
#define rs RD6
#define rw RD5
void delay(unsigned int time) //Time delay function
{
unsigned int i,j;
for(i=0;i< time;i++)
for(j=0;j< 3;j++);
}
//Function for sending values to the command register of LCD
void lcdcmd(unsigned char value)
{
PORTB=value;
rs= 0; //register select-rs
rw = 0; //read-write-rd
en = 1; //enable-e
delay(50);
en=0; //enable-e
delay(50);
}
//Function for sending values to the data register of LCD
void display(unsigned char value)
{
PORTB=value;
rs= 1; //register select-rs
rw= 0; //read-write-rd
en= 1; //enable-e
delay(500);
en=0; //enable-e
delay(50);
}
//function to initialize the registers and pins of LCD
//always use with every lcd of hitachi
void lcdint(void)
{
TRISB=0x00; //Port B is used as output port-connected to lcd
TRISD5=0; //Lcd controlling pins
TRISD6=0; //Lcd controlling pins
TRISD7=0; //Lcd controlling pins
delay(15000);
display(0x30);
delay(4500);
display(0x30);
delay(300);
display(0x30);
delay(650);
lcdcmd(0x3C); //5×10 Font Selected
delay(50);
lcdcmd(0x0C); //Display on Cursor off
delay(50);
lcdcmd(0x01); //Clear Lcd
delay(50);
lcdcmd(0x06); //Entry Mode, Increment Cursor Automatically
delay(50);
lcdcmd(0x80); //Control set at Lcd 1 Row, 1 Coulomb
delay(50);
}
void main()
{
lcdint(); //Initialize Lcd
display(0xea);//Display 5×10 J
display(0x6a);//Display 5×8 j
display(‘ ‘);
display(0x67);//Display 5×8 g
display(0xe7);//Display 5×10 G
display(‘ ‘);
lcdcmd(0xC0);
display(0x70);//Display 5×8 p
display(0xf0);//Display 5×10 P
display(‘ ‘);
display(0x71);//Display 5×8 q
display(0xf1);//Display 5×10 Q
while(1);
}
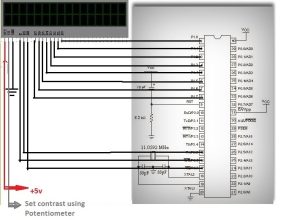
Displaying 5×10, 5×8 Characters on 16×2 lcd Using 8051(89c51, 89c52) Microcontroller.
- 8051(89c51,89c52) series microcontroller
- 16×2 lcd
- Potentiometer (To set Lcd Contrast)
- Crystal (11.0592 MHz)
- Capacitors 33Pf
Lcd data pins are connected to Port-1 of microcontroller. Lcd controlling pins en,rs,rw are connected to Port-3 pins#5,6,7. Circuit diagram of the project is given below.
Code is almost same like of the pic microcontroller. Only the syntax of the code is changed. Code is written in keil u-vision ide.
/**************************************************
* Property of: www.microcontroller-project.com *
* Author: Usman Ali Butt *
* Created on 13 April, 2015, 2:30 PM *
**************************************************/
#include<reg51.h>
sbit rs=P3^5; //Register select (RS)
sbit rw=P3^7; //Read write (RW) pin
sbit en=P3^6; //Enable (EN) pin
void delay(unsigned int time) //Time delay function
{
unsigned int i,j;
for(i=0;i< time;i++)
for(j=0;j< 5;j++);
}
//Function for sending values to the command register of LCD
void lcdcmd(unsigned char value)
{
P1=value;
P3=0x40;
delay(50);
en=0;
delay(50);
return;
}
//Function for sending values to the data register of LCD
void display(unsigned char value)
{
P1=value;
P3=0x60;
delay(500);
en=0;
delay(50);
return;
}
//function to initialize the registers and pins of LCD
//always use with every lcd of hitachi
void lcdint(void)
{
P1=0x00; //Port-1 as output
P3=0x00; //Port-3 as output
delay(15000);
display(0x30);
delay(4500);
display(0x30);
delay(300);
display(0x30);
delay(650);
lcdcmd(0x3C); //5×10 Font Selected
delay(50);
lcdcmd(0x0C); //Display on Cursor off
delay(50);
lcdcmd(0x01); //Clear Lcd
delay(50);
lcdcmd(0x06); //Entry Mode, Increment Cursor Automatically
delay(50);
lcdcmd(0x80); //Control set at Lcd 1 Row, 1 Coulomb
delay(50);
}
//MAIN FUNCTION
void main()
{
lcdint(); //Initialize Lcd
display(0xea);//Display 5×10 J
display(0x6a);//Display 5×8 j
display(‘ ‘);
display(0x67);//Display 5×8 g
display(0xe7);//Display 5×10 G
display(‘ ‘);
lcdcmd(0xC0);
display(0x70);//Display 5×8 p
display(0xf0);//Display 5×10 P
display(‘ ‘);
display(0x71);//Display 5×8 q
display(0xf1);//Display 5×10 Q
while(1);
}
Source: How to display 5×8 and 5×10 size font characters on 16×2 lcd with 8-bit microcontrollers
About The Author
Muhammad Bilal
I am a highly skilled and motivated individual with a Master's degree in Computer Science. I have extensive experience in technical writing and a deep understanding of SEO practices.