In this project, we will be making a mini weather station that measures temperature and humidity and transmits them wirelessly to a ground station, which displays the readings on an LCD display!
It’s a fairly easy project and can be used either on its own or part of something bigger.
Step 1: List of materials
For this project, we will be using:
– RF 433 transmitter/receiver module cost: ~2.00 USD
– DHT11 Humidity and temperature sensor cost: ~5.00 USD
– Two Arduino boards
– 16×2 LCD display HD44780 equivalent cost: ~2.00 USD
– 10k linear potentiometer cost: ~1.00 USD
– Jumper wires
– Two breadboards
 About the RX433.
This module can make an open air connection up to 500m, depending on the voltage you power it with (operating voltage range: 3.5-12V) and the length of the antenna you provide. Here, 5V are used from the Arduino board to power the RF433. For an antenna, you can solder a simple single-strand wire, like the one you see on the various pictures, which is about 17.2cm long. Depending on the frequency of your model, you should find out the appropriate length for the antenna.
You can calculate it on a website like this: http://www.qsl.net /kd4sai/antencal.html. But if you use a 433MHz transmitter, 17.2cm is the correct antenna length.
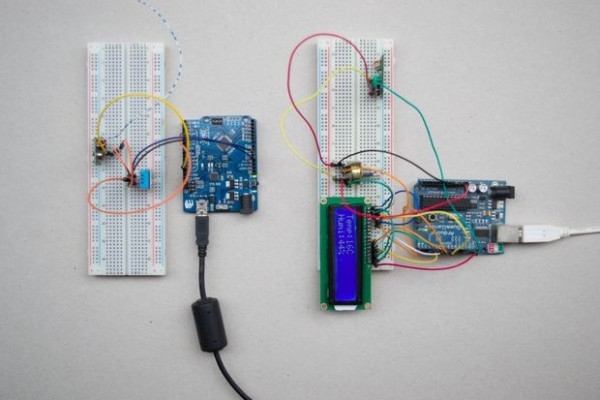
Step 2: Hardware connections
In general, the connections are very simple. Follow the instructions and images above, and you should have no problems.
Transmitter Side:
Connecting DHT11
Connect:
– the VCC pin on Arduino’s 5V output
– the GND pin to Arduino’s GND and
– the DATA pin to Arduino’s digital pin 4
Connecting RF433 transmitter
Connect:
– the VCC pin on Arduino’s 5V output
– the GND pin to Arduino’s GND and
– the DATA pin to Arduino’s digital pin 12
Receiver Side:
Connecting RF433 receiver
Connect:
– the VCC pin to 5V on Arduino
– the GND pin to Arduino’s GND and
– the DATA pin to Arduino’s digital pin 11
Note: one of the pins will not be connected anywhere.
Connecting the LCD display
To properly connect the LCD display, you will need to connect the following:
– LCD VCC pin to 5V pin
– LCD GND pin to GND pin
– LCD RS pin to digital pin 12
– LCD Enable pin to digital pin 11
– LCD D4 pin to digital pin 5
– LCD D5 pin to digital pin 4
– LCD D6 pin to digital pin 3
– LCD D7 pin to digital pin 2
Connecting the potentiometer
Connect:
– one of the outer pins to Arduino’s 5V output
– the opposite outer pin to Arduino’s GND and
– the middle pin to LCD’s VO
The potentiometer is used to control the LCD’s contrast, so you should fiddle with the pot a bit, when powered up, to find that sweet spot!
Once you have connected everything, it should look something like in the image.
For more detail: Mini weather station