The flashing LED is a tried and tested way of getting your board working, but it is somewhat tired as well. Since we have been supplying the proto shield with the blueberry purchases I thought it would be a good idea to do something different with the traditional “Hello World” project.
This project is intended for the DEVC-V18, however the code can be applied to any product in the DEVCC range.
See this instructable on our site www.zardynamix.com
Step 1: BluBerry / DEVCC Hello World
Hardware first
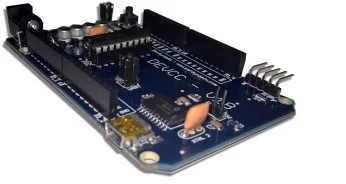
For the purposes of expedience I am going to assume that you have assembled the ProtoShield. As shown in the images, the shield includes two LEDs which can be connected to the relevant ports.
Insert the DEVCC Proto-Shield to the DEVCC V18Connect RB1 to 4Connect RB0 to 2
Code for ‘Hello World’
The hello world project is typically a flashing led, the interval is set so a timer is used to toggle the on / off state of the led. There are a number of ways to set and clear the LED and they are discussed below.
The simplest is to Set the output on so that the LED illuminates, start the timer and wait for the timer to count down. Clear the output and then wait for the timer to run again and when the timer has expired restart the process.
The idea is to produce a square output wave of 50% duty cycle, so that you have a uniform on / off state. The second way which requires a little more programming know how is to XOR (Exclusive Or) the output so that it toggles. The advantage here is fewer lines of code, which makes it more intuitive and easier to read
The LED will have two states either on or off 0 or 1. When the LED is 0 XOR with 1, then the LED changes state to 1 or on. When the LED is on or 1 XOR with 1 it toggles to 0.
In code you would have the following:
flash(){
PORTB.B0 = PORTB.B0~1;
Delay_MS(500); // 1 Second pulse, i.e. half second on and half second off
}
while(1){
Flash();
}
In other words [New LED State] = [Current LED State] XOR 1. The operation automatically writes the value back to the pin.
You will notice that the proto shield has two LEDs, so our next step is to get them to toggle alternately. We will modify the code provided above to include a second output. I have selected PORTB.B1 as the second output, but this is set to 1 i.e. it’s on when the PIC starts up whereas PORTB.B0 is off. When the code cycles the two LEDs will be illuminated alternately.
// Toggles LEDs
flash(){
PORTB.B0 = PORTB.B0~1;
PORTB.B1 = PORTB.B1~1;
Delay_MS(500); // 1 Second pulse, i.e. half second on and half second off
}
// Sets up device
startup(){
ANSELB = 0x00; // Sets all inputs to Digital
TRISB = 0xFC; // Sets
PORTB = 0x0; // Clears all outputs to ‘0’
PORTB.B1 = 1; // Sets bit 1 to high
}
// Main program
Void main(){
startup();
while(1){
flash();
}
}
Analysis and Quirks
The information presented is to assist in trouble shooting and understanding how things work.
Analogue Inputs
The newer PICs have multiplexed many features with the same PIN. One of the simplest of these is where a digital PIN shares the same location as an analogue input. By default, when the PIC starts up, the analogue peripheral functionality shared with the pin is by default available and takes precedence over the digital functionality. Owing to this if you have no use for the analogue inputs, they need to be disabled. This is done by writing to the ANSELX register. Replace the X for the port for example PORT B which is ANSELB.
Unless the ANSELB or ANSELX registers have been configured, where applicable you may experience results where the PORT does not respond as expected. Ensure that the ANSELx registers have been configured correctly.
Rounding Off
The project described here demonstrates an alternate way of ‘testing’ that your PCB is working. It’s a great tutorial type project to come to grips with a few aspects of using PICs. The code samples can be used to flash a single or multiple LEDs as your project expands, just add or remove pins from your code.
Source: DEVCC Hello World