
Summary of Alarm Clock Retrofit using PIC16F877
Summary: The author replaced an old alarm clock's original chip with a PIC16F877 microcontroller to add clearer alarm indication, one-touch radio, a true one-day-off alarm toggle, 4-digit alarm-time display, 3-way toggle for radio/arm/off, hour/minute buttons (reused switches), 5-minute increment alarm setting, and no AM/PM to avoid setting errors.
Parts used in the Alarm Clock Retrofit:
- PIC16F877 microcontroller
- Old alarm clock chassis with radio and speaker
- Second 4-digit display for alarm time
- 3-way toggle switch (new)
- Two salvaged pushbutton switches (hours and minutes)
- Rewired power and alarm circuitry
- Wiring and connectors
- Mounting hardware and insulation materials
I had some beef with my (very) old alarm clock. It had a radio which was nice to wake up to, but two problems:
1) I would be in bed and think “Wait, did I set the alarm?” I would have to get up, turn on the light and look at the position of the tiny black sliding switch.
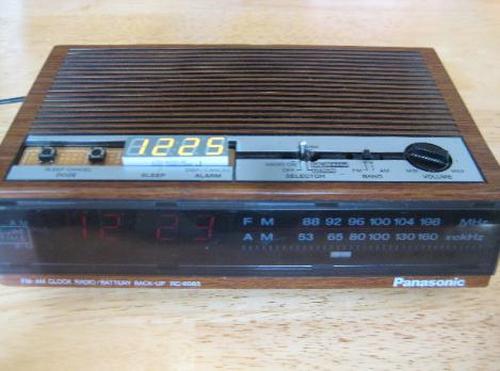
2) When I wake up in the morning and turn off the alarm, it’s still set to go off the next morning. When I started this project I had a roommate. I would wake up 5AM on Monday and take off on a business trip. 5AM Tuesday it would go off again. Too bad for him!
I decided to retrofit it, ripping out the chip that runs the show, replacing it with a microcontroller I could program
as I liked. All in all, it was an awful lot of work, but it feels good to have it work my way.
There’s a second 4-digit display on top that shows the alarm time. If this is lit, the alarm is set. You can tell at a glance whether it’s set.
Turning it off in the morning turns it off for tomorrow as well. I find it a lot easier to think of what time I want to get up tomorrow as I go to bed, rather than when I wake up.
I added a new 3-way toggle switch on top. Pulling it to the right turns on the radio to listen right now. Clicking it to the left once makes the alarm active (and the top display goes on), pushing it left again turns it off. Two of the switches that I salvaged from inside I reattached to the left of the display to set the hours and the minutes. If the alarm is set, these buttons change the alarm time, if not, they set the clock time.
The alarm time increments in steps of 5 minutes, since I never need to wake up at 6:03. Another somewhat unique feature is that there’s no AM or PM. This saves me from setting it wrong and it would only be a problem if I wanted to sleep for more than 12 hours!
For more detail: Alarm Clock Retrofit using PIC16F877
- What was the main motivation for retrofitting the alarm clock?
The author wanted visible confirmation the alarm was set and to prevent the alarm from remaining active the next day after being turned off. - What microcontroller was used to replace the original chip?
The PIC16F877 was used. - How can you tell if the alarm is set after the retrofit?
The second 4-digit display on top lights up when the alarm is set. - How does turning off the alarm in the morning affect the next day?
Turning it off in the morning also turns the alarm off for tomorrow. - How are the hours and minutes adjusted?
Two salvaged switches to the left of the display are used to set hours and minutes; they set alarm time if alarm is active, otherwise they set clock time. - What does the new 3-way toggle switch do?
Pulling it right turns on the radio to listen now; clicking left once makes the alarm active and lights the top display; pushing left again turns it off. - How precise is the alarm-time increment?
The alarm time increments in steps of five minutes. - Is there an AM/PM indicator after the retrofit?
No, the retrofit omits AM and PM so times are on a 12-hour basis without AM/PM distinction.
