Summary of 4TH FLOOR ELEVATOR CONTROL CIRCUIT PIC16F877
This article details a high school project: a 4-story elevator control system using a PIC16F877 microcontroller. The design includes floor displays, cabin indicators, recall buttons, and busy LEDs. It features cascaded circuit cards connected by thin flat cables to accommodate the moving cabin, powered by a low-speed geared motor with relay-based direction control. Reed switches detect the elevator's position at each floor, while an MDF frame houses the model.
Parts used in the 4th Floor Elevator Control Circuit:
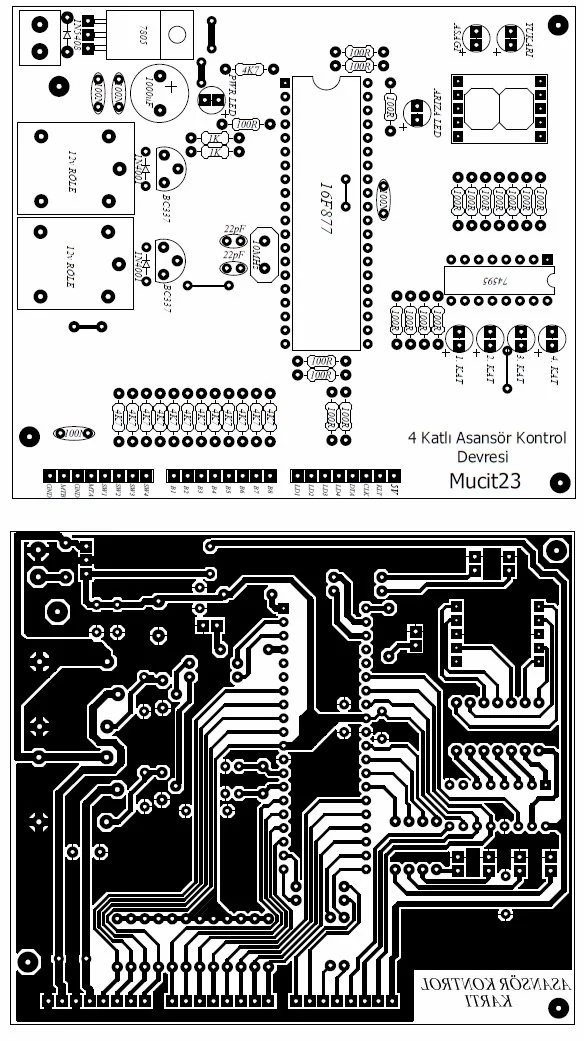
- PIC16F877 microcontroller
- Low-speed geared motor
- Relay direction control (two pieces)
- Magnetic switches (Reed Switches)
- Thin flat cable
- LEDs for display and status
- MDF material for the model frame
- Circuit cards for each floor
Hello Friends . In high school I have done an elevator control circuit I want to share with you . I’ve designed a 4-story elevator . What floor is the elevator on each floor,... Electronics Projects, 4th Floor Elevator Control Circuit PIC16F877 “microchip projects, microcontroller projects, pic16f877 projects, “

Hello Friends .
In high school I have done an elevator control circuit I want to share with you . I’ve designed a 4-story elevator . What floor is the elevator on each floor, a display showing that , Recall button , and the LED are busy . Likewise in the display in the cabin , which was on the floor , one for each floor indicating LEDs and buttons are available. There are olarakda PIC16F877 microcontroller .
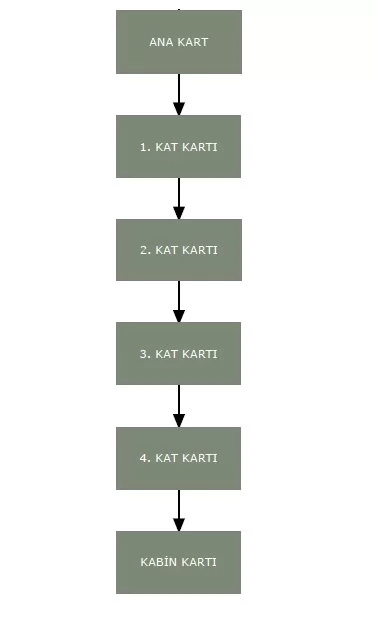
All cards must be cascaded together . So each separate cable from the motherboard is not going to fold . Instead card cables from the motherboard 1st Floor , 1st Floor 2nd Floor card from a card I made to enter . The most recent 4th Floor card will be attached to the card in the cabinet .. Camping is moving cab card for the connection between the 4th Floor card I made with thin flat cable . Cable is flexible up and down the cabin is important for comfortable movement . Cables quite a few more . To get rid of cable clutter I would advise you to keep the cables as thin as possible . 🙂
Tickets must be inter- connections in the following order form .
Move up and down the lift motor may be any low-speed geared motor is. The main card is made with two pieces of relay direction control.
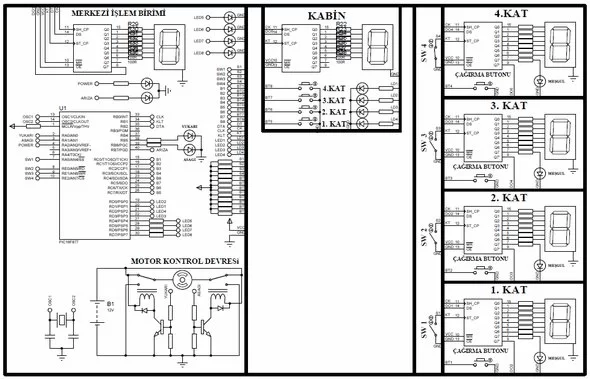
Before I forget, let me tell in the presentation. Each floor has one magnetic switch ( Reed Switch ) is necessary to add. This magnetic key card to the links located on each floor needs to be done. On the cabin to prevent the movement if you place a small magnet when faced with the cabin amnyetik switch circuit that we understand what floor.
Elevator is a model I’ve made with MDF.
All I have to say. Circuit is definitely working. Especially pay attention to the cable connection. You soldered a wire in the wrong place can cause grief for hours.
Source: 4TH FLOOR ELEVATOR CONTROL CIRCUIT PIC16F877 all files: 4th-floor-elevator-control-circuit-pic16f877.RAR
- What microcontroller is used in this project?
The project uses a PIC16F877 microcontroller. - How does the system determine which floor the elevator is on?
Each floor has a magnetic switch or Reed Switch that detects when a magnet on the cabin passes by. - Can any type of motor be used for the lift?
A low-speed geared motor can be used to move the lift up and down. - How are the circuit cards connected between floors?
All cards must be cascaded together using thin flat cables rather than individual cables from the motherboard. - What material was used to build the elevator model?
The elevator model was made with MDF. - What components indicate the elevator's status?
The system includes LEDs for displaying the current floor, indicating available buttons, and showing when the elevator is busy. - Why is it important to use thin flat cables?
Thin flat cables are necessary to prevent clutter and allow comfortable movement of the cabin up and down. - What happens if a wire is soldered in the wrong place?
Soldering a wire in the wrong place can cause significant issues and waste hours troubleshooting.