In this tutorial i am going to print/display ASCII characters on 16×2 lcd using pic16f877 microcontroller. Lcd is interfaced with pic microcontroller in 8-bit mode. Code is written in c language. High tech c compiler is used to compile code and code is written in Mp-lab ide. Interfacing 16×2 lcd with pic microcontroller and displaying characters on lcd is very easy. Only the portion which is little bit complex is how to generate/display ASCII characters on lcd. Well you don’t need to generate ASCII characters they are already present in the 16×2 lcd controller (HD44780) Ram, like other characters and numbers. You just need to know how to invoke the ASCII characters to be displayed on the lcd screen.
Project Requirements
- Microchip Pic16f877 microcontroller.
- 16×2 character lcd.
- Crystal 20MHz
- Power Supply
- Bread board or Design PCB(Printed circuit board)
- Potentiometer/Variable resistor (For setting lcd contrast)
If you are new in the field of microcontrollers and lcd’s and don’t know about lcd pin out, working and internal structure of lcd then please go through the following tutorials. They will clear you about the working of 16×2 lcd. You will learn how to display characters on lcd? Difference between commands and data send to lcd? It will also explain you about how to use lcd in 4-bit and 8-bit mode.
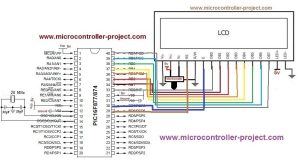
The circuit diagram of the project is given below. Port-B of Pic16f877 microcontroller is connected with data pins of 16×2 lcd. It means Port-B is used to send commands and data to 16×2 lcd. Lcd control signals(read/write, enable, register select) are provided using individual bits of Port-D. All the other connections are normal connections applying +5 volts to microcontroller and lcd. You can see the circuit diagram given below. Rs(Register select) is connected to Port-D Pin#6. En(Enable) is connected to Port-D Pin#7. Read/Write pin is grounded. Lcd will always remain in write state since we made the R/W pin ground.
Project Code
Coming to the code portion, I first include the header file htc.h. If you are using high tech c compiler always include this library, this library is necessary to be included in every project that is going to be compiled with high tech c compiler. It contains the compilers directives etc. Then the frequency of the oscillator is defined which is 20 MHz. Then individual pins of Port-D are defined. These pins are used to provide control signals to lcd. delay() function is used to generate some arbitrary delay where necessary. lcdcmd() function is sending commands to lcd with control signals. display() function is sending data to lcd with control signals. lcdint() function is initializing our lcd(8-bit mode, display on ,cursor off etc).
Important Instruction
In the main function two instructions are invoking ascii characters. The instruction i=j/10; where j is integer(int) and i is character(char). Now when we divide two integers and save result in character(char) variable. The result is stored in ascii format. Since j is 0 and dividing 0 by 10 gives 0. So i contains 0, ASCII value of zero.
The ascii character 0 is present at address 0x30. To go to address 0x00 negate 0x30 from 0x30. The instruction i=i-0x30; is doing the same job. First i contains 0x30 after executing i=i-0x30 i contains 0x00. Hence we are at starting address of ascii characters. Now increment the address one by one and display the ascii character associated with that address on the lcd screen.
Note that the ascii characters of the HD44780 controller differs from the standard ascii characters. The HD44780 controller contains ascii characters in the format given on the right side. Some addresses are also void. So don’t get confused when you see the characters like below displayed on your lcd screen.
Total digits in ram of 16×2 lcd are 256. So i decided to display them all. It contains ASCII, numeric, alphabet and special characters(Chinese). Some address are void so nothing will display on the lcd screen across these addresses.
| #include <htc.h> | |
| #define _XTAL_FREQ 20000000 //Oscillator frequency | |
| #define en RD7 //Lcd Controlling Pins | |
| #define rs RD6 | |
| #define rw RD5 | |
| void delay(unsigned int time) //Time delay function | |
| { | |
| unsigned int i,j; | |
| for(i=0;i< time;i++) | |
| for(j=0;j< 5;j++); | |
| } | |
| //Function for sending values to the command register of LCD | |
| void lcdcmd(unsigned char value) | |
| { | |
| PORTB=value; | |
| rs= 0; //register select-rs | |
| rw = 0; //read-write-rd | |
| en = 1; //enable-e | |
| delay(50); | |
| en=0; //enable-e | |
| delay(50); | |
| } | |
| //Function for sending values to the data register of LCD | |
| void display(unsigned char value) | |
| { | |
| PORTB=value; | |
| rs= 1; //register select-rs | |
| rw= 0; //read-write-rd | |
| en= 1; //enable-e | |
| delay(500); | |
| en=0; //enable-e | |
| delay(50); | |
| } | |
| //function to initialize the registers and pins of LCD | |
| //always use with every lcd of hitachi | |
| void lcdint(void) | |
| { | |
| TRISB=0x00; //Port 1 is used as output port | |
| TRISD5=0; //Lcd Controlling pins as output | |
| TRISD6=0; | |
| TRISD7=0; | |
| delay(15000); | |
| display(0x30); | |
| delay(4500); | |
| display(0x30); | |
| delay(300); | |
| display(0x30); | |
| delay(650); | |
| lcdcmd(0x38); | |
| delay(50); | |
| lcdcmd(0x0C); | |
| delay(50); | |
| lcdcmd(0x01); | |
| delay(50); | |
| lcdcmd(0x06); | |
| delay(50); | |
| lcdcmd(0x80); | |
| delay(50); | |
| } | |
| void main() | |
| { | |
| char i; | |
| unsigned int j,k; | |
| j=0;k=0; | |
| i=j/10; | |
| i=i-0x30; | |
| lcdint(); | |
| while(j!=255){ | |
| display(i); | |
| j++;i++;k++; | |
| if(k==15){ //Displaying characters on first line of lcd | |
| lcdcmd(0xC0); | |
| } | |
| if(k==31){ //Displaying characters on second line of lcd | |
| lcdcmd(0x80); | |
| k=0; | |
| lcdcmd(0x01); //Clear Lcd | |
| } | |
| delay(12000); | |
| }//End While | |
| } |
Download the project files , code and simulation. The code is written in c language using Mp-lab software and high tech c compiler. The simulation is made in proteaus 8.0. Please give us your feed back on the project.