Summary of MultiKey – One Wire Keypad
This article describes a simple serial keypad project using a Microchip 16F88 microcontroller. Unlike traditional matrix keypads requiring seven pins, this design uses only one data wire plus ground to support up to 12 buttons. It features a setup mode for adjusting output rates and can interface with computers via RS232 software to generate keystrokes. The project is ideal for beginners and small microcontrollers due to its minimal pin usage.
Parts used in the MultiKey – One Wire Keypad:
- 10K ohm resistors (R1-R6, R8-R14)
- 1K ohm resistor (R7)
- 10uF capacitor (C1)
- SMD green or red LED (Led1)
- Microchip 16F88 microcontroller (IC1)
- Push buttons (S1-S12)
- Box
- DB9 connector
- PCB
- Hex program for the microcontroller
Introduction
This is a simple and easy to make serial keypad. The microcontroller will output the number of the push button pressed.
This project can be used for many different purposes. Probably the most used application would be to interface to any electronic project that requires a keypad. There are several ready made keypads on the market, but those work with matrix connections and require 7 pins for a 12 button pad. For new programmers, matrix keypads can be a bit tricky to program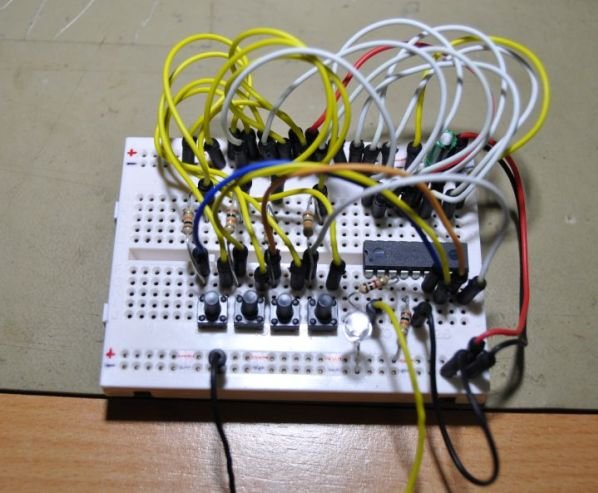
My circuit can use from 4 up to 12 push buttons with only one wire connection ( plus ground pin ) making possible to use a small microcontroller like an 8 pin to use this keypad. It’s also built in a setup mode where it’s possible to change the key output rate. This setting is saved in the microcontroller’s memory.
Another use for this is to, for example, connect to the computer and use it to control applications or even games.
Using any RS232 to keyboard software it’s possible to assign the input signals and convert them to keystrokes.
Schematic
The schematic shown bellow is for the 5 button version.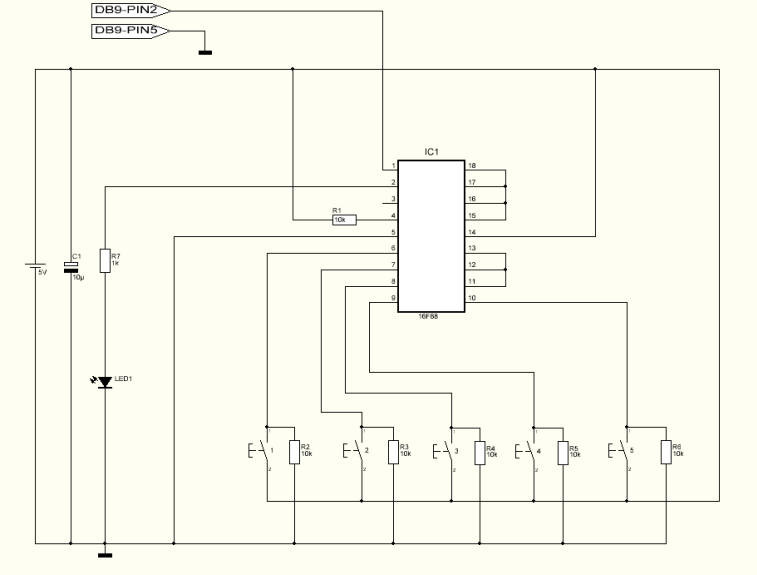
Notice that pins 11,12,13,15,16,17 and 18 are connected to ground. For each button added just remove the ground connection and connect the pin to a push button and add the resistor the same way as the first buttons.
Parts List
R1 10K ohms resistor
R2 10K ohms resistor
R3 10K ohms resistor
R4 10K ohms resistor
R5 10K ohms resistor
R6 10K ohms resistor
R7 1K ohms resistor
C1 10uF capacitor
Led1 SMD green or red led
IC1 16F88 microcontroller from Microchip
S1 Push button
S2 Push button
S3 Push button
S4 Push button
S5 Push button
Others:
Box
DB9 connector
PCB
Hex program for the microcontroller
For 12 push button version:
R8 10K ohms resistor
R9 10K ohms resistor
R10 10K ohms resistor
R11 10K ohms resistor
R12 10K ohms resistor
R13 10K ohms resistor
R14 10K ohms resistor
S6 Push button
S7 Push button
S8 Push button
S9 Push button
S10 Push button
S11 Push button
S12 Push button
For more detail: MultiKey – One Wire Keypad
- How many wires does this keypad require?
The circuit uses only one wire connection plus a ground pin. - Can I use an 8 pin microcontroller for this project?
Yes, the design allows the use of a small 8 pin microcontroller. - What is the maximum number of push buttons supported?
The system supports from 4 up to 12 push buttons. - How do I change the key output rate?
You must enter the built-in setup mode to change the setting, which is then saved in memory. - Can this device be connected to a computer?
Yes, it can connect to a computer to control applications or games. - How are input signals converted to keystrokes?
Using any RS232 to keyboard software allows you to assign input signals and convert them to keystrokes. - What makes this easier than matrix keypads for new programmers?
Traditional matrix keypads require 7 pins for a 12 button pad and are trickier to program. - What happens if I add more buttons beyond five?
To add buttons, remove the ground connection from specific pins and connect them to a push button with a resistor.