Summary of I2S USB MICROPHONE USING STM32 AND MEMS MICROPHONE
Virtual desktops separate the desktop environment from physical devices, enabling remote work. Andy Brown experienced audio frequency mismatch on his Citrix-hosted VDI (sounding like Mickey Mouse) and needed admin access to change VDI frequency. He opted to build an I²S USB microphone, considering two approaches: (1) a partly analog design using a MEMS microphone with amplification, conditioning, ADC, and digital processing before USB output, and (2) an all-digital implementation. The partly analog method has limited accuracy due to component tolerances.
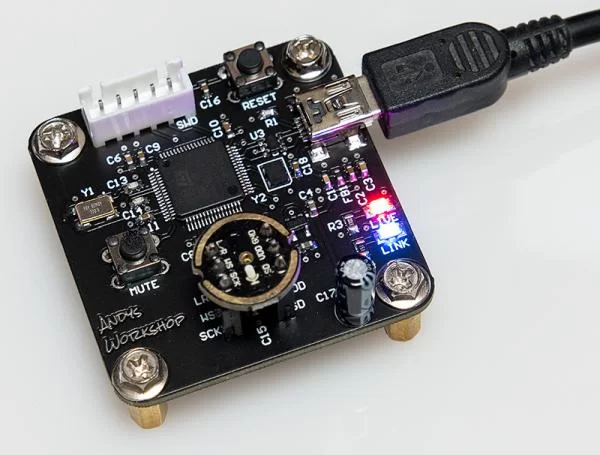
Parts used in the I²S USB Microphone project:
- MEMS analog microphone
- Microphone preamplifier / amplifier
- Signal conditioning components (filters, biasing resistors, capacitors)
- Analog-to-digital converter (ADC)
- Digital signal processing stage (microcontroller or DSP)
- USB audio interface / USB transceiver
- Power supply components
- Interconnects and PCB
Virtual desktops are used extensively in the IT sector currently due to the COVID-19 pandemic. This set-up allows the employees to work remotely and is convenient. Virtual desktops are preconfigured images of operating systems and applications in which the desktop environment is separated from the physical device used to access it.
Users can access their virtual desktops remotely over a network. Andy Brown found a problem while joining meetings in his company’s Citrix-hosted virtual desktop, he observed that the video was fine but the audio frequency on the VDI was mismatched to the actual frequency on the physical device. He described that he sounded like Mickey Mouse on Helium.
The solution to this mismatch in frequency is changing the frequency on the VDI that requires administrator-level access. Andy tried installing a microphone app on his phone that acts as a USB microphone when connected to a computer. But he needed a dedicated USB microphone and so he decided to build an I²S USB microphone. He came up with two possible implementation approaches. The first approach is partly analog and partly digital microphone circuits. The second method is to design with all digital components and techniques.
First Method: Partly Analog USB Microphone
In this method, an analog MEMS microphone is used as a transducer. The signal from the microphone will be then amplified and conditioned. Next, the ADC will convert them into digital signals. This stage is necessary for performing digital signal processing. In analog signal processing, a high level of accuracy can’t be achieved as the accuracy depends on the tolerances circuit components. After processing, the signal is ready to go to the USB audio output.
Read more: I2S USB MICROPHONE USING STM32 AND MEMS MICROPHONE
- What problem did Andy Brown encounter with his Citrix-hosted virtual desktop?
He experienced an audio frequency mismatch where his voice sounded like Mickey Mouse on Helium. - Why couldn't Andy simply change the frequency on the VDI?
Changing the frequency on the VDI requires administrator-level access. - What solution did Andy decide to build?
He decided to build an I²S USB microphone. - What are the two implementation approaches Andy considered?
One approach is partly analog and partly digital, and the other is an all-digital design. - What components are used in the partly analog USB microphone method?
An analog MEMS microphone, amplifier and conditioning circuitry, an ADC, digital signal processing, and USB audio output are used. - Why is analog signal processing limited in accuracy in the described design?
Because its accuracy depends on the tolerances of circuit components.