
Summary of Frankenbear Synthamajig using PIC16F877 microcontroller
Frankenbear Synthamajig is a USB-powered teddy bear instrument that looks like Frankenstein and plays synthesized sounds via a PIC16F877 microcontroller. The project converts a bicycle safety flasher into chest buttons, installs a small speaker and LM386 amplifier, and mounts components on a PCB inside a gutted teddy bear. The guide covers disassembling and deactivating the flasher, rewiring LEDs and power, preparing the bear by removing stuffing, and assembling electronics to create a novelty musical plush instrument.
Parts used in the Frankenbear Synthamajig:
- Small white teddy bear (preferably with red bow)
- USB cable
- Bicycle safety flasher
- Small speaker
- PIC16F877 micro-processor
- 20MHZ ceramic resonator
- LM386 audio amplifier
- 40 pin socket
- 8 pin socket
- PCB (cut to size of teddy bear)
- 2 - 10K potentiometers (preferably with knob)
- 2 - red knobs
- 2 - 0.1uF ceramic disk capacitors
- 1 - 0.022uF ceramic disk capacitor
- 1 - 330uF electrolytic capacitor
- 1 - 10uF electrolytic capacitor
- 1 - 0.1uF polyester film capacitor
- 2 - 220 ohm resistors
- 1 - 10K resistor
- 1 - 330 ohms resistor
- 1 - Spool red thread to match bear
- 1 - Role of electrical tape
- 1 - Red and black 22 AWG wire
Frankenbear Synthamajig
Look no farther, you have found it!
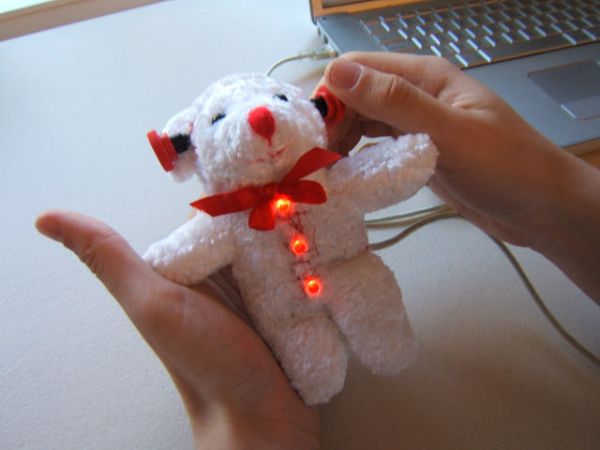
Now you can perform the nights away with your new USB-Powered teddy bear instrument. Yay!
 bear1.MOV
Go get stuff.
1 – Small white teddy bear (preferably with red bow)
1 – USB cable
1 – Bicycle safety flasher
1 – Small speaker
1 – PIC16F877 micro-processor
1 – 20MHZ ceramic resonator
1 – LM386 audio amplifier
1 – 40 pin socket
1 – 8 pin socket
1 – PCB (cut to size of teddy bear)
2 – 10K potentiometers (preferably with knob)
2 – red knobs (available at Home Depot)
2 – 0.1uF ceramic disk capacitors
1 – 0.022uF ceramic disk capacitor
1 – 330uF electrolytic capacitor
1 – 10uF electrolytic capacitor
1 – 0.1uF polyester film capacitor
2 – 220 ohm resistors
1 – 10K resistor
1 – 330 ohms resistor
1 – Spool red thread to match bear
1 – Role of electrical tape
1 – Red and black 22 AWG wire
Tools:
– PIC programmer
– Exacto knife or razor blade
– Soldering iron
– Hot glue gun
– Sewing needle
– Wire cutter
– Needle nose pliers
– Drill (possibly)
– Small philips head screwdriver (possibly)
Disassemble and carefully destroy the flasher.
The first thing we’re going to do is open up the flasher and remove the circuit board. This should be easy.
Next, we are going to deactivate the flasher.
The flashing feature is deactivated because I simply didn’t want it to blink. If you want to keep yours blinking, remove the button and solder a wire to each terminal where the button used to be on the board (and then skip the rest of this step as well as the next).
If you want to keep yours from flashing, go get your drill. Determine where the chip is on the board. It probably will look like a black dot, which is really a protective coating to keep people from tampering with it (see secondary picture below). Locate the dot and then drill through it until it is gone. This hole should also be enough of a precaution to break all unnecessary wiring connections.
Rewire the LED flasher.
Gut the bear.
Once the back of the neck is open then you can pull out all of the stuffing from the bear’s head and stomach. To aid in re-stuffing later, leave in the stuffing in the arms and feet.
There is something strangely rewarding about unstuffing the bear.
- What is Frankenbear Synthamajig?
It is a USB-powered teddy bear instrument built with a PIC16F877 that makes synthesized sounds and uses a bicycle safety flasher as chest buttons. - Can I keep the flasher blinking?
Yes; to keep it blinking remove the button and solder a wire to each terminal where the button used to be, then skip the deactivation steps. - How do I deactivate the flasher?
Locate the chip under a black dot on the flasher PCB and drill through it until removed to break flashing circuitry. - How are the flasher LEDs rewired?
After breaking traces, solder wires between any LEDs no longer connected by PCB traces and add ~4 inch power wires, observing red to positive and black to negative. - How do I prepare the teddy bear for electronics?
Cut stitching at the back of the neck, remove stuffing from head and stomach, and leave stuffing in arms and feet to aid re-stuffing later. - What microcontroller is used?
The project uses a PIC16F877 microprocessor. - What audio amplifier is used?
The project uses an LM386 audio amplifier. - What tools are required?
Required tools include a PIC programmer, Exacto knife, soldering iron, hot glue gun, sewing needle, wire cutter, needle nose pliers, and possibly a drill and small Philips screwdriver.
