Summary of Guitar booster pedal (MPX-1)
This article guides DIY guitarists on building a custom booster pedal to enhance tone without expensive gear. It emphasizes combining player skill with hardware modifications, specifically detailing the design, component selection, and testing of an overdrive circuit. The project involves modifying a standard schematic by adding power supply options, noise filtering, and variable gain feedback, followed by assembly on a perfboard within an aluminum case.
Parts used in the Guitar Booster Pedal:
- Piece of perfboard 1,5"x1,5" (14x14 holes)
- 1/4W 5% Resistors (100, 1k, 1.5k, 5x10k, 2x100k, 1M)
- Ceramic capacitors (2x47nF, 100nF, 10nF, 47pf)
- Electrolytic capacitors (2x10µF, 100µF)
- 1/4" Mono Jack (6.3mm) 2x
- DC Jack (2.1mm Pin) 1x
- JCM 4558 OP-AMP 1x
- 8-Pin IC header 1x
- Mounted LED 1x
- DPDT Footswitch 1x
- 10kOhm Potentiometer + Poti knob 1x
- Hammond 1550B aluminum case 1x
- Wires to connect jacks, potentiometer, switch, and LED
Every guitar player desires it:
The “perfect” sound!
The components for it are:
SOFT
- skill of the player
- mojo, soul, heart (name it the way you want, but essentially you can’t buy it -> You have to have it!)
HARD
- the guitar (the wood, the strings,… -> The Hardware)
- for electric guitars: The amp/speaker unit
While we can’t do anything but practice for the “soft” side we are able to improve a lot on the Hardware side without getting too much into expensive regions while doing it all by ourselves. This is the point where the hardware gets a little heart and soul ;-).
The easiest way to improve your sound into the desired direction is an effect, because you can modify the signal into the way you want it to be, without the need of cracking up your guitar of amp, which can result in broken and useless gear if you don’t know what you’re doing.
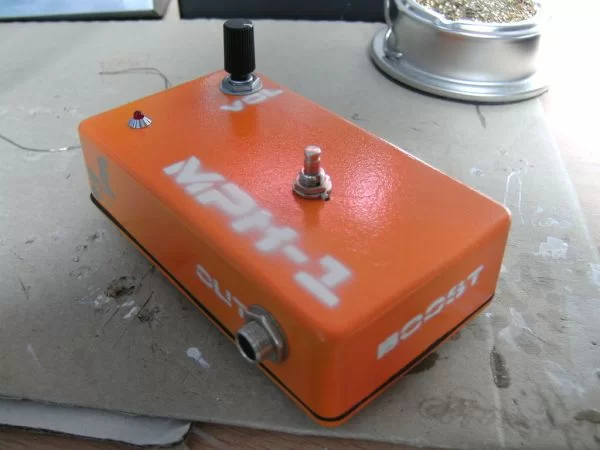
I started with a booster effect my brother wanted for his birthday, which is shown in the following steps. He mostly plays “Fender Strat Style” guitars with singlecoil pickups into a clean to lightly distorted amp. He wanted to add a little crunch to his tone without adding to much harsh distortion.
Step 1: The Circuit – Design yourself or take a given one?
After choosing an effects type you should find a circuit that will give you your desired sound. Therefor you can use the web (search for example for “guitar”, “effect”, “schematic”, “diy”,…) or try to get your hands on literature about this topic. If you are skilled or you are just an optimistic tinkerer you might want to do it all by yourself and design your own circuit, which is totally fine/fun/challenging/rewarding/… but not appropriate if you are a beginner and have to search the web for every component value or formula for calculation of high-/ or lowpassfilters. (If you didn’t get what a lowpassfilter is -> Stick with a design of the web that was proven to work)
For my booster pedal I chose a design of the web which I modified to get the desired sound. When you choose a design you might want to consider that your electronics dealer is not able to deliver you some parts you would need to build the circuit. Check that before you start building/buying/desiring your effect, because if highly required parts can’t be supplied to you your project dies before it begins.
My Design (Schematic at the bottom)
I chose an overdrive pedal design off of generalguitargadets.com (Schematic) and modified it like this:
- added a simple positive/middle/negative supply
- added a noise filter I found on beavisaudio.com right after the DC Jack (Huminator)
- took away the clipping diodes on the output
- connected the diodes in the feedback path directly
- added the switch to change the resistance of the feedback path (10k <->30k)
Specifications:
- 5-6V DC from power supply or battery
- Standard gain of 11 (Preamp)
- Boosted gain of 31 (“Crunch”)
- ON/(OFF) Switch + 1 Volume Poti
Step 2: BOM – Bill of Materials
BOM (bill of materials)
For my booster pedal I chose the following components:
- Piece of perfboard 1,5″x1,5″ (14×14 holes)
- 1/4W 5% Resistors (100,1k,1.5k,5x10k,2x100k,1M)
- Ceramic capacitors (2x47nF, 100nF, 10nF, 47pf)
- Electrolytic capacitors (2×10µF,100µF)
- 1/4″ Mono Jack (6,3mm) 2x
- DC Jack (2,1mm Pin) 1x
- JCM 4558 OP-AMP 1x
- 8-Pin IC header 1x
- Mounted LED 1x
- DPDT Footswitch 1x
- 10kOhm Potentiometer + Poti knob 1x
- Hammond 1550B aluminum case 1x
- Wires to connect the jacks,poti,switch and LED with the board
Tools needed
- electric drill with metal drill bits
- screwdrivers
- soldering iron (a simple one should do the job)
- pliers
- wire cutter
- exacto knife
- wire stripper
- … (equipment of your choice)
Step 3: Breadboard it / Test it
Don’t ever start to build a pedal without breadboarding and evaluating if :
- the circuit works
- the effect is the desired
Otherwise you’ll earn nothing but frustration.
To check the circuit for it’s characteristics a multimeter for the power supply and an oscilloscope are highly recommended, because if you are able to see what the circuit does to your signal you are able to improve it much easier than through guessing.
For more detail: Guitar booster pedal (MPX-1)
-
How can I improve my guitar sound without buying expensive gear?
You can modify the hardware side yourself by building or modifying effects pedals like a booster. -
What is the easiest way to modify your signal direction?
The easiest way is using an effect, which allows you to modify the signal without risking broken gear. -
Should beginners design their own circuit from scratch?
No, it is not appropriate for beginners to design circuits alone; they should stick with proven designs found online. -
Why should I check parts availability before starting the build?
You must check if your electronics dealer can supply required parts because missing components will cause the project to fail. -
What voltage does the designed booster pedal require?
The specifications call for 5-6V DC from a power supply or battery. -
Why is breadboarding recommended before final assembly?
Breadboarding ensures the circuit works and produces the desired effect, preventing frustration from building a non-functional unit. -
Which tools are highly recommended for checking circuit characteristics?
A multimeter for the power supply and an oscilloscope are highly recommended to visualize the signal. -
What specific modification was made to the feedback path in this design?
The diodes were connected directly in the feedback path, and a switch was added to change the resistance between 10k and 30k.