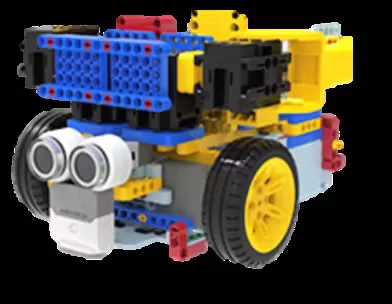
Using voice recognition with the in-built microphone, Wio Terminal (Voice Activated Robo Car) will be able to recognize the go, stop and background noise by TinyML.
Story of Voice Activated Robo Car
In this article, I will be making a voice activated Robo Car with the in-built microphone on Wio Terminal to recognize the go, stop and background noise by TinyML.
Have a look on the demo video below:
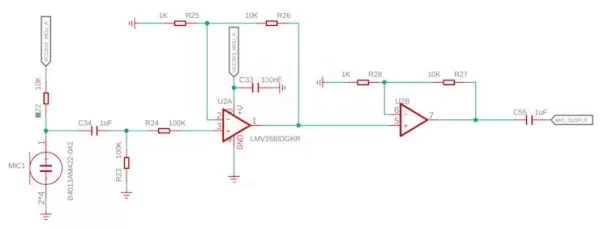
The microphone on Wio Terminal will only able to detect the sound intensity (check the schematic below or download to view full schematic) and hence, it will be challenging for it to do speech recognition for different words. Hence, I thought of some creative ways to capture the sound input and then train them with the Edge Impulse engine to see if it is able to do simple speech recognition. We will see the result at the end later.
Curious how it’s possible? Check out the detailed steps below to make one yourself!
In this detailed tutorial, we will cover the following:
- What’s UART Serial Communication?
- UART Serial Communication between Wio Terminal and uKit Explore
- 1.0 Train an Embedded Machine Learning Model Using Codecraft
- 2.0 Arduino Text Code Modification
- 3.0 Program the Robo Car (uKit Explore – Arduino Mega 2560 based)
- 4.0 Expected Result
- Giveaways
What’s UART Serial Communication?
The UART, or universal asynchronous receiver-transmitter, is one of the most used device-to-device communication protocols. This article shows how to use a UART as a hardware communication protocol by following the standard procedure.
When properly configured, the UART can work with many different types of serial protocols that involve transmitting and receiving serial data. In serial communication, data is transferred bit by bit using a single line or wire.
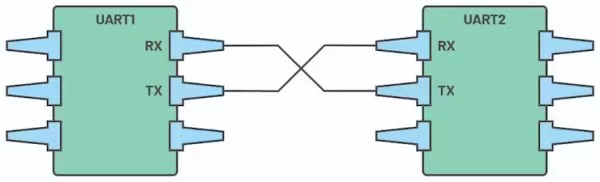
In layman term, UART allows an embedded device such as Arduino to send data over to another Arduino via the TX (transmit) and RX (receive) line as shown below.
Source: https://learn.sparkfun.com/tutorials/serial-communication/all
I often use UART as the communication protocols between embedded devices. Let me give you an example case study. Well, Arduino UNO has no built in WiFi and hence it’s not possible to do IOT related projects. With the understanding of the basic UART serial communication, I was able to leverage on the ESP8266/ESP32 as the co-processor to the Arduino UNO so that the data collected from the sensors attached to Arduino UNO will be sent over to ESP8266/ESP32 to send over to the cloud platform such as web server, Blynk or FAVORIOT.
With the ability to exchange data between two embedded devices (example Arduino UNO and ESP8266/ESP32), the possibility is unlimited!
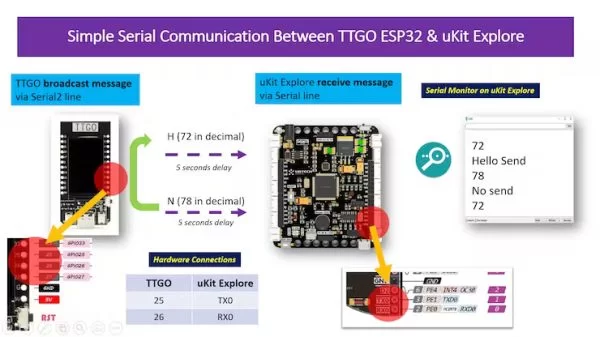
Example as below where I am trying to establish a simple serial communication between TTGO T-Display (Serial2 line) & uKit Explore (Serial line).
We will see that how this concept being applied in my voice activated Robo Car project.
UART Serial Communication between Wio Terminal and uKit Explore for Voice Activated Robo Car
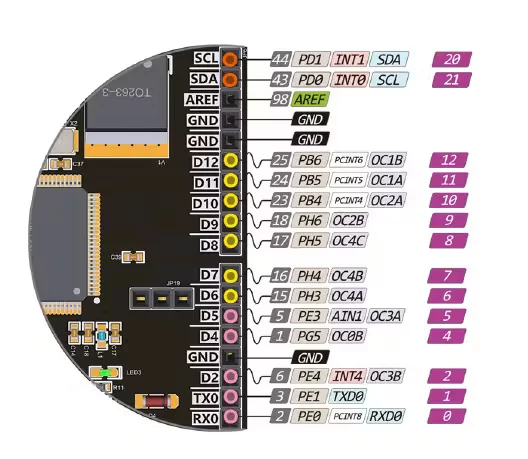
As we check the Wiki page for Wio Terminal, there’s TX/ RX pin available on the pin 8 and 10.

Whereas for uKit Explore, as it has the headers like in Arduino UNO pinout, there’s also TX/RX pin available on the pin D0 and D1. You can check the full uKit Explore pinout here: https://ubtechedu.gitbook.io/ukit-explore/v/english/ukit-explore-quick-start/pinout
1.0 Train an Embedded Machine Learning Model Using Codecraft
In this first section, our goal is to create an embedded machine learning model (voice recognition) using Codecraft platform
1.1.0Create and select models
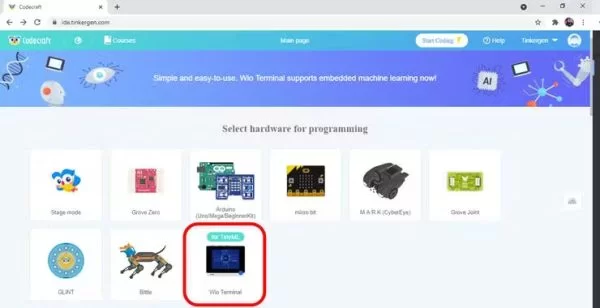
Go to https://ide.tinkergen.com/. Select “(for TinyML) Wio Terminal”.
1.1.1 Create the “Wake-Up Words Recognition (built-in microphone)” model
Click on “Model Creation” on the embedded machine learning box on the middle left. Then select the “Wake-Up Words Recognition (built-in microphone)” as shown below.
Enter the name for the model according to the requirements.

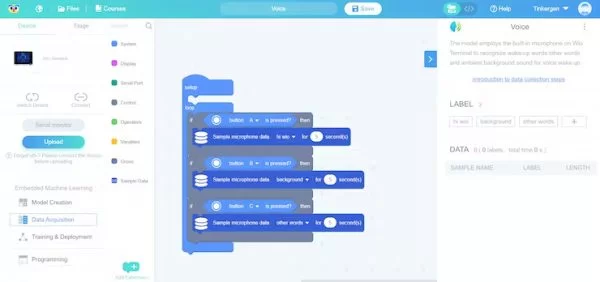
Click Ok and the window will automatically switch to the “Data Acquisition” interface.
1.2.0 Data Acquisition (on-board)
1.2.1 Default Labels
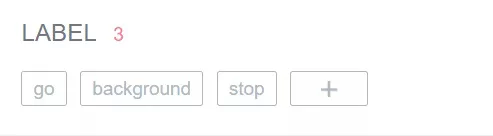
There are 3 default labels (hi wio, background and other words) that are automatically created for you.
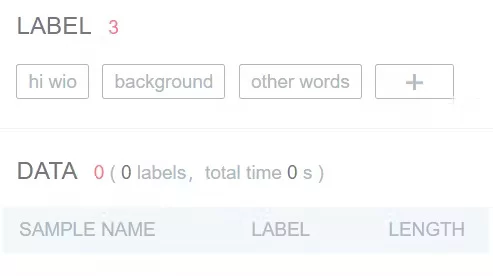
You can use it without any changes unless you want to have different names for your labels. For my case, I changed two of the default labels as below:
- hi wio changedto go
- other words changed to stop
1.2.2 Collecting data from modified labels and Data Acquisition Program Modification
Click on the “hi wio” label, you will be prompted to change the label name. I renamed the label to go and click “Ok”

Do the same for the “other words” label. You will now see your labels as shown below:
IMPORTANT: Now, you have to remember to change the labels on the default data acquisition program to reflect the correct modified labels:
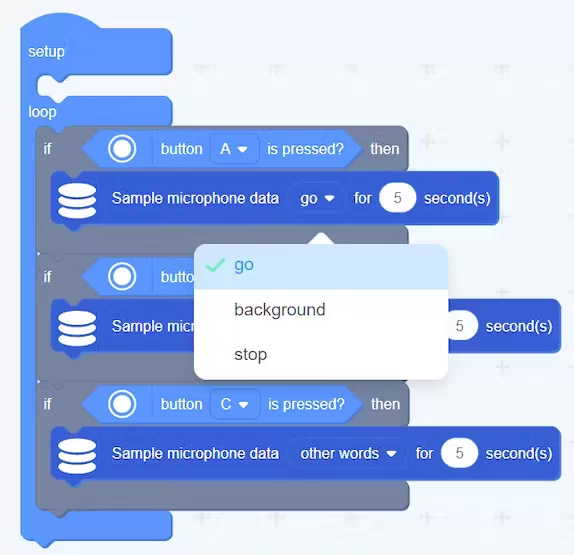
1.2.3 Connect Wio Terminal and Upload Data Acquisition Program
Connect Wio Terminal to laptop using the USB-C Cable. Click on the Upload button, and this action will upload the default data acquisition program. Typically, it takes around 10 seconds to upload. Once successfully uploaded, a pop-up window will appear to indicate “Upload successfully”.
Click “Roger” to close the window and return to the data acquisition interface.
![]()
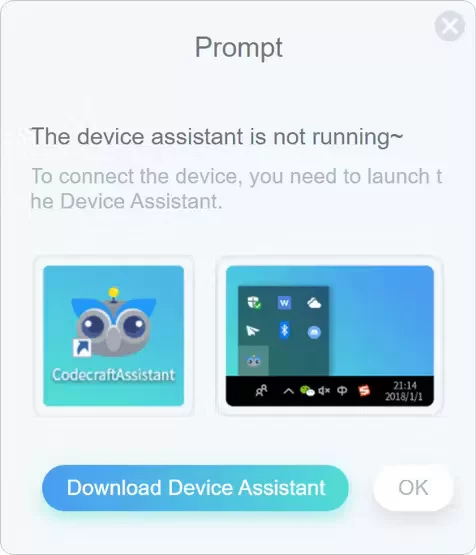
Note: You need to download “Codecraft Assistant” to be able to Connect and upload code on Codecraft online IDE.
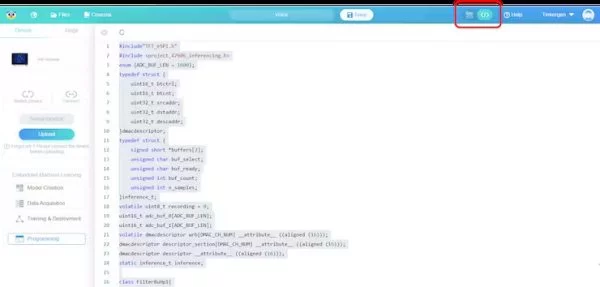
Caution: For the web version of Codecraft, if you don’t install or run the Device Assistant, you may get the message in the image below that you haven’t opened the Device Assistant yet. In this case you can check this page for further information: Download, installation and “Device Assistance” Usage.
1.2.4 Data Acquisition
In the upper right hyperlink, you will find a step-by-step introduction to data acquisition.
Follow the instructions to collect data accordingly to your modified labels.
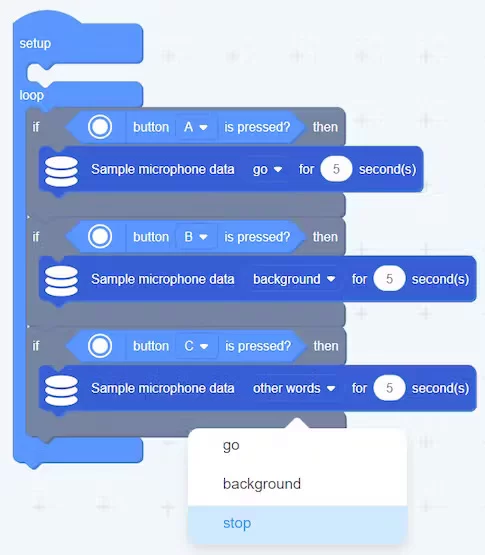
Pay attention on below:
- Wio Terminal button location (A, B, C)
- Animated gif has been accelerated; the actual action can slightly slow down.
- Please notice the red tips.
- Point the curser over Description Texts for more detailed content
After collecting the sample data for the 3 labels, now, the data acquisition step is completed. I collected 15 seconds for each of the labels.

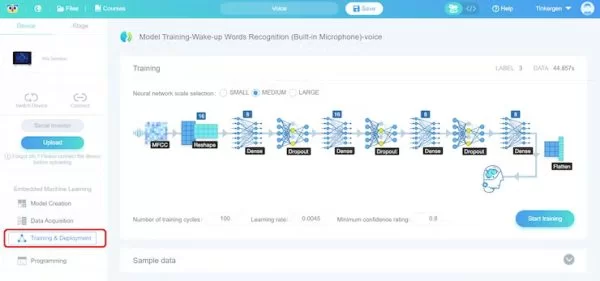
1.3: Training and Deployment
Click on “Training & Deployment”, and you will be seeing the model training interface as shown below.
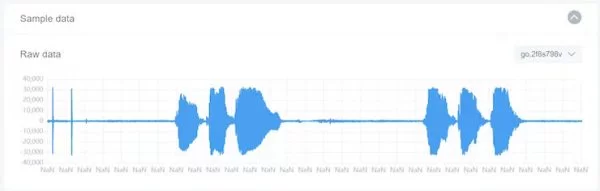
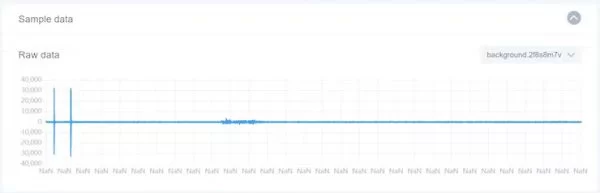
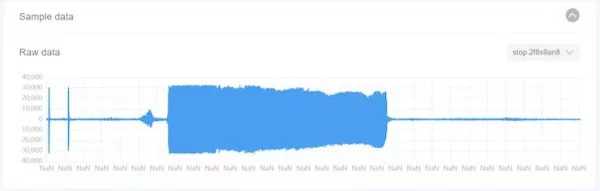
Waveforms for go, background and stop raw data are as shown below for reference. (can be viewed from the “Sample data” tab.
go
If you observe the waveform, for label “go“, my sound input is “go, go, go!” In 5 seconds window, I recorded twice with about 1 seconds rest.
background
For label “background”, I will just hold the Wio Terminal on my hand to capture the surrounding noise inputs. Hence, you could see the sound input level is not 0 as there’s some surrounding noise such as fan rotating sound level.
stop
For label “stop”, to differentiate it with “go”, I try on my sound input as “stoppppp………” for about 3 seconds.
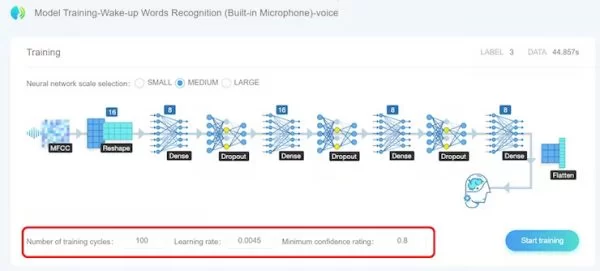
1.3.1 Select neural network and parameters
Select the suitable neural network size: small, medium and large
Set parameters:
- number of training cycles (
positive integer), - learning rate (
number from 0 to 1) - minimum confidence rating (number from 0 to 1)
The interface provides default parameter values of training cycles of 50, however, the accuracy was not very good. Hence I changed the training cycles to 100.
1.3.2 Start training the model
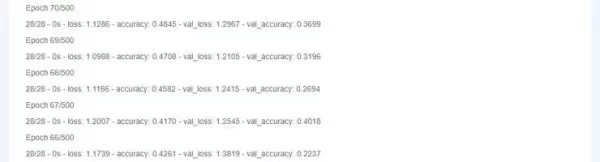
Click “Start training”. When you click “Start training”, the windows will display “Loading..”! Wait for the training to be done!
The duration of “Loading..” varies depending on the size of the selected neural network (small, medium and large) and the number of training cycles. The larger the network size is and the greater number of training cycles are, the longer it will take.
You can also infer the waiting time by observing the “Log”. In the figure below, “Epoch: 68/500” indicates the total number of training rounds is 68 out of total of 500 rounds.
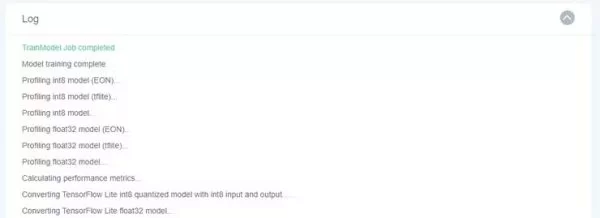
After loading, you can see “TrainModel Job Completed” in the “Log”, and “Model Training Report” tab will be appeared on the interface.
1.3.3 Observe the model performance to select the ideal model
In the “Model Training Report” window, you can observe the training result including the accuracy, loss and performance of the model.
If the training result is not satisfactory, you can go back to the first step of training the model by selecting another size of the neural network or adjust the parameters and train it until you get a model with satisfactory results. If changing the configurations do not work, you may want to go back to collect the data again.
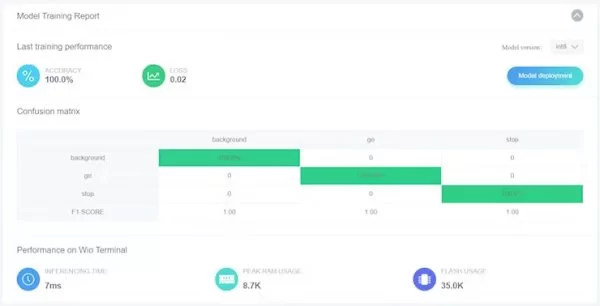
For my case, I am able to achieve 100% accuracy with modification on the training cycles to 100.
1.3.4 Deploy the ideal model
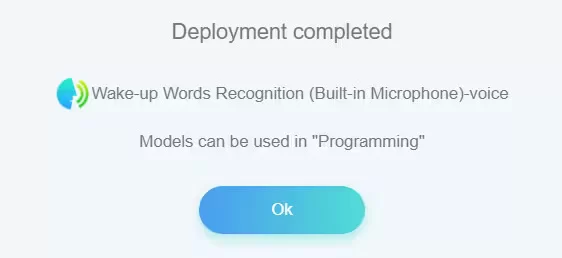
In the “Model Training Report” window, click on “Model Deployment”

Once the deployment is completed, click “Ok” to go the “Programming” windows which is the last step before we deploy the model to the Wio Terminal.
1.4. Programming & Model Usage
Alright, so now we done trained the model and the fun part of integrating Artificial Intelligence (Machine Learning in this case) with robotics (a Robo Car) using the UART communication protocol.
This is the sample program that created from the block programming interface:
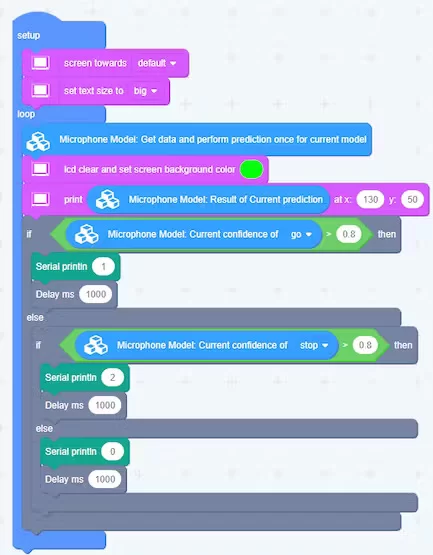
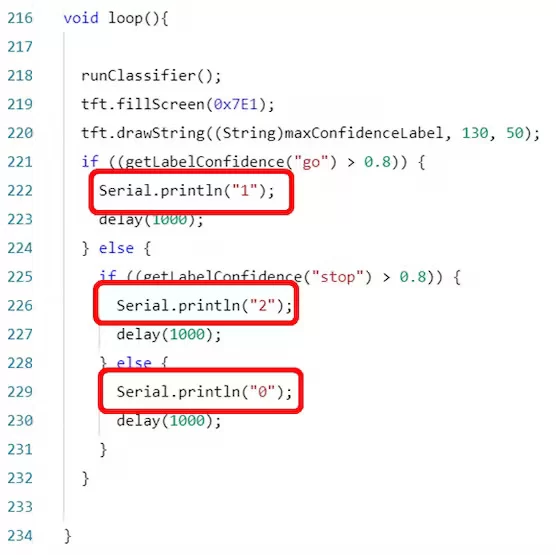
Let me try to explain what I am trying to achieve with this code. I make it into bullet points for easy understanding:
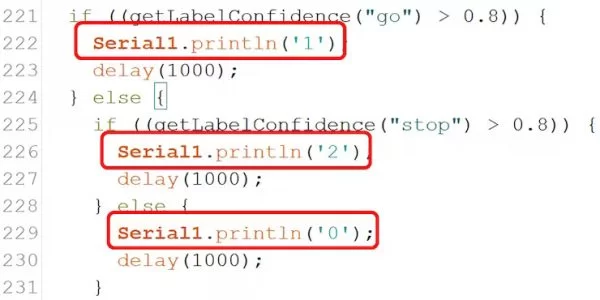
- As previously, we use the if-else conditional statements to evaluate the confidence of the labels.
- If the confidence of “go” is greater than 0.8 (80%), I will print “1” on the serial terminal.
- If the confidence of “stop” is greater than 0.8 (80%), I will print “2” on the serial terminal.
- Otherwise, if the confidence of “background” is greater than 0.8 (80%), I will print “0” on the serial terminal.
Ok, so for now, just remember 3 different conditions:
“go” > 0.8, the command is ‘1’
“stop” > 0.8, the command is ‘2’
“background”. the command is ‘0’
After some research online for the pinout of TX/RX for Wio Terminal, here’s my findings:
- We have the TX/ RX pin available on the pin 8 and 10 that can be used to connect to another board (uKit Explore in this case).
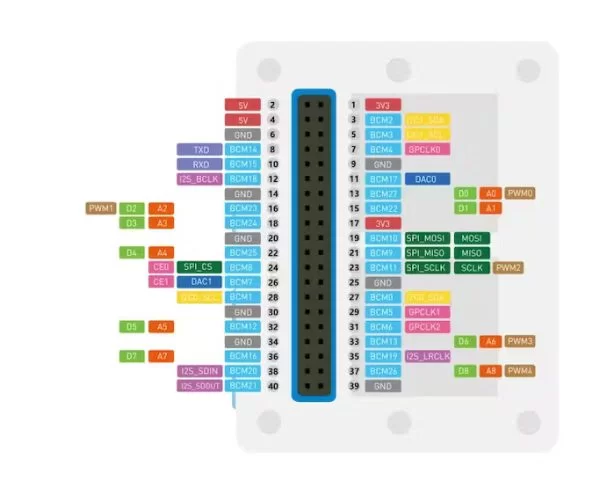
- The serial line you can access from the 40 pin header is Serial1 instead of usual Serial which basically shows the output via Serial Terminal.
Alright, so take note on the 2 important findings as above as it will be the critical part for our project!
If we have a look at the text coding for the corresponding blocks code, you will notice that the Serial.print is NOT using the Serial1 line. Hence, this leads us to our second step which is to continue our coding on Arduino IDE for customization.
2.0 Wio Terminal Arduino Text Code Modification
In this first section, our goal is to modify the Arduino text code to use Serial1.println instead of Serial.println so that the data can be transmitted via the TX/ RX pin available on the pin 8 and 10.
2.1 Toggle to the Text Code area & Copy The Text Code
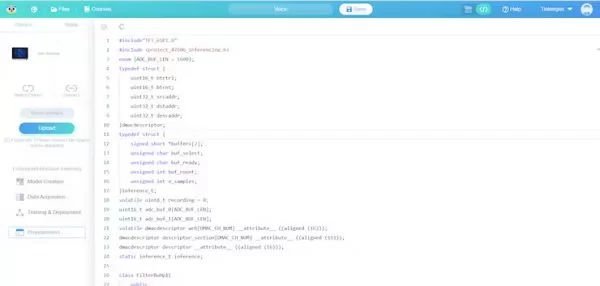
On the text code area, copy all the code by pressing on CTRL + A to select all the code.
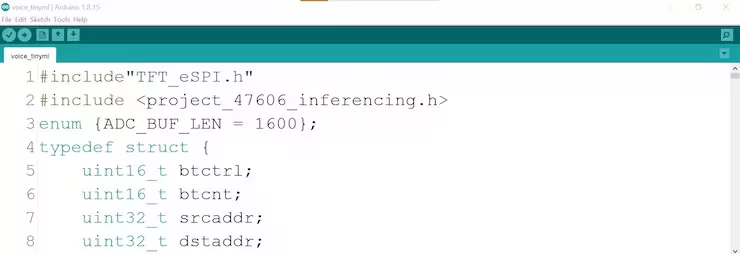
Open up Arduino IDE, create a new file, paste the code into the empty sketch by pressing on CTRL+V. Proceed to save the sketch with the desired name.
2.2 Copy the Edge Impulse TinyML Arduino Library
So, the question now is, how do I get all files containing the data for the trained model on Codecraft platform onto Arduino IDE?
Well, it’s easy. Follow the steps below:
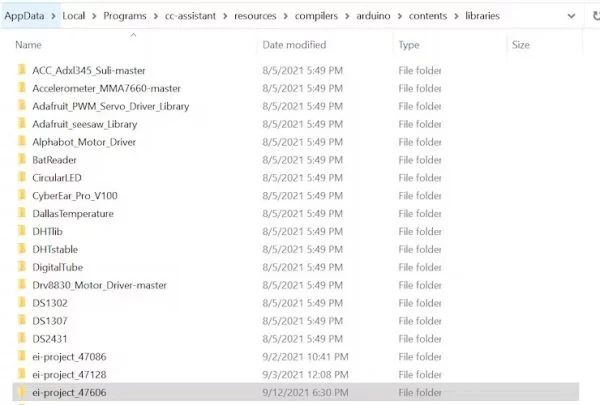
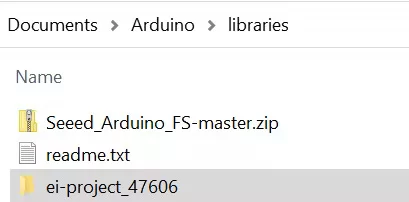
- Navigate to
C:\Users\<User_Name>\AppData\Local\Programs\cc-assistant\resources\compilers\Arduino\contents\libraries - Find the folder name that has the same number with the Edge Impulse header file on top of your Arduino text code (in my case it will be 47606)

- Copy the entire ei-project_47606 folder and paste it onto
C:\Users\<User_Name>\Documents\Arduino\libraries\
2.3 Modification on the Serial.println function
Lastly, let’s look back at the code, scroll down to the void loop section and modify the Serial.println function to Serial1.println instead.
2.4 Upload the Code
Finally, we are ready to upload the code.
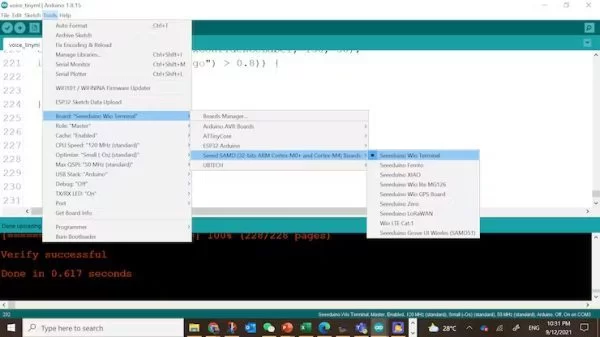
Make sure you have installed the Wio Terminal board support package. If not, please refer to the “Get Started with Wio Terminal” guide on Seeed’s Wiki.
Make sure you selected the correct board and COM port before you upload the code to Wio Terminal.
Alright, we have done the necessary modifications! Right now, the below condition still true for each cases and this time the command ‘1’, ‘2’, and ‘0’ will be able to send out from the TX/ RX pin available on the pin 8 and 10.
“go” > 0.8, the command is ‘1’
“stop” > 0.8, the command is ‘2’
“background”. the command is ‘0’
Source: Voice Activated Robo Car on Microcontroller with TinyML
About The Author
Muhammad Bilal
I am a highly skilled and motivated individual with a Master's degree in Computer Science. I have extensive experience in technical writing and a deep understanding of SEO practices.