Inspired by COVID-19 prevention, we have developed a system that measures the temperature of persons before they enter a building by Temperature Access Point Using an AVR® DA Microcontroller.
Story about temperature Access Point
During the pandemic, people are being asked to have temperature checked at any local market or grocery store, which is usually done by another person. This can be a risky do to person to person interaction. In order to reduce this risk, we have developed a Temperature Access Point, which automatically detects people and invites them to check their temperature, measuring it remotely, and then displaying it on a high-contrast (Organic Light Emitting Diode) OLED Display, without any human intervention.
Development
The AVR128DA48 was selected for development due to the wide array of on-board peripherals and ample I/O pins. The AVR® DA utilizes its on-board 12-bit ADC to measure the output from the Passive InfraRed (PIR) sensor in order to wake-up.
To accelerate development, a Curiosity Nano evaluation board for the AVR128DA was used. The Curiosity Nano is a low-cost development tool that breaks out the I/O on the device and includes a dedicated USB programmer on-board. In addition to the Nano, a Curiosity Nano Base board was also used. This board provide convenient access to 3 MikroBUS™ serial interfaces for easy connection of the development boards. In this application an OLED C display,an IR thermometer (IrThermo), and an Passive InfraRed (PIR) click were used.
To detect when a person enters the building, a contactless means of sensing them was required. In addition, the system would be acting as the gatekeeper to the building, rejecting access to feverish individuals. Mechanical switches or magnetic reed switches would not be appropriate for this application due to the risk of spreading illness through physical contact.
The PIR sensor, by contrast, generates a low-level analog signal that correlates with the temperature of the objects in its field of view, as shown below.
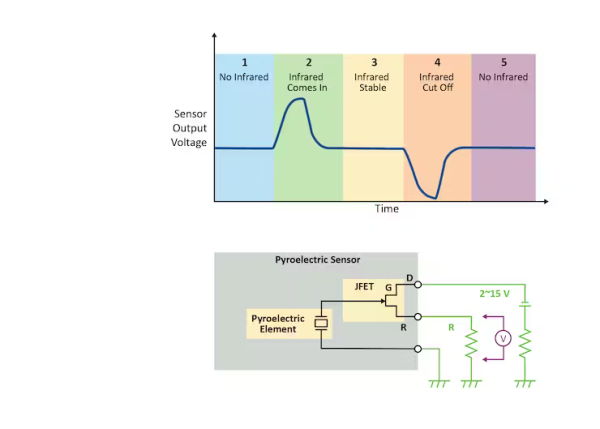
A sudden change in the sum of the temperatures in its field of view, such as a person entering, disturbs the sensor, and causes a change in the output level. The PIR sensor board comes with an analog front end that increases the scale of the output signal to a level which can be measured reliably using the on-board 12-bit ADC.
Set Range of Values
To reduce the processing overhead associated with the changes in the PIR sensor, the ADC’s window comparator is used to check if the value of the ADC is inside (or outside) of a set range of values. When the value is outside of the normal range, an interrupt is triggered, which wakes the device from sleep to begin processing.
While the PIR sensor does produce an output in relation to the amount of IR in its field of view, it is far too imprecise for measuring the temperature of a person. To accurately gauge the temperature of the person, the IR thermometer click board was used. The board has a digital high-precision IR thermometer that communicates over I2C or via a PWM output. In this application, I2C communication was used.
Once the temperature of the person has been measured, a message is printed to the screen indicating the temperature of that person and whether or not access is granted to the building. A buzzer can be attached to this board to indicate various events, such as the door unlocking or access being denied. The tone of the buzzer varies depending on the event. The LED on the Curiosity Nano is on if the door is “unlocked”.
Program Description of Temperature Access Point
Normally the AVR128DA is in sleep mode. The PIR sensor is sampled continuously by the ADC while in sleep. When the sampled value exceeds set window thresholds, the device wakes from sleep. Immediately following sleep, the IR thermometer measures the ambient temperature of the room and then of the person (or object) in front of the sensor, and compares whether:
- The difference in temperature is too small – the measurement is repeated up-to TIMEOUT_MEAS times.
- The difference in temperature is greater than the threshold, and the person is not feverish.
- The difference in temperature is greater than the threshold, and the person is feverish.
In the case of the temperature difference being too small, the system will eventually timeout and return to sleep as this is a false alarm. In the other two cases, enough of a difference in temperature exists to determine that a person is seeking access. The IR thermometer is used to measure their temperature REPEATED_MEAS times, which records the maximum value. The maximum is used to determine whether someone should be admitted to the building. In the case of the non-feverish person, the buzzer sounds, and the door “unlocks”. The OLED screen displays their temperature and a message indicating the door has opened. For feverish persons, the buzzer sounds a different tone, and the OLED screen displays their temperature and the message “Access Denied”.
Quick Setup
As an alternative to installing the development tools, the .hex file in the repository can be dragged and dropped onto the Curiosity Nano like a USB drive. The nano will automatically program and configure the AVR DA. If this option is used, only follow steps 1 and 4.
Step 1 – Hardware and Firmware Setup
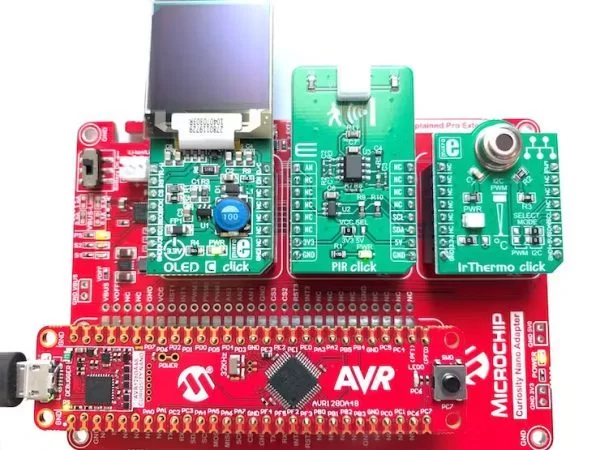
With the power off, plug the 3 clicks into the Curiosity Nano Adapter as shown below. Plug-in the AVR128DA48 Curiosity Nano into the socket. If you do not have the firmware downloaded, download and unzip the firmware to a folder of your choice.
Step 2 – Software Setup
Connect the Curiosity Nano to your development computer via a MicroUSB cable, such as this one, then launch MPLAB® X. Go to File > Open Project and navigate to the unzipped file folder. Double click on the folder to open it. If the project name on the left-sidebar isn’t in bold, right the project and select “Set as Main Project”. It is recommended to close other currently open files that are unrelated to the project to avoid confusion.
Step 2A (Optional) – Explore the Peripheral Configurations
Click the MPLAB Code Configurator (MCC) button in the toolbar to launch MCC. MCC will show you the configuration of the peripherals on the device.
NOTE: If this button is not visible in MPLAB, MCC is likely not installed. To install, go to Tools > Plugins > Available Plugins > MPLAB Code Configurator. After the installation has completed, restart MPLAB.
Step 3 – Program the Device
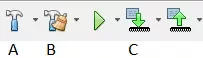
First, build the project. You can click either build (button A) or build and clean (button B). Build and clean will remove cached compiler and linker files, which can occasionally cause build errors. To program the device, click on the arrow pointing into the microcontroller (button C).
After pressing the programming button, MPLAB may ask for a tool selection. Select the Curiosity Nano for the AVR128DA. In most cases, the first-time programming use of a nano will require a firmware update for the nano, which will be installed automatically. After programming, the program runs automatically.
NOTE: If an error occurs during the firmware update of the Nano, unplug the nano from the PC and restart MPLAB. Reconnect the nano and repeat step 3.
NOTE: If the option for the nano is grayed out, a DFP file update may be necessary. Go to Tools > Packs and check the AVR-Dx_DFP to see if it is installed and up-to date. This program was tested with DFP 1.2.52 and 1.3.65.
Step 4 – Using the Demo
After programming, the demo should become active immediately. The PIR click produces an analog voltage related to the temperature of the surroundings. If the value exceeds the thresholds, the device receives an interrupt and wakes from sleep. The OLED display turns on and prompts the user to stand in front of the IR thermometer click. If the temperature is near or equal to ambient, the system marks this as a false positive and returns to sleep. When a person is detected, the IR thermometer measures the temperature REPEATED_MEAS times to find the maximum value. If the maximum temperature is in the normal temperature range, the screen will print “Door Opened” and a buzzer tone is played. If the temperature is elevated, “Access Denied” is printed to the screen and a different tone sounds.
Source: Temperature Access Point Using an AVR® DA Microcontroller
About The Author
Muhammad Bilal
I am a highly skilled and motivated individual with a Master's degree in Computer Science. I have extensive experience in technical writing and a deep understanding of SEO practices.