The first question I often get about this creation is “Why?.” The answer is quite simple, I am an engineering student at Stony Brook University. We play a game on campus called “Humans vs. Zombies.” That fact coupled with my over competitiveness, and my drive to engineer things most people wouldn’t is what ultimately spawned this NERF gun.
Although it may not be the first ever made, it certainly is one of the best to date. I would classify this as a prototype, it is far from perfect but it DOES work. Unfortunately I was only able to use it for a few days of the fall 2010 SBU HvZ game as it was damaged when a zombie caught one of the hoses and cracked the shell. It is of course fixable I just would rather make a new more improved version (Flywheels…. that’s the only teaser you’re going to get ;).
This Instructable will hopefully be viewed by a few other forums as I hardly have the time to even write this.
DISCLAIMER: Modifying a NERF gun in this manner will permanently alter it. This instructable should only be used as a reference, as your specific modification will be different. NEVER use a CO2 canister that has not been properly filled. This modification should only be attempted if the proper tools and safety precautions are employed.
Why do we go all out for HvZ? Because when else are we going to be able to deck out in tactical gear and run around campus with NERF guns?….. THAT’s why =)
Featured on:
Hackaday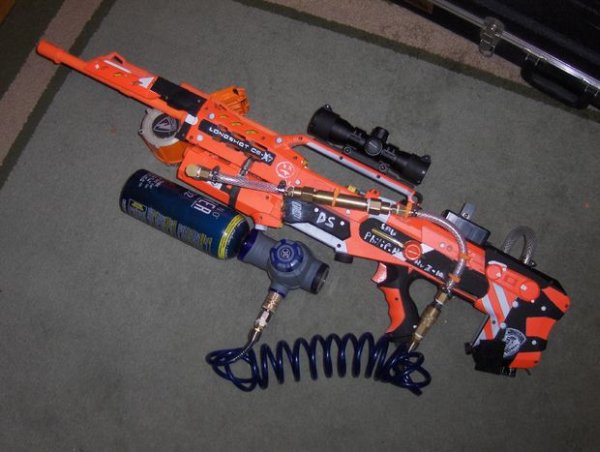
Step 1: Before you Begin
So you think you are ready to do this?
If you think I am going to just hand you all the information you need to make one of these things you are mistaken. I’m not going to explain every step in this Instructable, if you haven’t mastered any of the below steps you are not ready. Diving into this overhaul without even modifying a NERF gun before will just end in a broken Longshot (Which have been discontinued). Not to mention this is the type of project that requires you to sit down and think, simply following each step verbatim won’t work.
Step 1:
Get a longshot.
This may sound strange, but before you attempt this modification It is a very good idea to modify one using the guides available online. My favorite community site has to go to NerfRevolution , there is also NerfHaven but they tend to be very unfriendly to newcomers.
Step 2:
Angel Breech
I’m not going to outline all the steps of making an angel breech, the one used in my Longshot was the third I had made. Honestly it isn’t the best, the better your angel breech, the better your Semi-Auto Longshot. If you make one or two you will understand what changes can be made to suit your needs. So practice, practice, practice!!
Step 3:
Modify your clips
I didn’t have any luck with modding the 18 or 36 round drum magazines. I did However make 12 round extended clips with my new constant force spring addition. You can find the thread here (http://www.nerfrevolution.com/forums/viewtopic.php?f=8&t=1919). If you are looking at this from NR I an interflops friend, we came up with this together =).
Step 4:
Patients!! This project will not be over in a weekend. If I had to do it over again it would still take me about 3-4 weeks. I can however assure you that when you are finished you will be very happy.
Tools you will NEED:
1. Lathe
2. Drill (Mine is a Craftsman 11543)
3. Dremel (you will need abrasive cutoff disks and sander disks)
3. Screw drivers
4. Adjustable wrench
5. Vice grips
6. Hack saw
7. EPOXY….. LOTS OF EPOXY (5 minute, JB weld, epoxyy putty)
8. Sand paper
Now onto the real stuff!!
Step 2: How the bolt works
The setup I used is an open bolt system. Meaning that when you pull the trigger to launch the dart the bolt shoots forward; both loading the round and then firing it. The images below will better illustrate how it works. Don’t be scared by the images, I simplified the machining of the bolt drastically which you will see in the next step.
Stage 1: The bolt is at rest and a magazine of NERF darts is loaded into the blaster.
Stage 2: The trigger is pressed and the solenoid valve allows a burst of air to pass into the piston assembly
Stage 3: The piston slides forward chambering the NERF dart into the barrel. At the end of it’s extension the hole through the center of the piston passes the end of the pin riding through it. This allows the air in the piston to exit the barrel and propel the projectile.
Stage 4: The spring in the piston can now return it to the open position, and is now ready to fire again.
Just look at the pictures, it’s harder to describe it in words.
Step 3: The bolt
Before you even open up the shell of the Longshot you must have access to a lathe. I used a CNC lathe in order to manufacture the bolt, it isn’t necessary to use CNC but you must have some form of turning equipment to make the bolt.
Basically, If you can’t make the bolt….. stop here.
I have included a set of drawings, I left off a few dimensions because you will need to tailer certain portions of the bolt to fit what you want to achieve. The bolt as shown here will work with stefans and modified streamlines ONLY.
What you will need:
1. A Lathe
2. 1.5″ OD Delrin (McMaster P/N: 8572K25) your length will depend on your machining ability.
3. One 1/2″ Snap ring (McMaster P/N: 98585A109)
4. A spring
The spring will be the trickiest part, too strong and the pressure required to actuate the bolt will be too much, too weak and it won’t reset. I played around with quite a few springs before I found the combination that worked; just hit up your local ACE hardware store and get a couple different springs. Sanding of the piston will also be required so giving you a specific spring is pointless. Sand with FINE sandpaper until the piston slides smoothly in the housing.
Once the piston slides freely you can lubricate the inside with a little silicone grease, this will also seal the assembly better.
DRAWINGS NOTE:
I simplified all the dimensions I could to make this really easy to make. You will need to determine how you want to screw it together, you could epoxy it together if you really want. The diameter of the piston rod is designed to fit nicely in a 9/16 brass barrel. If you print these drawings out on 8.5 X 11 printer paper they will be 1:1 scale.
Step 4: GUT IT!!
This is the part where you REALLY need to ask yourself if this is REALLY what you want to do. Once you start this your Longshot will be irreversibly altered.
This step you are pretty much on your own, you will need to use your dremel to dice and slice the innards out until your bolt and angel breech fit nicely. Don’t let the first pic fool you, the bolt will be much farther back.
To attach the angel breech I used a 1/4 Hose barb with a 1/8NPT threaded portion. Wrap E-tape around it until is a snug fit with the inside of the piston, some how glue wouldn’t hurt either.
You will still need to use the boltsled but you can cut off the back tail. You will also need to chop off a large portion of the trigger tail, make sure it will still contact whatever momentary/micro switch you use for the trigger. Just hotglue the switch in after you solder wires to it, there won’t be much force on it so epoxy isn’t necessary. I added a hard stop for the boltsled using a piece I had removed from my modified raider, any piece of plastic will do.
To answer your question: The key switch is not necessary…. but it is awesome. 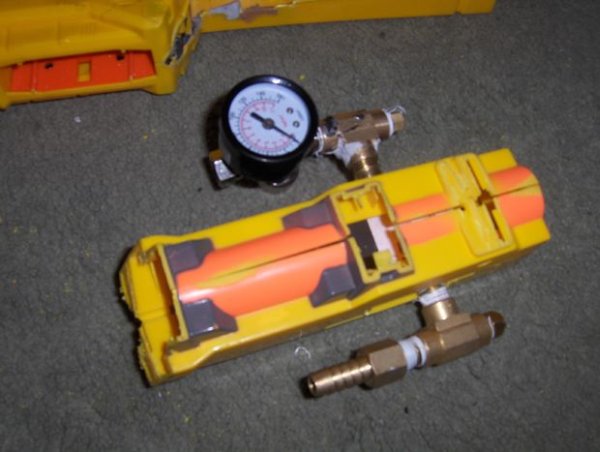
Step 5: Hide the solenoid valve!!
I purchased my solenoid valve off of E-bay. The only requirements of the solenoid is that it has to be a 3 way 2 position valve, that way when the valve is disengaged the back of the piston will be exposed to atmospheric pressure. If the valve doesn’t allow the air in the back of the piston to exit the bolt will not reset properly. 12 Volts is easy to work with, it is possible to use a 24 volt relay but it will require more batteries.
I choose to hide the solenoid valve in the housing of the front gun. This will require more dremel wizardry, but IMO looks much cleaner than any of the alternatives I could come up with. 5 minute epoxy, epoxy puddy, and JB weld were all used to keep that housing glued to the main shell. Make sure you only glue one side as you might need to take it apart later!! Notice the expansion chamber on the side, it is necessary in order to have rapid fire capabilities!! The bigger you can make the chamber the better (within reason)
For more detail: Semi-Automatic NERF Longshot
About The Author
Ibrar Ayyub
I am an experienced technical writer holding a Master's degree in computer science from BZU Multan, Pakistan University. With a background spanning various industries, particularly in home automation and engineering, I have honed my skills in crafting clear and concise content. Proficient in leveraging infographics and diagrams, I strive to simplify complex concepts for readers. My strength lies in thorough research and presenting information in a structured and logical format.
Follow Us:LinkedinTwitter