I recently had the urge to create some “eye candy”; Thinking along the lines of my LED Sign (it’s not dead, just waiting on parts!), I chose to create a similar effect, using only a single line of leds, instead of a 5×7 array.
Persistence of Vision is some sort of effect, either psychological or biological in nature, that allows our eyes and brain to ‘see’ motion and patterns in a sequence of rapidly stills (hence a movie projection). 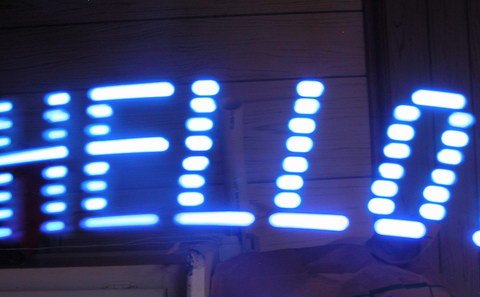 This effect can be exploited using basic digital electronics to create a virtual LED sign, which the viewer will ‘see’ when the pov toy is put in motion.
Commercial POV toys are usually some sort of led matrix attached to a spinning contraption, and display either a fixed or scrolling message. Those are fine, but the technical aspects of motorizing the display make it beyond the scope of a simple project. Therefore, my project relies entirely on elbow grease – swing the wand and watch the messages appear.
Revision one of my POV toy is compact. It measures approximately 2.25″ length wise by 1.1″ width wise. The circuit consists of an inexpensive Microchip PIC 12F683 microcontroller, and a 74HC595 serial shift register. The display consists of eight 3mm leds, I chose blue for the first unit, but I’ll probably make a few more with different colors, I especially want to see green and amber – those leds don’t see a lot of action in the world of consumer electronics.
The circuit is very simple. A tiny microcontroller provides the brains, a simple and inexpensive shift register provides the brawn, and a switch and hall effect sensor provide some control. My first unit has no hall sensor, so power is controlled with the push button switch. When “off”, the pic is in a ultra-low power sleep state. Come to think of it, I could have put the shift register into a tri-state mode when “off”, but for now, it holds its gates at Vdd, which provides no bias across the leds, so there shouldn’t be much current going anywhere. The hall effect sensor will eventually control the power to the display, as well as provide some synchronization. Right now when swinging the wand, the message is legible in one direction, and backward in the next. I plan to try putting a small round magnet in a tube, and gluing it behind the hall sensor. When swung in one direction, the magnet will be forced over the sensor by g-force. When the wand is swung back, the magnet will be forced away from the sensor. This should let the microcontroller know not only to blank the leds during the ‘backward’ swing, but also how much time it has to render the entire message, speeding up the display for a quick swing, or slowing it for a long swing.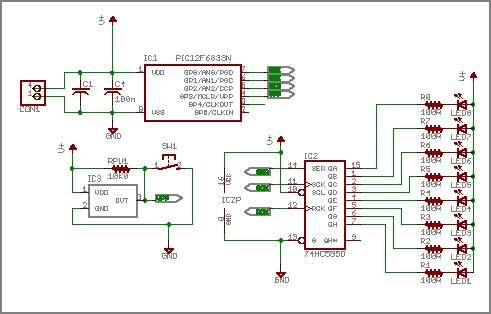
The circuit board is a single layer layout with two jumpers. I went with as many SMT components as I could afford, since I hate drilling holes in my home-made circuit boards. Power is currently provided by a 3.7 volt 1600mAh lithium ion cell.
I tried making some video of the unit in operation, but my camera wouldn’t play ball. Next weekend I may have more time to fiddle with photography and try to get some ‘action shots’.
For more detail: POV Toy
About The Author
Ibrar Ayyub
I am an experienced technical writer holding a Master's degree in computer science from BZU Multan, Pakistan University. With a background spanning various industries, particularly in home automation and engineering, I have honed my skills in crafting clear and concise content. Proficient in leveraging infographics and diagrams, I strive to simplify complex concepts for readers. My strength lies in thorough research and presenting information in a structured and logical format.
Follow Us:LinkedinTwitter