
Back in January 2014 I was at a meetup of Baby Boomer Makers at TechShop in San Carlos, California. We were going around the table, each taking a turn to talk about projects we’d like to do. Bob spoke up to describe a problem his elderly mother was having – she couldn’t remember to take her medicines on time every day. Each week Bob found that his mother had either forgotten to take her pills one day, or she had run out too soon because she had double-dosed. Both these problems are frightening. Bob is a retired electrical engineer and said to the group, “I have an idea for a device to help elderly people keep on their medicine schedule. I can make the electronics, but I don’t have a way to make a case for the project.”
His story really resonated with me. I’ve been a member of TechShop for several years and have learned to use a number of the sophisticated computer controlled fabrication machines that they have for members to use. I looked at Bob. “I can do that. If you make two sets of electronics, I’ll make two cases and we can trade.” Smiling at each other we started a great collaboration.
Six months and many prototypes later, the Pill Reminder was born. Bob set up his mother with one of the first units. Each week after that he checked and found that his mother was taking her pills twice a day as she should! There were no more cases of double-dosing or forgetting to take them. She was 100% compliant! It’s now been two months and his mother continues to take her pills as she should. Bob and I are very pleased.
Please cast your vote for this project in the Microcontroller Contest!
(at the upper right hand corner of this Instructable)
We decided early on to share our final designs with the world using one of the Creative Commons licenses. And now we want to share the Pill Reminder with the world through this Instructable.
We have detailed plans and assembly instructions and the Arduino source code available on the web at
http://www.shrimpware.com/pillreminder/
And the complete package of instructions and software is included in the last step of this Instructable.
In this Instructable I will highlight some of the build process so that you have a good idea of what needs to be done.
Let’s get started!
Step 1: What Exactly Does the Pill Reminder Do?
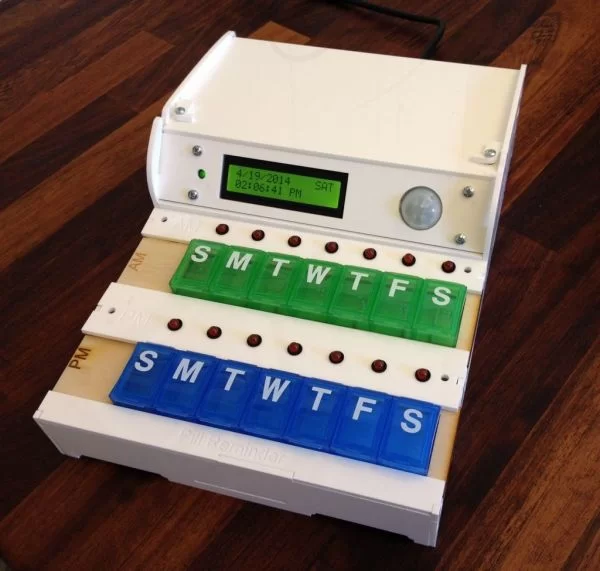
The Pill Reminder is an Arduino controlled device to prompt a person when it is time to take their pills. The Pill Reminder has 14 pill compartments. Each compartment corresponds to one day of the week. Each day of the week has two compartments, one for morning pills and one for evening pills. Each pill compartment has an LED above it. Twice each day, morning and evening, the Pill Reminder will turn on the appropriate LED to indicate which pill compartment should be taken.
The Pill Reminder has a real time clock to keep track of the day and time.
It also has a proximity sensor. During each pill taking interval, the first time a person approaches the Pill Reminder it will cause the currently illuminated LED to blink. We hope this attracts the user’s attention.
The Pill Reminder is intended to be used by someone who has trouble remembering to take their pills each day. We intend for someone else to fill the pill compartments each week. To make this easier the pill compartments are on trays that can be removed. This allows the care giver to have a second set of pill compartments that they fill up and then can quickly replace the empty ones.
Released under a Creative Commons license, you are free to make one yourself.
Step 2: Make the Case
The Pill Reminder can be made from acrylic plastic or Baltic birch plywood. In either case use 3mm material. This Instructable will use the acrylic case for discussion. The only difference with the wood version is how you glue it together (obviously).
Our documentation includes the cut files in CorelDraw and PDF format. I highly recommend using a Epilog Laser Cutter to make these precision parts. TechShop members have access to these devices. If you don’t belong to TechShop you can also get the parts cut by one of the many laser cutter job shops that are springing up. (For example, www.prawndesigns.com)
The first step is to dry fit all the pieces together. If you don’t do this, then you’re sure to make an oops that you might not be able to correct. Note that the ends of every piece has a letter on it. Note that every slot also has a letter on it. By matching the two up you can easily assemble the case. Now take it apart again.
Use bar clamps to hold the big side pieces in place and apply a small amount of acrylic glue (solvent really). It doesn’t take much! If you drip solvent where it doesn’t belong DO NOT wipe it up; this just makes a mess. Your best option is to wait and let the solvent dry. Be careful to place the bar clamps away from the slots so that solvent does not get on the rubber pads of the clamps.
Once the sides dry a bit move the clamps to assemble the front and back. I found that my acrylic sheet was a little thinner than 3mm. You can see in the photo how I used tooth picks in each slot under the base to lift it up. Once the solvent dried I could remove them and the case dried to be rock solid.
You can remove the clamps and assemble the rest of the cross pieces that hold the pill trays. There are several parts to put in, but each has a letter on the end – be sure to match it with the corresponding slot or groove. The only other trick to these cross pieces is to make sure they sit all the way down against the base; push them in and hold them while you apply solvent to them.
Now locate the two slide carriers for the pill dispensers. If your carriers are made from wood, then press a pill dispenser into each until they sit as shown in the photo. If your carriers are made from acrylic, then do not press them into place; you will break the plastic carriers. Instead you must gently file the slot in each carrier until it just fits the pill dispensers. Then use a few dabs of hot glue to hold the pill carriers in place.
You can slide the two assembled pill carriers into your Pill Reminder case. They slide in from right to left. Note that one is labeled AM and one PM. They are made differently so that you cannot insert them in the wrong spot.
Finally, assemble the catches that hold the top closed. Each catch is held in place with one screw and a nut. Tighten the nut until the catch has some friction but can still be rotated. Apply a second nut to lock the first one in place. You could also put a drop of Locktite on the nuts.
The Pill Reminder case went through many iterations as I tried different design ideas. For those of you who are interested in the evolution of the case, I’m including a link to a short video I made of the design process.
For more detail: The Pill Reminder
About The Author
Ibrar Ayyub
I am an experienced technical writer holding a Master's degree in computer science from BZU Multan, Pakistan University. With a background spanning various industries, particularly in home automation and engineering, I have honed my skills in crafting clear and concise content. Proficient in leveraging infographics and diagrams, I strive to simplify complex concepts for readers. My strength lies in thorough research and presenting information in a structured and logical format.
Follow Us:LinkedinTwitter