Week 01
January 11, 2012 (1 hour):
Met with professor Talavage to discuss the basic functionality of the headset sensor devices that will be used to collect data for this project. Discussed challenges of interfacing these devices to the base station using the USB protocol standard.
January 11, 2012 (1 hour):
Met as a team to complete preliminary project proposal.
January 12, 2012 (3 hours):
Researched USB protocol standards. Determined that the base station must have some sort of USB host to communicate with the USB sensor devices. Discovered that it would be much easier to implement USB communcation protocol with a motherboard rather than a bare microcontroller.
WEEK 01 SUMMARY
Accomplishments: Submitted preliminary project proposal. Gained insight into USB protocol standard, and determined a motherboard would be ideal to handle USB communication.
Weekly Work Total: 5 hours
Project Work Total: 5 hours
Week 02
January 18, 2012 (1 hour):
Met with Professor Vijay Raghunathan to further discuss project idea. Professor Raghunathan suggested using a BeagleBoard running embedded Linux as primary means of USB communication. The BeagleBoard would also be able to interface to a hard disk, maintaining the file system necessary to hold data obtained from several headset sensor devices.
January 18, 2012 (3 hours):
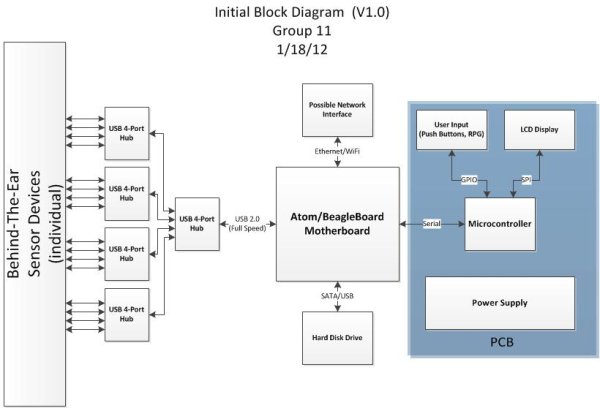
Met as a team to discuss PSSC’s for this project as well as system design. The current plan is to cascade powered USB hubs to support up to 16 USB headset sensors, which will connect to a USB port on either a BeagleBoard or Atom board. This board would also manage a file system on a hard drive disk used to store data from the headsets. A standalone microcontroller would be used control an LCD display, as well as power some LEDs and interface with the user through pushbuttons and a rotary pulse generator. The standalone microcontroller would communicate with the motherboard through a serial interface. Also, it was decided that the group would utilize Trello as a free project management service for this semester.
PSSCs:
1. An ability to obtain raw data from sensors via a USB interface with motherboard
2. An ability to store raw data and manage files on mass storage device
3. An ability to charge and monitor sensor battery status and convey to the user
4. An ability to receive user input and interface to the user through graphical display
5. An ability to communicate to the motherboard via the microprocessor using serial interface
 January 18, 2012 (1 hour):
Completed preliminary system block diagram (V1.0)
January 20, 2012 (1 hour):
Met with Professor Johnson to discuss concerns related to the proposed design meeting 477 course requirements. Johnson expressed that he thought the project placed too much functionality on the motherboard, leaving little functionality for the custom PCB. It was concluded that either a much larger portion of responsibility would need to moved from the motherboard to PCB, or a new project idea would need to be developed.
January 20, 2012 (2 hours):
Met with George Hadley to discuss the possibility of moving USB host functionality from the motherboard to the PCB. George felt that amount of work required to achieve this would be much too great to fully complete the design by the end of the semester. The team concluded that a new project idea would be a much better idea than trying to modify the original idea. It was concluded that the new design would be a “Reverse Geocache” device, where instead of locating a box using gps coordinates, there would be a box that would remain locked until it had been brought to the correct sequence of GPS locations.
January 21, 2012 (4 hours):
Met as a team to discuss theory of operation for the new project idea. It was determine that the newly named “RevGeo” Reverse Geocache would receive GPS signals to determine its current location, direct its user to the next “checkpoint” by the use of LEDs and a compass with tilt compensation, and unlock itself with either a solenoid or servo controlled locking mechanism when the box has reached its final destination. The box will also have an LCD screen to interface with the user, read instructions from a microSD card, and a speaker to play audio when the box unlocks. Finally an RFID “master key” system will be implemented to override the system and unlock the box at any time. A new preliminary system diagram was also developed during this meeting.
New PSSCs:
1. An ability to obtain and decode global positioning data via GPS
2. An ability to decode acceleration and magnetometer data to determine a compass heading
3. An ability to access and interpret files located on a microSD card
4. An ability to display information to the user via an LCD display
5. An ability to identify an RFID tag using an RFID reader and serial interface
WEEK 02 SUMMARY
Accomplishments: Project proposal, block diagram, and PSSCs created for initial idea, then revised to reflect new project idea.
Weekly Work Total: 12 hours
Project Work Total: 17 hours
Week 03
January 23, 2012 (3 hours):
Worked through Sparkfun Eagle tutorials for Schematic, Layout, and Custom Component Generation. Based off the knowledge gained in these tutorials, the group created a custom component for the National Semiconductor LM2675M-5 switch mode voltage regulator chip. Using this custom component, a layout and schematic was individually begun for the 5V regulator circuit described in the PADS tutorial.
January 23, 2012 (2 hours):
The group discussed a preliminary list of major components needed for the project. Items on this list are as follows: Microcontroller, GPS receiver, compass, RFID receiver, MicroSD card, locking mechanism, rechargable battery, LCD screen, speaker, case. Began more in-depth research on some of these parts, with the goal of purchasing many of these parts in the next few days.
January 24, 2012 (1 hour):
Completed the schematic and layout for the 5V regulator circuit described in the PADS tutorial, and was checked off by the George Hadley for completion of HW #2.
January 24, 2012 (1 hour):
Met as a group to finalize the TCSP presentation slides for tomorrow, and determined who would discuss each topic during the presentation.
January 25, 2012 (2 hours):
Met as a group to develop a preliminary cost sheet based on the components be used for the project. The total estimated cost for the design will be around $300. Several parts were ordered during this meeting, which will arrive by Monday of next week at the latest. Those components are as follows:
* GPS Receiver – Copernicus II DIP Module (Sparkfun)
* Tilt Compensated Compass (with breakout board) – LSM303DLH (Sparkfun)
* RFID Starter Kit (RFID module, USB reader, RFID cards) – ID-12 (Sparkfun)
* Speaker – 8ohm, 0.5W (Sparkfun)
* Pelican Case 1150 – 8.18″ x 5.68″ x 3.62″ (Amazon)
WEEK 03 SUMMARY
Accomplishments: Completed Sparkfun Eagle Tutorials as well as HW#2, preliminary parts list completed and several components purchased.
Weekly Work Total: 9 hours
Project Work Total: 26 hours
Week 04
January 30, 2012 (2 hours):
Researched microcontroller choices for this project. The PIC microcontrollers from Microchip look to be a good choice, as Microchip has a Memory Disk Drive File System library that allows for easy interfacing with SD cards. Some other requirements for a suitable microcontroller include having 4+ UART channels, 2+ I2C channels, 2+ SPI channels, and enough code and data memory for the Memory Disk Drive File System library along with all application code. Taking all of this into consideration, the PIC24FJ128GA306 looks to be a strong contender in the choice of micro for this project.
January 31, 2012 (4 hours):
Created and finalized TCSP Powerpoint on Design Contraint Analysis to be presented in class tomorrow. The microcontroller decided on for this project is the PIC24FJ256GA106, which has 256KB Flash and 16KB RAM, which will allow plenty of space for application code, as well as for the Memory Disk Drive File System Library from Microchip to assist with MicroSD interfacing. Also, the PIC24FJ256GA106 has 4 UART, 3 SPI, and 3 I2C, which satisfies the project design contraints of requiring 3 UART (GPS, RFID, PC Debug), 1 SPI (MicroSD), and 1 I2C (Digital Compass). The team decided to incorportate an FT232RL IC into the project design, allowing for the device to communicate with a PC via a USB virtual COM port. PSSCs were also revised to reflect comments from TAs and professors. The revised PSSCs are as follows:
1. An ability to obtain and decode global positioning data in order to verify if current location matches pre-determined desired location.
2. An ability to utilize accelerometer and magnetometer data to determine a compass heading with tilt compensation.
3. An ability to access and interpret files located on a microSD card.
4. An ability to display information to the user via an LCD display.
5. An ability to identify an RFID tag using an RFID reader.
February 1, 2012 (5 hours):
Completed Introduction and Design Requirement sections of the Design Constraint Analysis Homework. For more details see the “Homeworks” section of the website.
February 2, 2012 (5 hours):
Completed Component Selection Rationale and Conclusion of Design Constraint Analysis Homework, as well as the initial parts list and revised block diagram. Finalized entire Design Contraint homework. Called up Microchip to obtain samples of the PIC24FJ256GA106 microcontroller. The samples should arrive late next week.
WEEK 04 SUMMARY
Accomplishments: Completed Design Contraint homework assignment. Finalized and ordered the microcontroller chosen for this project (PIC24FJ256GA106).
Weekly Work Total: 16 hours
Project Work Total: 42 hours
Week 05
February 8, 2012 (2 hours):
Met with Chuck to discuss debugging/testing methods for the PIC24FJ256GA106. Chuck supplied the group with an Explorer 16 development board for PIC24 microcontrollers, complete with a PIC24FJ128GA010 for development purposes. Installed the Microchip MPLAB IDE for use with PIC24 software development and testing, and downloaded the Microchip Memory Disk Drive File System Library for use with interfacing PIC micros to SD cards. Completed a demo tutorial on how to create a new MPLAB project, connect to the development board, download code, and debug the project on the microcontroller.
February 10, 2012 (3 hours):
Continued to experiment with the Microchip MPLAB IDE that will be used as the development environment for the PIC24 microcontroller. Began to look at the datasheet for the PIC24FJ256GA106 to identify critical pins for initial programming, debugging, and functionality. For communication with the ICD 2 Debugger, connections must be made from the debugger to the MCLR (Master Clear) pin, PGEC/PGED pair, and Vcc/Vss. Also, due to the limited number of pins on the chosen microcontroller, pins for UART and SPI communication need to be assigned funcationality using the Peripheral Pin Select Registers. It seems as though the user is able to assign input and output pins to a given peripheral without much constraint, which will provide a large amount of freedom when designing the system. The PIC24FJ256GA106 micros that were ordered last week came in today, and the team talked with Chuck to place an order for microcontroller breakout boards to be used during initial experimenting and testing stages.
WEEK 05 SUMMARY
Accomplishments: Obtained the main microcontroller to be used for this project. Installed the IDE to be used with the PIC24 micro, and completed initial tutorials related to creating and building new projects. Began to look at critical pins on micro for initial programming and testing.
Weekly Work Total: 5 hours
Project Work Total: 47 hours
Week 06
February 14, 2012 (3 hours):
Researched and confirmed how several of the chosen peripherals for this project will interface with the PIC24FJ256GA106. Since the RFID unit operates on 5V, it was initally thought that level translators would be needed so that the 5V TTL serial logic could communicate with the 3.3V micro. After further research, it was discovered that the PIC24 device has several digital input pins that are tolerant up to 5.5V. This alleviates the need for any level translators between the two devices. Also, since the digitial compass I2C lines typically operate on 1.8V digital logic, it was confirmed that the Sparkfun breakout board has built-in level translators to ensure correct operation with the 3.3V micro. Lastly, it was discovered that only one of the PGECx/PGEDx pin pairs on the micro need to be connected to the ICD 2 debugging unit, and that the Configuration Bits (set in software) identify which pair is to be used.
February 15, 2012 (3 hours):
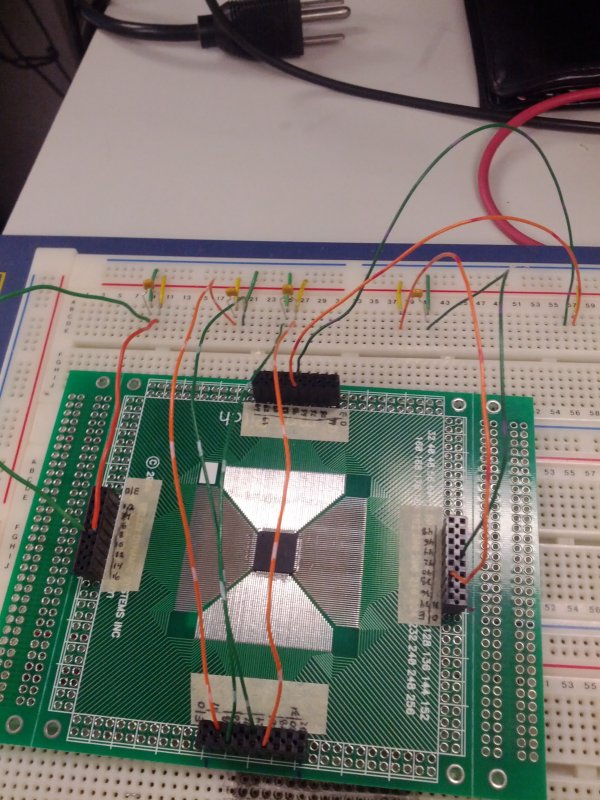
Soldered headers to the breakout board which Jeff previously soldered one of the PIC24 micros to. Verified connectivity for each of the pins on the breakout board, and used masking tape to label the microcontroller pin numbers. Began to add .1 uF decoupling capacitors to each Vdd/Vss pair, as well as the appropriate resistors for the MCLR pin as specified by the PIC24FJ246GA106 datasheet.
February 16, 2012 (5 hours):
Obtained the 10uF capacitor needed for the Vcap/Vddcore pin to allow the internal voltage regulator on the micro to convert the 3.3V Vdd to 2.5V for the microcontroller core. Obtained an RJ-11 cable from Chuck for use with the ICD 2 debugger, stripped the wires on one end, and soldered headers to the wires for use with the microcontroller breakout board. Applied initial power to the microcontroller breakout board, and was able to successfully connect to and program the micro via the MPLAB software. Created an initial hearbeat program using one of the timer modules and an interrupt, which toggles an I/O pin when the timer count reaches 0xFFFF. Since the peripheral clock for the microcontroller currently operates at 4MHz, the square wave generated should have a frequency of 4M / 2^16 / 2 ~= 30.5 Hz This result was successfully observed on an oscilloscope,
February 18, 2012 (2 hours):
Met with Jeff to begin testing the newly obtained FT232 breakout board from Sparkfun. The goal for tonight was to be able transmit a single character from one of the UART modules on the microcontroller to the FT232, which would then transmit the character via USB to a virtual COM port on a PC. Initialized the UART1 module to 9600 baud, 8 bit data, no parity, and 1 stop bit. Placed a character in the UART1 transmit buffer, but was unable to retrieve the character on the PC side. Connected an oscilloscope to the Rx pin on the FT232, and could see that the character was correctly transmitted by the UART module, but would still not show up on the PC terminal.
WEEK 06 SUMMARY
Accomplishments: Verified how several peripherals would interface with the microcontroller. Successfully constructed a breakout board for the PIC24FJ256GA106, and created an initial “Hello World” heartbeat program to verify functionality. Began to interface with the FT232 module, but were unable to receive a character on the PC side.
Weekly Work Total: 13 hours
Project Work Total: 60 hours
Week 07
February 19, 2012 (3 hours):
Continued working on interfacing with the FT232 module, with the goal of receiving a character on the PC side sent from the UART1 module on the microcontroller. Soon found out that characters could be received on the PC via USB only when the power cord was connected to the laptop that was being used for communication. As soon as the power cord was removed, communication would stop. Began to look into USB power specs for laptop on battery vs. not on battery, but could not find any obvious solution to this strange problem. Wrote a basic function to transmit strings of data via UART, but soon found that the printf function in the library would automatically send data out via a properly initialized UART1 channel. This printf function will be very useful for debugging statements in the future.
February 20, 2012 (6 hours):
Fixed the problem with the FT232 only working when the power cord is attached to the laptop. Apparently, not all of the ground rails on the breadboard were connected together, and this was causing unpredictable behavior with the FT232 module. Began to create another test program using both the UART1 and UART2 modules of the microcontroller, with the goal of sending a character from the PC to the Rx pin of UART2 via the FT232 chip, then copying the character from the UART2 Rx buffer to the UART1 Tx buffer, and sending it back to the PC via UART1 and the FT232 chip. Ran into a whole bunch of weird issues, where only one UART module or the other would work at a time. After a lot of debugging, it was discovered that the Peripheral Pin Select registers, which controlled which pins were used for each peripheral module, were set by default to only allow one write sequence. Once this default setting was changed, both UART modules were able to work at the same time, and the echo to terminal program proved to be successful. Another program was also created to read in data from the RFID module via UART2, and verify the RFID code against a stored list of valid “keys”. This program also proved to be successful.
February 21, 2012 (8 hours):
Connected the GPS module to a breadboard and was able to recognize the device by using the Trimble GPS Studio PC program. Able to successfully configure the GPS device via the PC program, log messages, and convert the messages to ASCII text for further analysis. Unable to actually obtain any sort of GPS lock or coordinate data at this time due to lack of an antenna for the GPS device.
Moved focus from the GPS to the digital compass module, which interfaces via I2C. Researched the I2C protocol to understand the fundamental communication pattern between devices. Next, looked at the application notes and datasheet for the compass, to understand which registers to initialize for functionality. Began initializing the I2C1 module on the microcontroller for 100 KHz (standard mode), and creating routines to send and receive bytes to both the accelerometer (slave address 0x18) and the magnetometer (slave address 0x1E). After initializing I2C module and creating functions for communication, a test program was developed to retrieve accelerometer data and display it to the PC terminal. Programmed the micro and ran test code, but unable to retrieve data from the compass module. Placed a scope on the I2C lines, but did not see logic signals being transmitted. Further debugging will be necessary.
February 22, 2012 (3 hours):
Verified pins on microcontroller schematic to ensure correct PCB connections. Only the I2C lines and all Vcc/Vdd pins are required to be connected to very specific pins. All UART and SPI pins can be assigned to any RPx pin (reprogrammable peripheral pins) on the device, and any GPIO pins can be assigned to any Ryx pin, where ‘y’ is an I/O port letter, and ‘x’ is a corresponding pin number for that port.
February 23, 2012 (4 hours):
Focused on the compass and I2C module again. Suprisingly, after reconnecting the compass module to the micro, the I2C module worked immediately. Created a test program to obtain both accelerometer and magnetometer data, and display to the PC terminal (picture below). Partway through the night, the I2C stopped working and began displaying behavior similar to what was seen on Tuesday. After some tinkering with wires and reprogramming the micro, the module began working again with no actual changes in software. Could not replicate the problem again for the rest of the night. Not sure if this is a software or hardware problem yet, but leaning towards the hardware side.
WEEK 07 SUMMARY
Accomplishments: Able to communicate with PC via UART1 module, and RFID via UART2 module. Able to communicate with GPS via PC application. Able to obtain accelerometer and magnetometer data via I2C1 module, but errors may still exist either in hardware or software.
Weekly Work Total: 24 hours
Project Work Total: 84 hours
Week 08
February 27, 2012 (3 hours):
Shifted focus from software development to preparation for the upcoming Design Review on Wednesday. Created two powerpoint slides related to the preliminary software design and development status. Some of the software accomplishments thus far involve communicating with the FT232 module via UART1, receiving RFID data via UART2, and communication with the compass module via I2C. The next goals on the software side of things are initilizing communication with the GPS module (UART3), LCD screen (GPIO), and MicroSD card (SPI). Also created a small table catagorizing the pins used on the microcontroller into pins used for initial setup (Vcc/Vss/Debug/MCLR), pins used for serial communication (UART, SPI, I2C), GPIO pins for the LCD and pushbutton, and PWM pins for the speaker and servo. As of now, 13 pins are used for initial setup, 13 for serial communication, 15 for GPIO, and 2 for PWM. Altogether 43 of the 64 pins are currently in use. Began working on Component Selection slides, which will be heavily based off of the ones used for the Design Constraint presentation.
 February 28, 2012 (4 hours):
Completed the Component Selection slides for the Design Review tomorrow. The major component choices that will be discussed include the PIC24FJ256GA106 microcontroller, Trimble Copernicus II GPS Receiver, LSM303DLH Digital Compass, and ID-12 RFID receiver. Updated the block diagram for the project, removing the LEDs for user interface, and added the MAX17043 Fuel Gauge to monitor battery status. The LEDs were removed as the team believes the compass heading would be able to be displayed using the LCD screen instead, which would simplify the PCB design and also help to reduce power consumption for the project. Worked with Jeff to finish up the Schematic and Theory of Operation slides, and polished up the entire Powerpoint document for the presentation tomorrow.
March 3, 2012 (2 hours):
Worked with Jeff to re-connect the GPS module to the Trimble GPS application on the PC. The FT232 breakout board is used to provide a serial to USB conversion, so that the device can be recognized through a virtual COM port on the PC. Connected the newly obtained antenna to the GPS and applied power. The PC application was able to show the connection status of each satellite detected, and by moving the antenna to a window, enough satellites were discovered to start obtaining position data. The next step was to take the GPS unit (complete with breadboard) outdoors and test tracking while moving. The GPS was placed inside of the Pelican case, and the lid was placed on top to simulate normal operation. A route was walked, and then promptly repeated, since both teammates forgot to enable logging of data on the PC the first time. The data results were highly accurate, as shown in the image below (The team attempted to spell out “HI” near the bell tower), but the GPS had some problems initially discovering the satellites in between the first and second runs. More experimentation is required to determine if this was related to the positioning of the GPS, or some other factor.
WEEK 08 SUMMARY
Accomplishments: Prepared all required materials for the Design Review presentation, and performed initial satellite acquisition of the GPS module, in addition to logging and mapping data via the Trimble PC application
Weekly Work Total: 9 hours
Project Work Total: 93 hours
Week 09
March 4, 2012 (3 hours):
Created a detailed Excel document regarding pin assignments for the PIC24FJ256GA106. This spreadsheet includes a list of all pin numbers, all possible uses for each pin, whether or not the pin is 5V input tolerant, the chosen functionality of each pin for this project, the associated peripheral for each pin, and any special notes for each pin. This will help greatly in the upcoming week, since the pin assignments will most likely need to be shifted around before the PCB is finalized. Discussed proposed changes to the PCB with the rest of the team. Most likely, the GPIO pins for the LCD will be moved so that all of them correspond to pins on Port B, rather than scattered around Ports G, B, and F. Also, headers and traces might be added to the PCB to allow the second serial port on the GPS to be used in combination with an additional (removable) FT232 module for easy programming, logging, and mapping of GPS data for debugging purposes, even when connected to the PCB.
For more detail: Joshua Marchi’s Lab Notebook
About The Author
Ibrar Ayyub
I am an experienced technical writer holding a Master's degree in computer science from BZU Multan, Pakistan University. With a background spanning various industries, particularly in home automation and engineering, I have honed my skills in crafting clear and concise content. Proficient in leveraging infographics and diagrams, I strive to simplify complex concepts for readers. My strength lies in thorough research and presenting information in a structured and logical format.
Follow Us:LinkedinTwitter