The independent studies research with Dr. Karl Gugel during the fall semester of 2010 involved experimenting with built-in and separate Ethernet controller devices. The goal of this project was to determine the necessary components needed to be able to interface the various ethernet controllers with numerous microcontroller devices. Dr. Gugel essentially wanted to be able to control the microcontroller through the Internet on an Internet browser in a different location from where the ethernet device was located. This document not only describes the research accomplished but also serves as a guide for ethernet design solutions. Since this project involved ethernet and the Internet, it was beneficial to gain knowledge about how TCP/IP works, the uIP and lwIP TCP/IP stacks, the HTTP protocols, and JavaScript. Below is a list of source references that were used. 1) Dannenberg, Andreas. MSP430 Internet Connectivity. SLAA137A. Texas Instrument, Feb. 2004. Web. 25 Sept. 2010. . 2) Dunkels, Adam. The UIP Embedded TCP/IP Stack. Rep. Swedish Institute of Computer Science, June 2006. Web. 25 Sept. 2010. 3) Dunkels, Adam. Design and Implementation of the LwIP TCP/IP Stack. Rep. Swedish Institute of Computer Science, 21 Feb. 2001. Web. 25 Sept. 2010. 4) “HTTP Made Really Easy.” James Marshall’s Home Page. Web. 3 Nov. 2010. . 5) “JavaScript Tutorial.” W3Schools Online Web Tutorials. Web. 25 Sept. 2010. . The application note SLAA137A from Texas Instrument, reference 1, has a comprehensive but brief introduction of what the TCP/IP stack does, how it works, and the layers that are associated with it. There are also other topics that are discussed briefly and how they all interact with each other. The uIP and lwIP are TCP/IP stacks that were used in the TI Stellaris code. The other references include information about HTTP and JavaScript, which is a way to interact and communicate with the web server. Although the entire Internet protocols contain an enormous amount of information, it is not necessary to go too in-depth in the research. Only a basic knowledge of the topic is helpful when deciphering the various sample codes for the TCP/IP stack and ethernet controller. The devices that were experimented with were the Texas Instrument Stellaris LM3S6965 evaluation board and the EasyWeb 3 board (MSP430F149 with a Crystal Lan CS8900a ethernet controller). The Microchip PIC18F97J60 was not physical tested, but will also be discussed briefly, as well as other PIC devices, since it has similar attributes to the Stellaris board.
Texas InstrTexas Instrument Stellaris LM3S6965
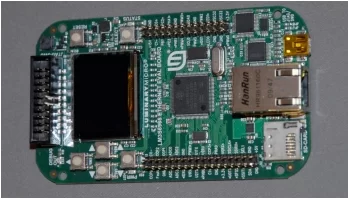
The first evaluation board that was tested was the Texas Instrument Stellaris LM3S6965. This
microcontroller is a 32-bit processor that contains a built in ethernet controller and all the
necessary parts to integrate it. The evaluation board included external peripheral components
such as an OLED display, smaller piezo-electric speaker, and SD card slot. Figure 1 displays the
board used.
The great thing about the Stellaris board was that there were example programs to demonstrate
simple to more advanced aspects of the microcontroller such as blinking the LEDS to I/O control
through the Internet using different TCP/IP stacks. A few of the example programs demonstrated
different way to use of the ethernet controller. One way, in particular, was by running a
webserver and uploading content on an Internet browser. The most useful example was the
ethernet I/O program, which controls various I/O controls from the microprocessor through a
dynamic webpage. Although the code was commented, tracing the functions back to the
appropriate location was necessary to be able to modify the program to fit our application.
The ethernet I/O program uses the Lightweight TCP/IP stack (lwIP) created by Adam Dunkels.
The advantages of using the lwIP is that it features all the basic components to get the ethernet
controller connected to the Internet, but also more advanced functionalities. The lwIP features:
1) IP (Internet Protocol)
2) ICMP (Internet Control Message Protocol)
3) UDP (User Datagram Protocol)
4) TCP (Transmission Control Protocol)
5) Specialized no-copy API
6) Berkeley socket API
One drawback of the lwIP stack is the amount of code space needed. Since the lwIP implements
a full protocol stack, the space needed is much over 10kb. On the other hand, the uIP is designed
to be a low performance stack that requires extremely little RAM, approximately 5kb. The
drawback is that it has a lot of limitations compared to the lwIP; one of the disadvantages of the
uIP is that one has a single buffer for both input and output, thus data transfer is much slower.
Since the Stellaris LM3S6965 has plenty of memory, lwIP is a suitable choice. TI has example
programs for both uIP and lwIP stacks.
The example program demonstrates two different ways of transferring data and commands from
an Internet browser to the webserver. One way to control I/O ports of the microprocessor is
through CGI/SSI, which uses header info and tags to determine the appropriate actions to take,
create an appropriate document to send in response, and send it back to the client. The other way
of data transfer is through and an easier technique, the “GET” method of the HTTP protocol. TI
created a special file system that intercepts the requests from the web browser. It gets the request
from the client (internet browser), determines what the id is, retrieves the data that is specified by
that id, and sends it back to the client. The second technique was modified to fit my application
since altering the JavaScript on the webpage did not seem as much trouble as modifying the
CGI/SSI code.
The first thing that had to be accomplished was to determine what the main source code is used
for. The main source code initializes the all of the ethernet controller registers, sets up the ports
that are used to demo the program, initializes the necessary interrupts and timers, and establishes
a connections and IP address. Figure 2 displays the IP address that is established by the DHCP
client (dynamic host configuration protocol – automatically assign IP address) in the main source
code. The code was tested point-to-point (board directly to computer), board connected to a
router (local network), and the board connected directly to cable modem. All cases worked
properly and were able to control the board via the Internet through an Internet browser. Board
control was also successful outside of the United States via the Internet.

Once all that is completed, the interrupts and timers do all the work. The second thing that had to
be accomplished was to figure out how the program sends and receives the data from the Internet
browser. Below is a list of relevant source codes that need to be modified:
1) io_fsdata.h – contains the webpage in hex format
2) lmi_fs.c – TI specified file system that intercepts the requests from the client
3) io.c – contains functions to change or read specific io pins
1.1 Experimentation
1.1.1 IO_FSDATA.H
The header file io_fsdata.h contains the webpage in hex format. The original webpage of the
example program has several web pages linked together to a parent webpage (index.html); all of
the files are contained in one folder (fs). The page io_http.html includes the i/o control demo 1,
which controls the user led and the pwm frequency/duty cycle though dynamic JavaScript
interaction. The main goal is to read and write values to user specified location. This involves
creating html and JavaScript code to fetch the current value at a location (read operation), to
change the read location, to change the current value at a location (write operation), and to
change the write location. The JavaScript functions allow the webpage to update content without
having to refresh the whole page. This is handy especially if speed and performance is needed
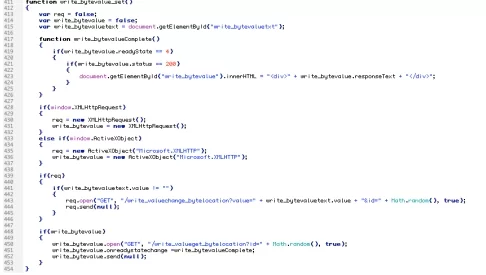
for the user’s application. Figure 3 displays a code snippet of the JavaScript function to change
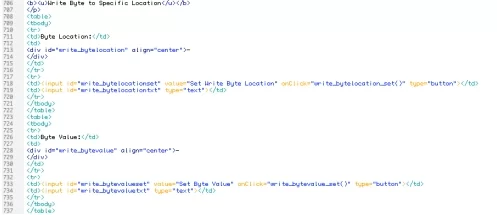
the value pointed by the write location. Figure 4 displays the html code for the value input forms.
Several references, found on the first page, were used to understand the JavaScript functions that
were written for the LED and PWM controls. Similar code was written for the added READ and
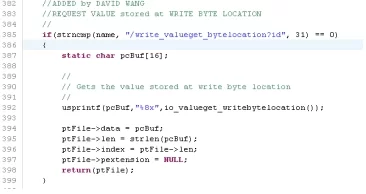
WRITE operations. For example the write value function: When the user inputs a value into the
input form and clicks the button, the onClick value is performed (in this case
write_bytevalue_set() function). The JavaScript function opens an HTTPRequest to the web
server. If the request is acknowledged and valid, the function uses the http method “GET” to get
the data specified by the id “/write_valueget_bytelocation?id=” followed by the user inputted
value. It is then sent to the web server and intercepted by the lmi_fs.c code (will be discussed
later on). After the web server performs the necessary tasks for that id, data is sent back to the
client and the write value displayed on the Internet browser changes to the new write value.
When altering the webpage code, if any changes are made to the static content of the web pages,
a specific script must be used to regenerate io_fsdata.h, in order for those changes to be picked
up by the web server. TI specified in the beginning of the lmi_fs.c code that the file system data
(io_fsdata.c) for that application must be included. The file is generated by the makefsfile utility
exe program by using the command “makefsfile -i fs -o io_fsdata.h -r –h” (without the quotes) in
a command prompt. FS is the folder that contains all the web pages and image content. The thing
that TI does not specify is that the makefsfile has to be in the same project folder that has all of
the source code and the FS folder. Once all is done, io_fsdata.h is created and will be in the
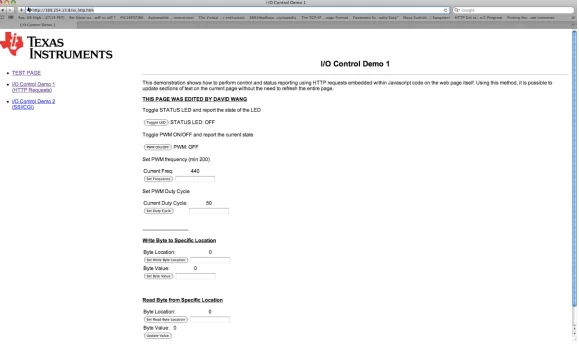
project folder. Figure 5 displays the web page with the modifications made to accommodate the
read and write operations.
To access the webpage in the Internet browser, the IP address of the board (shown in figure 2)
must be typed into the address bar, after once a connection is made.
1.1.2 LMI_FS.C
The source code lmi_fs.c is the code that intercepts the HTTP request from the client. TI created
a structure fs_file that contains a function fs_open, which services the requests. This structure is
used throughout the entire program to be able to access this information when it is necessary.
The code obtains the id that is sent by the client, and determines what id it pertains to. Figure 6
displays the code for the id “/write_valueget_bytelocation?id=”. It is checked to make sure that it
is the correct id within the if statement, it then gets the value stored at the write location from the
io_valueget_writebytelocation() function (shown in figure 7). This value is stored as an 8
decimal place hexadecimal value in the array pcBuf. Similar code was written for the other id
requests in the JavaScript functions of the web page.
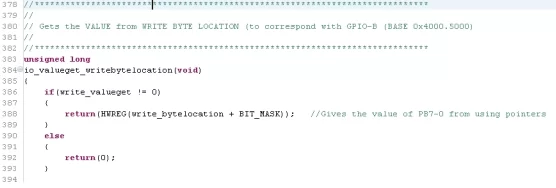
The header files included in the StellarisWare program was useful when writing functions that
access the microcontrollers internals. HWREG is a function that uses pointers to access that
specific memory location, as shown in figure 7. It was helpful to use these because it makes it
easier to write the C code and it essentially optimizes/reduces the amount of code to read.
1.1.3 IO.C
Source code io.c contains all the functions to read or change the specific io pins that are used. In
the example program, the user led and the pwm frequency/duty cycle were used. To demonstrate
that it is possible to read and write bytes to a microcontroller, a read value from a specific
location and a write value to a specific location were added. This way the user would have the
freedom to select which memory location they wanted to read or write to. Functions were added
to the io.c code to be able to access a particular location and be able to read or write a 32-bit
value (in hex). In reality, to access every valid location in the microcontroller requires
initialization of all peripherals and io ports. For demonstration purposes, only the memory
location 0x40005000 (PortB of the microcontroller) was used to test the added functions. PortB
was used because all 8 pins of that port were available on headers. For verifying and debugging
purposes, reading and writing to PortB could be checked with a multimeter to the corresponding
pin headers. Figure 8 displays a snippet of a function that was added to the program. The
function is called when the user requests to write a value to a specified location (in this case,
only 0x40005000).
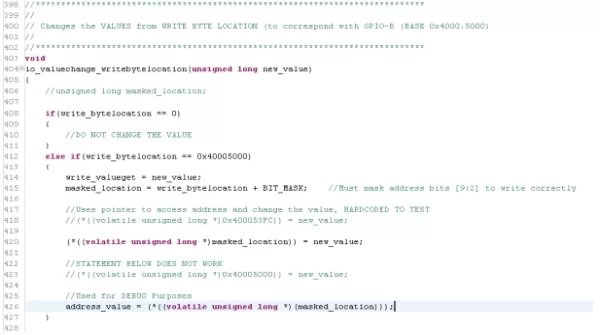
The way the architecture of the LM3S6965 is configured is different than the other
microcontrollers that have been experimented with. When read or writing to a port (i.e. PortB at
location 0x40005000), a mask must be used in conjunction with the base location address. The
mask must be configured for pin 9 to pin 2 where pin 9 is PB7 and pin 2 is PB0. A bit mask of
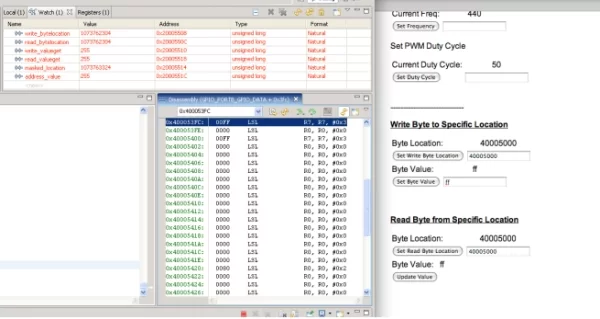
0x3FC was used with 0x40005000 to access all the PortB values. Figure 9 displays the added
webpage and the debugging terminal to verify the values were correct.
1.2 Advantages
There are several advantages of using the Stellaris LM3S6965 microcontroller. One advantage is
that TI provides various example programs, for different development environments, that can be
used to help the user develop around their specific application. Not only does TI implement the
lwIP stack, but the uIP stack is also implemented. TI provides the programs for Code Composer
Studio, CodeSourcery Tools, IAR, Keil, and Code Red Technologies. This gives the user
flexibility in what they can use depending on what their application calls for. In this case with the
ethernet io control program, it contained all the necessary functions that fit my application.
Another advantage is that taking the microcontroller alone and interfacing it with the Ethernet
jack is fairly simple. There are 4 control lines: TXOP, TXON, RXIP, and RXIN. Two other io
pins are needed to control the Ethernet jack LEDS, and the MIXO is supplied VCC. If the user is
creating a board for the LM3S6965 and using the Ethernet function (not using the evaluation
board), interfacing is not complicated. Refer to TI LM3S6965 Microcontroller Datasheet section
16.3.1, Hardware Configuration, to see the proper method for interfacing the Ethernet controller
to a 10/100BASE-T Ethernet jack.
Also, a big advantage is that the Stellaris is powered and debugged by a mini usb cable, or by
TI’s JTAG programmer. This is beneficial because it can limit the amount of pins used for
programming/debugging, which in turn makes more io pins available for use. TI gives the user
more flexibility in their design by adding functions like this in the microcontroller.
1.3 Disadvantages
One disadvantage is that the code environment used for the Stellaris board was Code Composer
Studios (CCS) by TI. CCS is a very complex, but fully developed IDE that is a powerful
software program. Although previous experience with CCS was with ASM projects, setting up C
projects was not straightforward. It was crucial that header files and source files for the project
are linked directly to the entire project workspace. This can be accomplished by pointing the
“path include/search” under the building options to be pointed to the folder that contains all the
necessary files for the project. If this is not done properly, when compiling the project errors that
occur will notify that there are “unresolved symbols” within the code. This problem took a while
to figure out and solve.
Another disadvantage is the use of the lwIP TCP/IP stack. The lwIP is very in-depth and
complex for a beginner programmer. Although TI provides example programs that demonstrate
the various peripherals on the microcontroller/evaluation board, the user may find themselves
without a helpful example code for their application. In the case of the ethernet controller, if the
user has an application that involves more of the functionality of the TCP/IP stack rather than the
basic protocols, developing their own code to fit the application may have to be done. With this
project, only the basic protocols and very limited knowledge about TCP/IP was needed since TI
provided the perfect code, the ethernet io control (implements lwIP TCP/IP stack, uses both the
file system and CGI/SSI to communicate between the client and the web server). Depending on
the application, TI’s example programs can be directly modified to fit one’s desires.
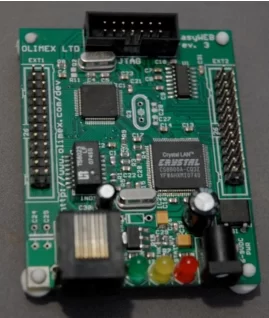
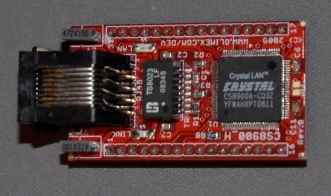
2. Olimex EasyWeb3
The Olimex EasyWeb3 board comprises the MSP430F149, 8-bit, microcontroller and the Crystal
Lan CS8900a ethernet control device. Figure 10 displays the EasyWeb3 board. Figure 11
displays the Crystal Lan standalone ethernet device that can be ported to any 8 or 16-bit
microcontroller of the user’s choice. The EasyWeb3 was used mainly because the board
implements all the necessary components to integrate the ethernet controller with the MSP430.
The reason why the CS8900a was used for this project was that TI provided an application note
that involved the implementation of the ethernet controller with an MSP430 and a TCP/IP stack.
Most microcontrollers with built in ethernet controller devices are either 16 or 32-bit
architectures, which can be an overkill depending on the user’s application. Since TI provided
example code, device drivers, and a basic TCP/IP stack, this would be a valid choice for the
user’s application.
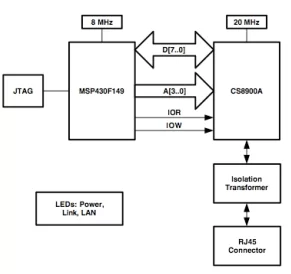
The CS8900a is a low-cost ethernet LAN controller that has a simple bus interface that can be
directly connected to a microcontroller’s io ports. All that is needed is an 8-bit bus for data, 4-
bits for an address bus, and two io pins for the control signals (Read and Write). Once a valid io
address is applied to the address bus and driving one of the control lines, data transfer over the
data bus can occur. The CS8900a can also be driven either by 5V or 3.3V, which makes it
suitable for TI MSP430 family. Figure 12 displays the hardware block diagram from the TI
application note SLAA137A (reference 1) of the interfacing of the MSP430 to the CS8900a.
2.1 Experimentation
The example code that was provided with the TI application note included the ethernet module
(device drivers for the CS8900a), the TCP/IP module created by Andreas Dannenberg, and the
application code. The code was initially written and compiled for IAR Embedded Workbench.
Code Composer Studio was used to try and compile the example program, since that
environment had been used before. There were many problems associated with compiling
including incompatible function types. These errors could not be fixed so IAR was used. The
problem when trying to compile with the free version is that it limits the amount of code that can
be compiled (~4kb). Unfortunately the code is more than 4kb and a time sensitive evaluation
version was used.
The TCP/IP stack functionality is very limited compared to the lwIP stack TI modified to their
example programs. It includes the functions of ICMP, TCP, IP, and HTTP but is limited. The
code that needed attention was the easyweb.c and webside.c source files, which are the main
code and webpage HTML. Easyweb.c essentially initialized the clocking system, the ports, and
the ADC’s on the microcontroller (for the specific demo). It then initialized the TCP stack and
TCP ports (setup of the ethernet controller). The main loop listened for incoming TCP
connections, and processes through the DoNetworkStuff() function. This function handled all the
network, TCP/IP stack and user events by keeping track of the TCP state (closed, listening,
established, etc..) and handling the processes.
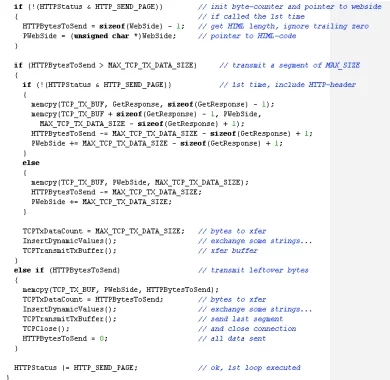
Depending on the users application, the HTTPServer() function should be modified. The
function assumed that the initial data received by the web browser was a “GET” request. This
“GET” request was not directly serviced by the code (is not implemented), because there was
only one web page. Once it was connected, it began sending the webpage HTML code. The
HTML code was stored in an array of unknown size. The transmitter buffer can only handle a
certain size of data each time, so the webpage array size was determined and was sent out string
by string (max size the transmit buffer holds) until all of the content was sent. The way TI made
a “dynamic” webpage possible without changing the content of the static webpage array was
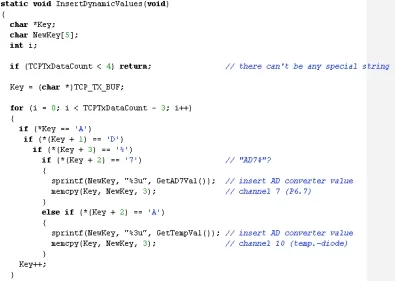
through searching for special character sequence in the code. The InsertDynamicValues()
function searched through the transmit buffer for the special character sequence, decoded it,
found the ADC value that corresponded to that character sequence, and replaced sequence with
that value in the transmit buffer. The code then repeated itself over and over again. Figure 13
displays part of the HTTPServer() function code. Figure 14 displays the InsertDynamicValues()
function.
2.2 Advantages
The best thing about the CS8900a ethernet controller was that it is 8 and 16-bit microcontroller
compatible, which makes it attractive when implementing it separately with any microcontroller.
It has the ability to do the same thing as the TI Stellaris built in ethernet controller, but it should
be ported to a full TCP/IP stack such as lwIP to avoid any limitations (as was with experimented
with). With only 14 pins needed to control the device, the CS8900a can be interfaced with a
microcontroller that has plenty of io pins.
Depending on the user’s application, the example code from TI is a well-written, basic web
server program to allow contents of a webpage to be transferred over the Internet. The code, as
is, can be modified to allow text changes within the HTML code. It would have the same
principal as replacing the special character string with the actual ADC value, in the original code
above. Someone who wants to display a static webpage that does not take up a lot of memory
space, this controller would work well.
2.3 Disadvantages
As with the TI Stellaris board, the goal was to create read and write operations to user specified
memory locations. The user would dynamically interact with the microcontroller via the
webpage. The problem with the EasyWeb3 code setup was that the TCP/IP and HTTP code does
not service the “GET” method protocol. Also because the code resends the entire HTML code
over and over again, the JavaScript function that updates the text on the web browser would
automatically get written over. By using the original structure of the webpage content
transmission, using JavaScript functions would not be suitable. It is possible to change the text
display on the web browser with the same method that was being performed with the ADC
value. By having a special character sequence in the static content webpage array, searching for
it in the transmit buffer, replace it with what the user wants to display, and transmit it. With my
application and using the code as is, it would be only possible to create a READ operation
without the user specifying a particular memory location and not a READ and WRITE operation
with the user changing memory locations.
Another disadvantage would be the code compile limitation in the free version of the IAR
Embedded Workshop. Experimentation with the CS8900a and MSP430 could not be completed
due to the time limitation on the evaluation version. With working with any TCP/IP stack, the
user needs to be aware of about how much memory the code takes up. This will reflect what
code environment the user develops in.
3. Microchip PIC18F97J60
Although the PIC18F97J60 was not physically experimented with, it is very similar to the TI
Stellaris LM3S6965 microcontroller. Microchip manufactures 8-bit and 32-bit microcontrollers
with built in ethernet controllers. The PIC18F97J60 has an 8-bit architecture, which most
companies only have them in either 16 or 32-bit architectures. There are many advantages of
having an 8-bit architecture versus a 16 or 32-bit, but it mainly depends on the user’s application
and restrictions/limitations. Microchip also produces several different varieties with built in
ethernet controllers within the PIC18 family, the PIC18F97J60 is just one example. Compared to
the TI Stellaris LM3S6965, there are only five signal lines that need to be interfaced with an RJ45 ethernet jack (TPOUT+, TPOUT-, TPIN+, TPIN-, RBIAS).
Microchip created it’s own TCP/IP stack to use for only the PIC18, PIC24, dsPIC and PIC32
families. The supported protocols within the stack are ARP, IP, ICMP, UDP, TCP, DHCP,
SNMP, HTTP, FTP, and TFTP. Implementation with this stack can be accomplished in
approximately 28-34 KB of code. Compared to the lwIP stack, it is fairly similar if not has more
functionality. There are several forms of interaction between the web pages and the server such
as using CGI and form processing (“GET” and “POST” handling), which is similar to the TI
Stellaris example code. This gives the user flexibility in their design and application.
One advantage of the PIC is that there are various types of third party integrated boards that
implement all the necessary components to get the ethernet controller working. Olimex
manufactures:
1) PIC-Micro-Web: PIC18F67J60
2) PIC-Mini-Web: PIC18F25J10 with the ENC28J60 ethernet controller
3) PIC-Web: PIC18F252 with the ENC28J60 ethernet controller
4) PIC-Maxi-Web: PIC18F97J60
5) PIC-P67J60: PIC18F67J60
6) PIC-GSM: PIC18F97J60
For microcontrollers that do not have built in ethernet controller, a popular standalone ethernet
device is the ENC28J60 by Microchip. It uses the SPI function to interface to the
microcontroller. Except for the SPI lines, there are five other signal lines on the device that
hooks up to the ethernet jack (TPOUT+, TPOUT-, TPIN+, TPIN-, RBIAS). Figure 15 displays
two ways to interface PIC microcontrollers to ethernet devices, refer to the Microchip website
for original figure
Another advantage with the PIC microcontrollers is that they have an enormous collection of application notes and web seminars that pertain to everything about ethernet solutions. This includes elaborate explanations of the TCP/IP stack, interfacing via PPP and SNMP, ethernet theory operation, and general TCP/IP networking. Documentation with Microchip is far superior to any of the other boards and controllers that were experimented with. Some source references related to the PIC that would be helpful are listed below: 1) Rajbharti, Nilesh. The Microchip TCP/IP Stack. Tech. no. AN833. Microchip Technology Inc., 21 Aug. 2008. Web. . 2) “Ethernet Solutions Design Center.” Microchip Technology Inc. Web. 30 Nov. 2010. . 3) Understanding PIC WEB Boards and How to Use Microchip’s TCP-IP Stack. Rep. Olimex Ltd., Apr. 2008. Web..
4. Conclusion
Most of the time was spent experimenting with the TI Stellaris LM3S6965. This was the first
encounter working with networking and TCP/IP theory in conjunction with a microcontroller
application. It is helpful to learn the fundamentals of how the TCP/IP stack works and the
functions that makes the communication between the web browser and the web server possible.
As stated before, the use of either the LM3S6965 or interfacing the CS8900a with a
microcontroller of choice depends on the user’s application. Both are fairly simple to interface
with all the ethernet components, it is mainly dependent on how much flexibility and what the
limitations/restrictions the user wants and has.
For the application of creating interactive READ and WRITE operations where the user can
specify a particular memory location to access, it was necessary to have all the functionalities
within the example TCP/IP stack and code. For example, with the Stellaris controller, the
example code, ethernet io control, had everything that was needed to modify and fit the
application. The most time consuming part was trying to setup the development environment,
figuring out what the code does, and where exactly needs changing. I would highly recommend
the LM3S6965 because it is simply to implement, it has example code that is perfect for simple
to advanced applications, and TI makes fairly good products.
The Crystal Lan CS8900a ethernet controller with the MSP430 seemed to lack in the fully
functional TCP/IP stack. A user that has an application that demands protocols such as DCHP,
FTP, etc must have a good background in programming to either create their own functions or
port the device drivers to another TCP/IP stack like lwIP or uIP. For a user that just wants to
display a static webpage or do simple dynamic content replacing, this TCP/IP stack is simple,
has a small code size, but does the job. An advantage is that it can be interfaced with either an 8-
bit or 16-bit microcontroller of choice, which gives the user flexibility in hardware choice.
Although not physically tested with, the PIC18F family microcontrollers with built in ethernet
controllers are impressive. For a user that wants both the full functionality of the TCP/IP stack
and the selection behind different types of architecture size (can use PIC24 or PIC32 families),
this provides everything needed for simple to advanced web applications. Compared to the
LM3S6965, it is very similar, if not has more functions. A big advantage of the PIC over the
other controllers is the numerous documentation and application notes available for ethernet
design solutions. Another advantage is that Olimex produces boards that have either
microcontrollers with built in ethernet or interfacing with the Microchip ENC28J60. This
provides the user with options but also already built hardware that only needs code to run.
Example code is provided for the different boards.
With all the choices above, the best solution really depends on the user’s application. If the user
wants to apply simpler or more advanced web applications, prefers working with a certain
company, or has limitations and restrictions, there are numerous possibilities to choose from
above including the PIC or the Stellaris microcontrollers. For more simple static applications, the
CS8900a device with any microcontroller would be suitable.
Source: Ethernet Controller and Microcontroller Research
About The Author
Muhammad Bilal
I am a highly skilled and motivated individual with a Master's degree in Computer Science. I have extensive experience in technical writing and a deep understanding of SEO practices.