A couple of months ago I picked up cheap WiFi-controlled LED bulbs (one among dozens of very similar devices), after seeing them at a friend’s place. This turned out to be an excuse to play with the ESP8266, which has inspired several hacks.
I was overall very happy with these bulbs: decent Android and iOS apps and, compared to fancier solutions (e.g., Philips Hue or Belkin WeMo), they do not require any proprietary base stations, and you can’t beat the price! However, switching off the lights before falling asleep involved hunting for the phone, opening the app, and waiting for it to scan the network; not an ideal user experience. I was actually missing our old X10 alarm clock controller (remember those?), so I decided to make one from scratch, because… why not?
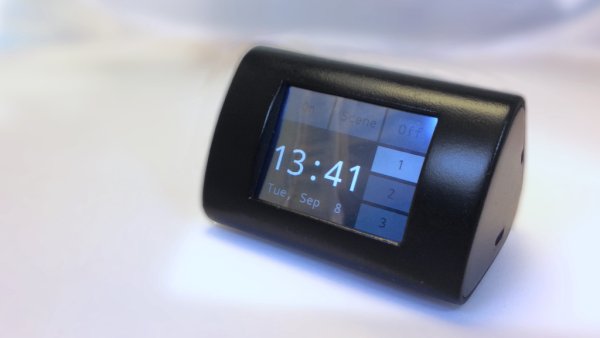
Although the X10 Powerhouse controller’s faux-wood styling and 7-segment LED had a certain… charm, I decided to go more modern and use a touchscreen. I also designed a 3D printed enclosure with simple geometric shapes and used it as a further excuse to play with 3D print finishing techniques. Here is the final result:
If this seems interesting, read on for details. The source code for everything is available on GitHub. Edit: You can also check the Hackaday.io project page for occasional updates.
Component selection. There are several boards with the ESP8266, most of them using the ESP-12 module. I decided to go with the SparkFun Thing (which directly incorporates the ESP chip), as it also includes a LiPo charge controller. Perhaps overkill for battery backup, but nice to have. If you do use the charge controller, then the price is very reasonable (e.g., an Adafruit ESP breakout and Micro-LiPo combo will cost about the same–although flash is 4x larger and the ESP-12 module is FCC-approved). Also, it’s a very nice board for experimentation and it’s become my go-to ESP board: nice header layout, and the easiest to program (tip: instead of fiddling with the DTR jumper on the Thing, just cut your DTR wire and insert a pin header pair: once esptool starts uploading, just pull the pin and.. done!).
For the display, modules with a parallel interface were out of the question, since the ESP does not have enough pins. After some googling, I found Digole’s IPS touchscreen, which incorporates a PIC MCU and can connect over UART, I2C, or SPI (selectable via a solder jumper). There are several users that really like Digole’s display modules and, particularly their older models, seem quite popular. The display itself is very nice. However, touchscreen support appears to be relatively recent and isn’t that great (more later). It is also a bit on the expensive side, the firmware is not upgradeable (so you’re basically stuck with whatever version your module comes loaded with — I got one with an older version that has some bugs with 18-bit color support), and manufacturing quality could have been a bit better (mine had poor reflow). Still, for prototype experimentation, this isn’t a bad module and the company is generally helpful to customer inquiries.
For more detail: ESP8266 touchscreen WiFi light controller and clock

