Mother’s Day was approaching, and I am getting my 8 year old son started with electronics. So why not combine the two? In the next few pages we’ll show you the project we did – a blinking heart with several effects, all driven by a microcontroller. Taught my son not only about how to make mommy happy (she LOVED the present), but also about project planning, prototyping, soldering, programming, and testing. Everything a budding little engineer needs!
By the way, if you like this project you may want to check out some other electronics design instructables I did:
http://www.instructables.com/id/DPScope-Build-Your-Own-USBPC-Based-Oscilloscope/
http://www.instructables.com/id/DPScope-SE-the-simplest-real-oscilloscopelogic-/
http://www.instructables.com/id/LCS-1M-A-Full-Featured-Low-Cost-Hobby-Oscillosc/
Step 1: Circuit design and assembly
As this was a learning project for my son, I wanted to keep everything as simple as possible. We started out breadboarding some fundamental circuits – hooking up the microcontroller, blinking a single LED, and so on. Then we decided about the layout of the LEDs and went scavenging for the necessary components in my lab in our basement.
As for the microcontroller, we used a Picaxe 18A (see http://www.picaxe.com for more info). Picaxes are a line of very simple-to-use microcontrollers, perfect for our task. The 18A is actually a pretty old model, but was sufficient for the task. Apart from programming them in a simple version of Basic it also offers flowchart programming – this is what we ended up using since for an 8-year old I think it is way more intuitive. Nothing better than having a visual representation of the program flow.
The circuit schematic is shown above; nothing out of the ordinary. The circuit runs off two rechargeable batteries. The currents into the LEDs are low enough that the microcontroller can drive them directly. The pushbutton shown in the actual circuit ended up not getting used so I omitted it from the schematic. The Picaxe has a bootloader installed and is programmed through a simple serial interface – two resistors and a 3.5mm stereo jack is all it needs for that.
You may notice that there are always two LEDs hooked up to each output of the microcontroller, which means they aren’t independent. This was again to limit complexity – that way all LEDs can be driven from a single port. Using a larger microcontroller with more outputs would have been possible but I wanted to avoid the code bloat that would result – I rather have a smaller program that my son can actually understand and handle. The way that the LEDs are hooked up – the LEDs of each pair are sitting at opposite ends of the heart – still allows for lots of interesting patterns.
We built up the circuit on a standard prototype board. It was the first time my son did some soldering (under very close supervision by myself to be sure), he was very excited. Above you can see the final result.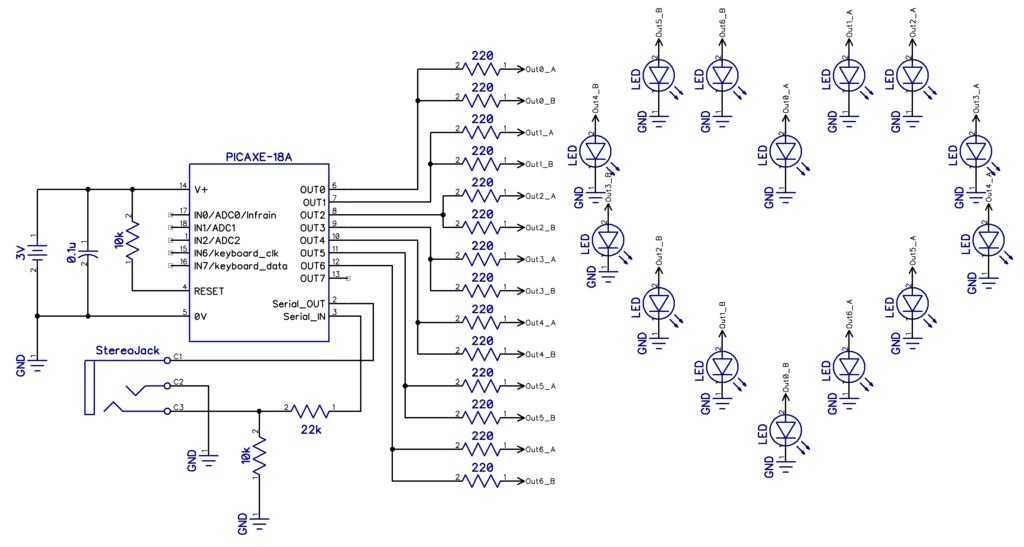
Step 2: Enclosure
Next thing was the enclosure (box). I had found a suitable one in my drawer which even had a battery compartment. The board fit pretty tightly.
In order do drill the holes accurately we got another protoboard where we marked the location of the LEDs on the “real” board. With a needle we could punch through the two mounting holes for each position and then drill the box right between each of these two marks. This worked pretty well and we were able to fit all the LEDs through the holes.
The batteries are standard rechargeable NiMH type AA cells, held in place with a battery holder.
For more detail: Electronic Heart (Flashing LEDs) – Mother’s Day Project
About The Author
Ibrar Ayyub
I am an experienced technical writer holding a Master's degree in computer science from BZU Multan, Pakistan University. With a background spanning various industries, particularly in home automation and engineering, I have honed my skills in crafting clear and concise content. Proficient in leveraging infographics and diagrams, I strive to simplify complex concepts for readers. My strength lies in thorough research and presenting information in a structured and logical format.
Follow Us:LinkedinTwitter