*** There’s an updated version of this kit available at http://www.theledart.com/blog/store ***
Responding to many requests, Aurora 9×18 Kit is now available, so this is the Instructable specific to building the kit.
Please leave comments, especially tips for successful assembly.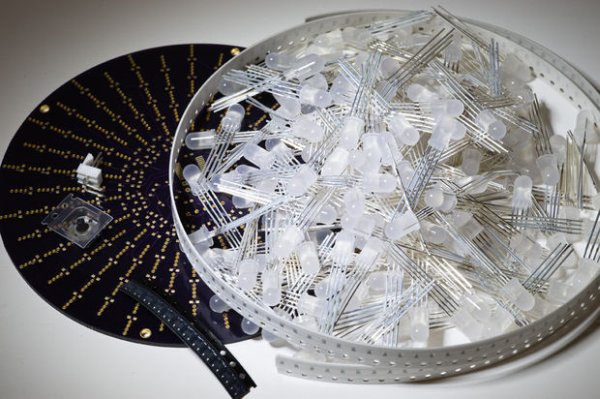
Step 1: Identify the Parts
First, identify all the parts contained in the kit.
Below is the parts list.
[Parts List]
qty item
1x Custom PCB
162x 150Ohm (0603)
9x 220 Ohm (0603)
3x 470 Ohm (0603)
13x 1k Ohm (0603)
1x 10k Ohm (0603)
1x 1uF (0603)
2x 10uF (0603)
1x AP7333-33 or AP7313-33 (“JZ” or “NZ” printed on it)
1x PIC24F08KA101-SS
3x DMP3098L (“DMB” printed on them)
12x MMBT2222A (“K1P” printed on them)
1x 4-way Stick Switch EVQQ7
162x Tricolor LED (common-cathode)
1x Molex 2 pin header (right angle)
Resistors have their values written on them. Two top digits followed by the number of 0’s after. So 150 ohm would have 151 written on them. Those are so small, be careful not to misplace them. I always tidy up the work area before starting assembly. Make sure you have a good lighting, too.
Capacitors do not have anything written on them, so be sure to keep them in the carrier (tape) until you are ready to solder them.
Transistors have letters printed on them, however they are codes, so the codes are noted on the list above.
Other parts are quite obvious, I think.
Step 2: Tools & Supply
- Magnifier visor or other visual aid device (I think this is essential)
- Tweezers (fine tip ones)
- Solder paste in syringe*
- Electric hot plate*
- Soldering iron (temperature controlled)
- Solder (flux core. go for the highest quality solder you can afford. 0.015 inch / 0.4 mm diameter recommended for SMD.)
- Solder wick (thin braid recommended – mine is about 1.5 mm wide.)
- Wire cutter (I recommend this one.)
- Microchip PIC programmer (supports PIC24F08KA and capable of In-circuit programming through a standard 6-pin ICSP connector, such as ICD2, ICD3, PICKit2, PICKit3) and a computer
(* If you are doing the reflow method)
Good lighting is also very important. You can work much better when you can see the details.
Step 3: Solder the SMDs
I’ve shown the “poor man’s reflow” method using solder paste and electric griddle on the Aurora 9×18 Instructable. You can do the same, however hand soldering is still a viable option. I think hand soldering might be quicker for more experienced solderers.
* I don’t recommend Aurora 9×18 to be your first SMD project. If you have not done any SMD soldering before, please practice before taking on Aurora 9×18. Aurora 9 bar might be a good project to get your feet wet.
There are so many videos showing the SMD soldering techniques on YouTube. You might want to search “SMD soldering” and watch some. You will realize that SMD soldering is nothing to be afraid of.
(This one is very informative: http://youtu.be/3NN7UGWYmBY )
Print out the part placement guide (ideally in color) and follow the order to minimize the errors.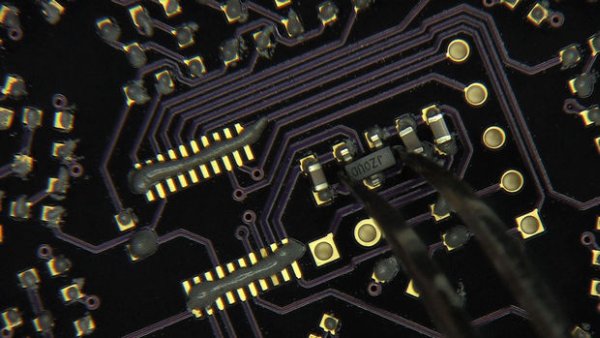
Step 4: Inspect & Program
Once all the SMT parts are soldered, inspect carefully for bad joints and shorts.
After making sure everything is good, it’s time to program the PIC microcontroller. This part is described in the step 10 of the original Instructable. However here are the points:
- Connect 5V power supply – you can not supply the power from the programmer, as that will stress the voltage regulator on board.
- See the chart for the pin assignments.
- 6th pin of the ICSP connector (LVP) is not used. Use only pin 1 – 5.
- You need to use “High-Voltage Programming” mode, in order to write all of configuration bits required for Aurora 9×18. You will find this option in IDE, under “Programmer” menu -> “Settings”. On “Program Memory” tab, check “Use high voltage on MCLR”.
- If you are using older programmers which output higher than 9V to program (like ICD 2), please add a voltage limit circuit to protect the PIC24F used. See the photo with my comment.
- PICKit 2 and 3 are fine without any modifications.
For more detail: Aurora 9×18 Kit
About The Author
Ibrar Ayyub
I am an experienced technical writer holding a Master's degree in computer science from BZU Multan, Pakistan University. With a background spanning various industries, particularly in home automation and engineering, I have honed my skills in crafting clear and concise content. Proficient in leveraging infographics and diagrams, I strive to simplify complex concepts for readers. My strength lies in thorough research and presenting information in a structured and logical format.
Follow Us:LinkedinTwitter