This LED clock may not be the easiest to build but surely it is the one with fewer parts that you can find, for that reason I call it “The ANP LED Clock”. (ANP stands for Almost No Parts.)
Using the micro controller PIC 16F84A or the 16F628 (same pinout), this clock have more and improved features than my previous LED Clock.
Here are the features on this ANP LED Clock:

- Can use common cathode or common anode 7-segment LED displays.
- Displays time as 12 hours or 24 hours format.
- Allows to enable or disable the display for battery-operated circuits.
- Can control the display brightness to reduce power consumption
- 7-segment LED displays are charlieplexed to reduce I/O ports usage.
- PM LED indicator (optional)
- Only 10 parts needed: 1 PIC 16F84A, 2 22pF Capacitors, 2 n.o. switches, 1 4Mhz Xtal and 4 CA or CC 7segment LED displays.
- Operates from 2.5 to 5.5 Volts, it can even work with a 3V coin batteryBecause all this features, the applications for this ANP LED Clock could be:
- Inexpensive LED Clock to replace the expensive broken one from your luxury car.
- “vintage” LED wristwatch – Using some LED display from old calculators and 3 Volts coin battery, it’s possible to build a small clock.
- Jumbo Clock – Non-inverting buffers can be used to drive more voltage and lit giant 7-segment led displays.
- Compact clock for your appliances or projects
Even more:
Desktop Clock as gift for a friend
- Nice clock to keep your 4-years old niece distracted for a while
- A piece of trash after your 4-years old niece were playing with the clock.
Pin 2 to VDD C Anode display, VSS for C Cathode
Pin 3 to VDD Enable display, VSS disable display
Pin 4 to VDD Normal operation, VSS Reset
Pin 5 VSS Ground or –
Pins 6..13 To multiplexed display
Pin 14 VDD or +
Pins 15 & 16 Xtal Oscillator (4Mhz only)
Pin 17 to Display Decimal Point
Pin 18 PM LED indicator (optional)
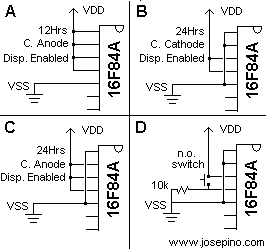
Figure C: For 24 Hours LED clock using Common Anode 7-segment LED displays.
Figure D: For Battery operated clocks, a 10k resistor and a switch can be used to view the time, specially for wrist watches.

| Bill of materials:1 PIC 16F84A with JP8410-a software 1 Xtal 4 Mhz 2 22pF ceramic capacitors 2 n.o. micro switches. 4 7-segment LED displays (CA or CC) |
Optional:1 LED for PM indicator 1 4.7k resistor 1 n.o. microswitch for brightness control. |
Notes:
1.- Before applying power to the circuit, set the configuration pins to the one desired. DO NOT APPLY POWER without connecting pins 1, 2 & 3.
2.- Device configuration: CP Off, WDT Off, PWRTMR ON, OSC Xtal.
About The Author
Ibrar Ayyub
I am an experienced technical writer holding a Master's degree in computer science from BZU Multan, Pakistan University. With a background spanning various industries, particularly in home automation and engineering, I have honed my skills in crafting clear and concise content. Proficient in leveraging infographics and diagrams, I strive to simplify complex concepts for readers. My strength lies in thorough research and presenting information in a structured and logical format.
Follow Us:LinkedinTwitter