This is a just-for-fun project I did in the Digilent MakerSpace. Usually whenever I play board games I use a dice-rolling smartphone app since dice are so easy to lose. I thought I would try making my own hardware version though. It turned out really well and was a lot of fun. In this Instructable I will go over how I designed the circuitry, wrote the code for the microcontroller, made the housing, and put it all together!
I entered this project in several contests on Instructables. If you like this project, please vote for it by clicking the “Vote!” ribbon in the top right corner.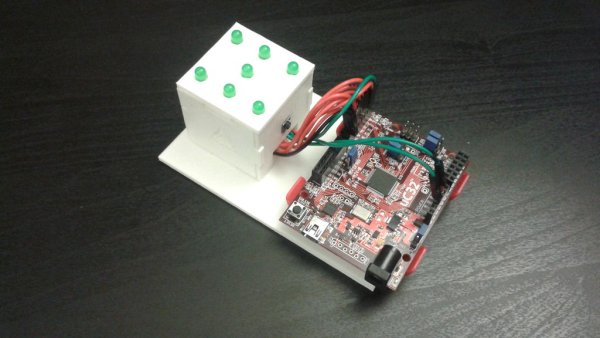
Step 1: Materials
Here’s a list of the parts I used for this project.
- chipKIT uC32 Microcontroller and USB cable
- You can also use a lot of other microcontrollers such as the Arduino Uno, or chipKIT Uno32
- 7 green 5mm LEDs
- Push button (approx. 6mm wide)
- 2 zUNO clips to hold the microcontroller board
- You can order some or even 3D print your own zUNO clips for free at the link above.
- 3D printed housing (file below)
- Not everyone has access to a 3D printer, but there are plenty of other options here. A thick card stock or paperboard will work perfectly. Also, if you want a 3D printed version and don’t have access to a printer, there are several companies (such as i.materialise, Sculpteo, Ponoko, and Shapeways) that will print a design for you and mail it to you.
- For putting everything together you just need some basic tools: wire cutters, a soldering iron, and some glue (hot glue and super glue both work well).
My 3D print design can be found at this link. From this page you can order a print from one of the companies I mentioned above. Or, if you will be printing it yourself, you can download the file here too. Tinkercad will also allow you to make a copy of the file so you can make your own edits. You can make changes to the design to use a different size of LEDs or a different button. You can also make it bigger and even add text or logos!
Now onto the design. I will start by explaining the circuitry in the next step. After that, I will talk about programming the microcontroller. And last but not least, putting it all together!
Note: If you are going to be printing the housing, I would start that now as you continue through the remaining steps. Then the print will be done when you’re ready to put everything together.
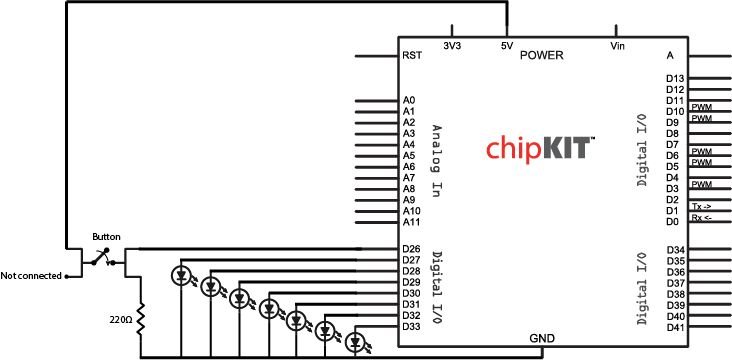
Step 2: The Circuit
The circuit for this project is very simple. We just need a power and ground connection to the LEDs and a few wires going to the button. Note: the “power” to the LEDs comes from the microcontroller’s Digital I/O pins.
I included a schematic view of the uC32 so you can see how everything will eventually be connected to the board.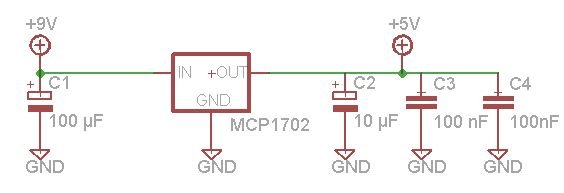
Step 3: Programming the Microcontroller
I wrote my code in MPIDE. MPIDE is completely free and can be downloaded here. Note: MPIDE can program just about any microcontroller, including all chipKIT and Arduino boards. If you’re using an Arduino board and already have Arduino’s IDE that will work just as well too.
If you’re brand new to microcontrollers and programming in an IDE, here is a quick tutorial that explains how to install MPIDE and use it to communicate with your board: Intro to MPIDE.
The code I wrote for the microcontroller can be seen below. There are three main portions to this “sketch”:
- The roll() function which makes it look as if the die is actually rolling. This is a function I created myself and it is included in the code below.
- Generating a random number between 1 and 6 with the rand() function. (This function is predefined in the stdlib.h header file.)
- And a series of if statements to light up the correct LEDs based on the random value that is generated.
This code can be copied directly from the box below and pasted into your IDE. Then you can upload it directly to your board from there. If you’re unsure how to upload the sketch, check out the “Intro to MPIDE” tutorial linked above.
Note: Sorry for the very space-consuming formatting for the code. It used to display in a nice little box that you could scroll through, but Instructables made some changes to their editing interface and I’m not able to do that anymore.
For more detail: 3D Printed Microcontroller Dice Roller
About The Author
Ibrar Ayyub
I am an experienced technical writer holding a Master's degree in computer science from BZU Multan, Pakistan University. With a background spanning various industries, particularly in home automation and engineering, I have honed my skills in crafting clear and concise content. Proficient in leveraging infographics and diagrams, I strive to simplify complex concepts for readers. My strength lies in thorough research and presenting information in a structured and logical format.
Follow Us:LinkedinTwitter